![[IMAGE]](http://www.darrylsgarage.com/356/356C-3.jpg)
Last Updated on June 27, 2021
The Public Unveiling -The 1964 Porsche 356C project that I put the finishing touches on over the pandemic was finally unveiled to the public at the Pacific NW Region - Porsche Club of America's Concours d'Elegance on June 12, 2021 at Denny Aker's Workshop nearby in Bothell, Washington. I entered it in the "Restoration" class which is a full judging of the car, top, bottom and inside all the compartments, including the glovebox! It took 1st Place in its class and got a lot of great questions about the car from members already quite familiar with it since I had written 7 local Porsche club magazine articles (links to them in following blog entries) chronicling its 13-year on-and-off restoration. It was so great to be able to gather without masks (for those who were fully vaccinated) and connect with the many new Facebook friends I've made over the pandemic as well as catch up with many of my car buddies I hadn't seen in at least 2 years.
![[IMAGE]](http://www.darrylsgarage.com/356/356concours1.png)
![[IMAGE]](http://www.darrylsgarage.com/356/356concours2.png)
Entry: 6/15/07 - A wise man once told me, "Opperknockity tunes but once" and I've tried to live by those virtuous words throughout my life. Well about 4 months ago I stopped by the shop of my 911 mechanic, John Walker (of John Walker's Workshop fame) in Seattle. John had this amazing "barn find" 1964 Porsche 356C coupe that came out of the Portland, Oregon area. This car had thrown a rod through the case of the engine and been disassembled and stored away in 1976 only to return to the light of day 30 years later when John bought it and hauled it up here to Seattle. John had completely rebuilt the brake and fuel systems which were ruined from the years of moisture build-up in them and assembled a new engine using a close serial number 1965 356C case as the basis for adding 1720 cc "big bore" cylinders, slightly "hotter" cam, 912 heads, single-shaft Solex 40 PII-4 carbs and a sport muffler. Now it's fully road-worthy, still the original silver paint over what appears to be rust-free sheetmetal and a few rattle-can primer covered DIY type body repairs. I stopped by John's shop last Monday, the day after Denny Akers hosted the 356 Registry's "356 Bull Session" car show, from which I was still salivating over all the 356 Porsches. I noticed John had a brand new Harley-Davidson motorcycle sitting there. I asked if he had made it to Denny's and he said no and had been hoping to go and see if anybody was interested in buying his "barn find" 356C.
![[IMAGE]](http://www.darrylsgarage.com/911/911JWW.jpg)
I just about had a seizure when I heard he was considering selling this awesome car and I told him I was extremely interested and could have the cash to him within 3 hours of agreeing on a price. Some e-mail flew back and forth last evening and by 11 AM this morning I was standing in John's shop with a Bank of America envelope stuffed with "fat stacks" of two hundered fresh $100 bills still in the currency bands! I drove the car home, grinning like I did the first time I drove my first VW Bug by myself because it reminds me so much of it when behind the wheel! This old 356C starts-up easy and runs nice and smooth and I am so stoked about finally having one of these fine old cars that I still can't believe it! I had to raise the 912 to park the 356 under it temporarily in the workshop until I free up some space in my storage garage. Since I will be taking the 912 into the painter soon, I'll have the room to lift the 356 to get a better look under it. By the way, those are rare 1970 "deep six" Fuchs wheels that John put on the car to "tart" it up and give it that "outlaw" look and they will be coming off to be sold to recoup some of the purchase price since they usually sell for a couple thousand for a set in this shape. To fall into a running, drivable 356C that had a professional Porsche mechanic already rebuild the fuel system, brakes and engine for $18K was a deal I couldn't refuse!
![[IMAGE]](http://www.darrylsgarage.com/356/356home9.jpg)
![[IMAGE]](http://www.darrylsgarage.com/356/356home10.jpg)
![[IMAGE]](http://www.darrylsgarage.com/356/356home11.jpg)
![[IMAGE]](http://www.darrylsgarage.com/356/356home12.jpg)
![[IMAGE]](http://www.darrylsgarage.com/356/356home13.jpg)
![[IMAGE]](http://www.darrylsgarage.com/356/356home3.jpg)
I drove back down to John's shop in the afternoon with the Honda CR-V to return his "transfer" license plates and haul all the boxes of parts that had been removed, NOS rubber window and wing vent seals, spare steel wheels, dash pad and the original bumpers back home. John threw in some new deco repro strips for the bumpers. What is it about "basket case" cars and the excitement of digging through the boxes of parts and finding treasures? Unfortunately unlike the 912, I didn't find the original tool kit but it looks like I have all the seals for glass, doors and lids so that will save a bit of money.
![[IMAGE]](http://www.darrylsgarage.com/356/356home1.jpg)
The car is like a time capsule, the headliner is original and intact, dash paint is original, radio is there but not working and the odometer shows just over 83,000 miles which sounds right for a car that had only 12 or so years use before throwing a rod in the engine. The original paint code on the Reutter door plate is 6206 which is metallic silver and the interior leather shows signs of the classic Porsche red color which has been dyed black. I have always wanted a metallic silver 356 with a red leather interior and this is what the factory COA will certainly confirm as original... yes, I'll spring the $100 for the "birth certificate" on this car! The Oregon license plates confirm the last tab was indeed from 1976. To give you an idea of how long this car has sat in storage, I was putting my first 1962 VW Beetle on the road about the time this one was being rolled into the barn.
![[IMAGE]](http://www.darrylsgarage.com/356/356home2.jpg)
John never transferred title on the car and his, like most Porsche specialty repair shops, attract heirs eager to settle estates and liquidate "dad's old Porsche". He was planning to simply "flip" it at a tidy profit so he did a minimal rebuild on the engine using spare parts he had laying around, it runs OK but not great and has a pretty major oil leak. The engine does look great though, freshly hot tanked case with new powdercoated engine tins in the correct shade of gray for the 356C on the fan shroud. For right now I'm just thrilled to have a running Porsche "616" engine to tinker with before rebuilding the one on my '66 912. I plan on driving this 356C a lot while I'm finishing up the 912 project so no worries about delaying completion of the 912. It's just good to have my next project already in the chute and start watching for parts and such, being able to drive it is bonus points!
![[IMAGE]](http://www.darrylsgarage.com/356/356home4.jpg)
Entry: 6/18/07 - Rainy weather continues to delay taking the 912 to the paint shop, no big deal since I'm done with my part of the paint prep and ready for a little break from sanding. I spent most of Father's Day playing with my new 356 project, the first task was making room for all the parts in the boxes that came with the car. I sorted through all the boxes and put them on their own shelves in my "warehouse" for longterm storage. The next task was removing those beautiful "deep six" Fuchs wheels and installing the beautiful set of 5-1/2" wide chrome wheels that will eventually be going on the 912. I will be going with 4-1/3" wide wheels on the 356 which will take some hunting to find some with an appropriate manufacture date stamped on them, figuring out what that date should be based on my serial number is the first step in that little project. The last task for the day was hunting down any exposed rust and giving it a coat of SEM Rust Seal as a "first aid" dressing until the day I can media blast and properly fix the areas. I am very pleased with the lack of serious rust anywhere on the car on the top side but I'll have to wait to see what lurks on the underside until I have the 912 off the lift. I've got the battery on the charger and will move the 356 into my "showroom" for storage once I've got it fully charged. The "GEN" light comes on when the car is idling and John Walker threw in a spare 6-volt voltage regulator with the car as a fix to that problem so it will be the first thing I solve. The oil leak gets worse the longer I drive with the newly rebuilt engine that looks to be coming from the flywheel area so it might require pulling the engine to fix.
![[IMAGE]](http://www.darrylsgarage.com/356/356chg1.jpg)
I am totally in love with this car already and can picture a fresh coat of the classic German racing color, a metallic silver paint with a fresh new red leather interior, exactly like the one below. I am particularly fond of red German square-weave carpet and look forward to gutting that tired interior and bringing it back to the vivid color scheme it left the factory with.
![[IMAGE]](http://www.darrylsgarage.com/356/356goal1.jpg)
Entry: 6/24/07 - I took the 356 out for a drive today with the new wheels and thought a few more pictures for the website were in order. The car is now parked in the "showroom" and will remain there until I finish the 912 project. I'm currently thinking that I'll pull the engine from the 356 to fix the oil leak that seems seep from the main crank seal and pool in the transaxle bellhousing since it drains upon stopping and doesn't continuously drip. Seems kind of odd that a freshly installed seal would seep but a tear-down will tell all.
![[IMAGE]](http://www.darrylsgarage.com/356/356home5.jpg)
![[IMAGE]](http://www.darrylsgarage.com/356/356home6.jpg)
![[IMAGE]](http://www.darrylsgarage.com/356/356home7.jpg)
![[IMAGE]](http://www.darrylsgarage.com/356/356home8.jpg)
Entry: 7/12/07 - I've moved the 356 onto the 4 post lift and taken a good look at the underside of the car. Other than a fairly large hole under the battery and a somewhat mangled rockerpanel on the left side, the car is totally solid. Everything is nice and greasy around the transaxle area so there's no rust there and it looks like it's still the factory build as all the fasteners are correct and appear untouched so the transmission has most probably never been out of the car. There was a fairly large dent in the lower left front fender that looked like the perfect place to try a new tool I bought for my air hammer to pound out dents. The secret to using an air hammer to do this type of work is to adjust the air flow to the tool so that when it's wide open with no back pressure it makes the air hammer putt like an idling motor. That way you can pause between "burps" to allow the air hammer to build the pressure you desire, fine tuning it on the fly as you use it.
![[IMAGE]](http://www.darrylsgarage.com/356/356lfnd1.jpg)
So here's the dent before any air hammer work:
![[IMAGE]](http://www.darrylsgarage.com/356/356lfnd2.jpg)
And here's how it looked after the first pass using the air hammer. I could tell that there is a skim-coat of BONDO under the rattle-can primer areas because of the cracks and pink substrata so this nose has had some bodywork at some time and there is a pretty thick coat of filler on the lower right side because I can see BONDO oozing through screw-in slide hammer scars from behind up under the spare tire well. At this point it's time to stop and strip the surface to bare metal since if there's BONDO, I can't read how flat the real metal surface hidden under the filler is.
![[IMAGE]](http://www.darrylsgarage.com/356/356lfnd3.jpg)
Some quick work with my standard "aircraft style" paint stripper, scraper and steel bristle brush and the bare metal surface was quickly exposed, no BONDO under this side. I used my pneumatic random-orbital sander with 150-grit paper to blend the edge of the paint and expose high spots on the metal. Now I can see all the existing hammer marks when I proceed to the next step of hammer and dolly work and shrinking disc. There's also some surface rust that will be getting the spot sandblaster treatment as well. I'm very happy with the general health of the underlying steel, it looks like the car had some DIY bodywork but where there's silver paint, there's no BONDO.
![[IMAGE]](http://www.darrylsgarage.com/356/356lfnd4.jpg)
Entry: 9/6/07 - The severe oil leak from the front (flywheel) side of the engine is keeping me from driving the car so I need to pull it to replace the flywheel seal. Dropping the engine went pretty quickly, I removed the Solexes before dropping it just to make it easier. It's works exactly the same as with any air-cooled Volkswagen... it is in a sense just a "glorified Volkswagen"!
![[IMAGE]](http://www.darrylsgarage.com/356/356eng1.jpg)
Once the engine was out, I pulled the clutch and flywheel off and noticed the lip where the flywheel meets the seal was rough, bead blasted but not polished. I though "AH-HA!" and proceeded to polish the lip and reinstalled a new rear oil seal and gland nut. Putting the engine back in the first time was a lesson in 356 heater box horns, the secret being that I need to lift the engine high enough to get the generator inside the rear shelf, pulling the whole engine backwards to allow clearance in front and then feeding the heater box horns over the rear axles... heater box horns in first wouldn't work. Anyway long story short, all that work and the oil leak was actually worse than before. Whatever is causing the leak at the flywheel seal is not a simple problem and is going to take a complete tear-down of the engine to figure out what it is. So much for a fun toy to play with while my 912 is coming together, this poor 356C is rolling back into the garage to sit until I have time to do a proper engine rebuild on it... BUMMER!
![[IMAGE]](http://www.darrylsgarage.com/356/356tendd.jpg)
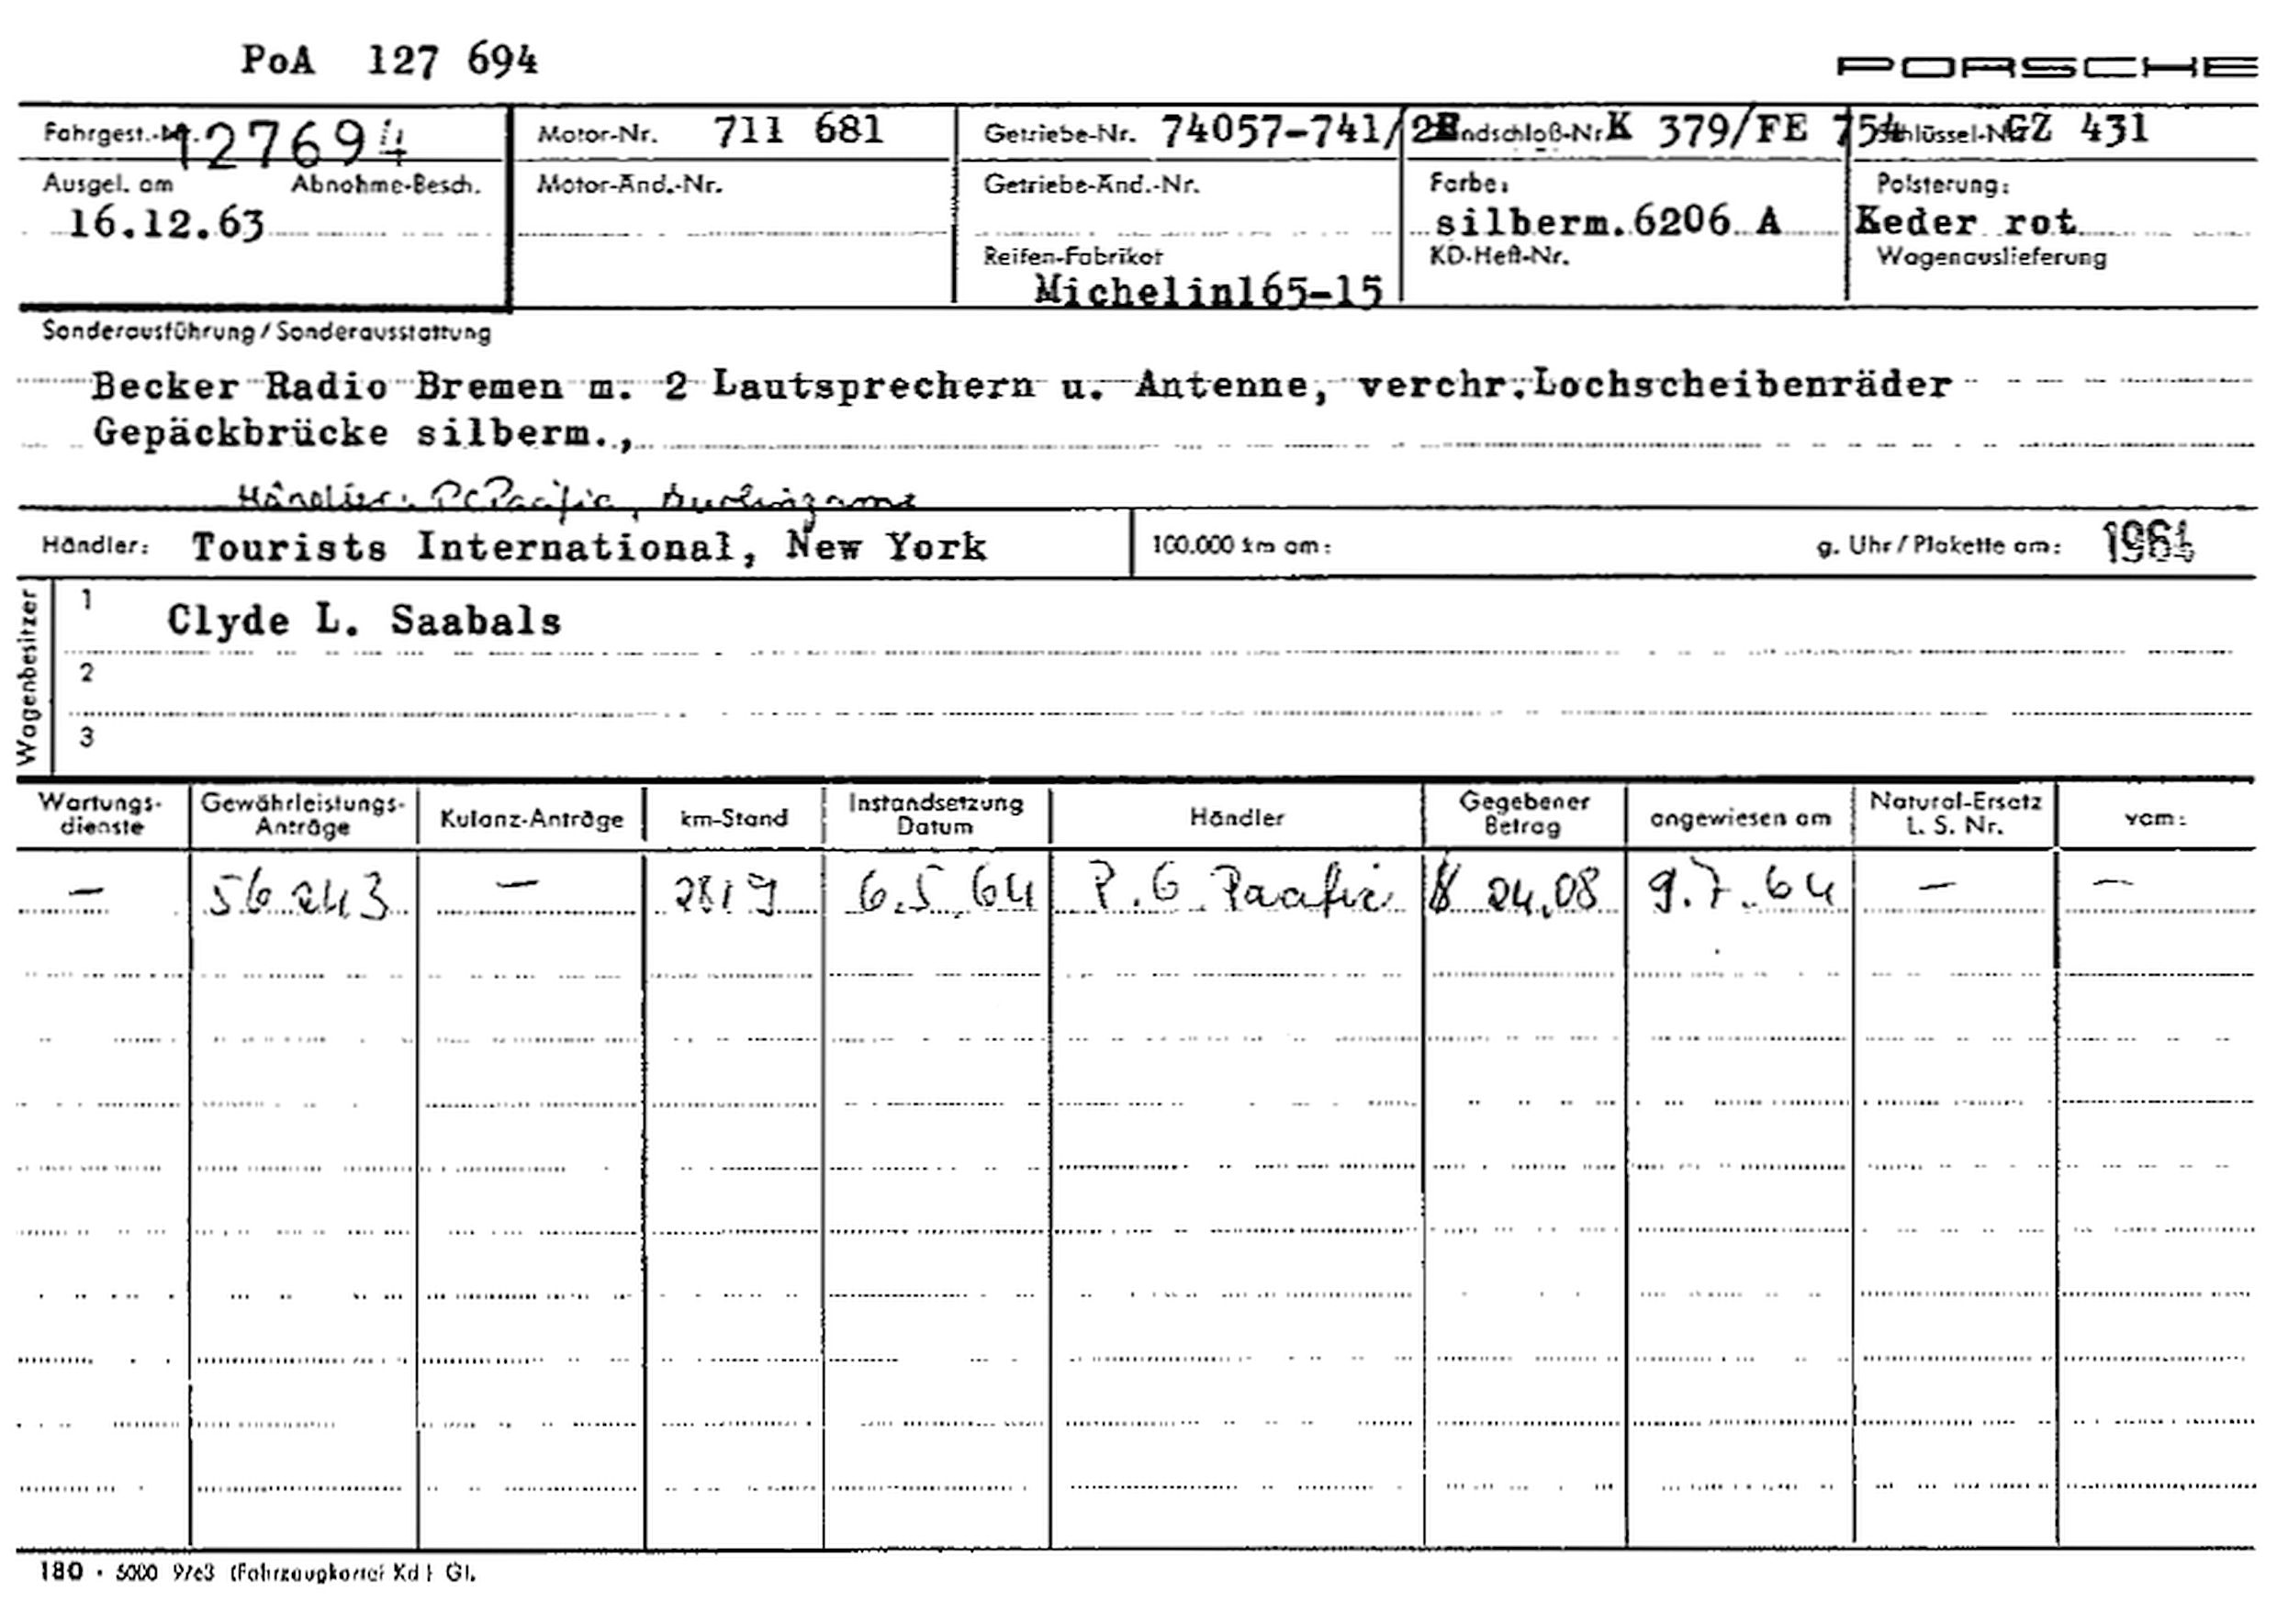
Entry: 10/12/07 - Today the "birth certificate" for my 356C arrived from Porsche. This is a service of the company, where for $110, they will pull the original build spec, called a "kardex" from the factory archives and print them on a special "Certificate of Authenticity" for you.
![[IMAGE]](http://www.darrylsgarage.com/356/356cert1.jpg)
As you can see from the following close-up photo, details such as engine and transmission serial numbers, paint and interior colors, options like tires, wheels and radio are kept on the factory kardex. For a 100-point concours restoration, all these facts would have to match the car perfectly. Since my car doesn't have the original engine, its value is somewhat diminished, or as I like to think about it, offset by the dollars it would cost to make the car 100% perfect. As you can see, silver with a red interior is what matters most to me, I love that color combination and to have my car coming like that from the factory is a real bonus! The serial number on the transmission is also a match so the only thing that's not original, which I already knew, is the engine out of a 1965 356C.
![[IMAGE]](http://www.darrylsgarage.com/356/356cert2.jpg)
I also acquired the factory Kardex (build sheet) confirming all the information contained on the CoA above. Click on the image to see a larger version.
Entry: 9/30/11 -So after a 4 year break from the 356, I'm at a good point in my life. I've finished a "revolutionary change period" in my life and it's time to start working on the 356C again. In the last year I've purchased and moved to a country acreage in Woodinville, built a new, bigger "facility" for my hobby, and am finally all set up to begin restoration work again. My new shop has 50% more floor space at 24' x 36' and I've built in the necessary work bench and cabinets to keep my tools out of the dust and mess that comes with media blasting and metal working. Like the Three Little Pigs, this, my third shop is the culmination of years of thought and planning and it is a joy to spend time in when the gloomy winter weather sets in. I do have to get my two houses back in Kenmore fixed-up and sold because taking care of three houses is a bit of a nightmare!
![[IMAGE]](http://www.darrylsgarage.com/67ghia/newshop.jpg)
Separated by a wall from the shop is a 36' x 60' climate-controlled "showroom" where I display all my projects in one place; the future, in progress and completed ones. Above the showroom is a loft of the same dimensions to serve as a warehouse for organization and storage of all the parts of the dismantled projects since I usually have a couple going at one time. It's been a hell of a lot of work to get this done in a year but my productivity and enjoyment of my hobby should be greatly enhanced. Life out in the country is pretty great too and I have immediate access to some beautiful country roads without having to drive my classic old cars on a freeway to get to them. Not a bad way to start a new chapter of my life and I hope to be blogging frequently again soon.
![[IMAGE]](http://www.darrylsgarage.com/67ghia/showroom.jpg)
Entry: 1/28/14 - Another 3 year break from the 356, it's like this car is cursed! Why can't I just fix the damn thing up and enjoy it instead of waiting for time and finances to go "concours" perfect, bare metal paint and all only to have yet another over-restored 356 to blend in with all the others in the area. So after looking at the car sitting in my showroom for 7 years, it struck me the other day that I've got this solid 356C that is not being enjoyed because I need to do a complete tear-down of the engine and figure out why it leaks such a large amount of oil out of the bell housing. Also since putting Webers on my 912, I've become a diehard "resto-mod" vintage Porsche enthusiast since making the engines run as well as modern fuel will allow them to seems to outweigh the benefits of 100% originality if your primary interest is driving and using the car and not showing it as concours quality. I've been watching my friend Jack Morris build twin-plug 616 engines for some time and after driving a couple, realize that a bit more of a hotrod 356C is the direction I'd like to take this car while still preserving it for a complete bare metal restoration someday in the future. Today I took the first step in that process by pulling the engine out of the car and preparing it for delivery to Jack for him to build a "long block" twin-plug, big bore engine that will end up using Weber carburetors. This engine isn't the original one so the whole "numbers matching the birth certificate" purist thing is not even possible and there's no impact on the car's value, so why not build a hotrod and drive it instead of letting it sit in the garage, waiting for someday. I'll probably actually use the car more if I'm not worried about rock chips and door dings.
![[IMAGE]](http://www.darrylsgarage.com/356/356twin1.jpg)
![[IMAGE]](http://www.darrylsgarage.com/356/356pull2.jpg)
Entry: 1/30/14 - Well, after discussing all the decisions and possible issues with Jack, I gave him a $2000 deposit to start buying parts and I've got the engine torn down to the point I can drop it off with him. Funny how easy it is to tear down a perfectly clean engine. I'm excited about a 1720cc with twin plugs, should get about 30-40% more seat-of-the-pants horsepower while using a modern, fully manufacturer supported Weber 40 IDF carbs. In the 6 years I've been playing with the 616/36 on my 912, I've had some major philosophical shifts in how I view the hobby and with all the interest in the car and modern aftermarket developments aimed at making them faster, more reliable and more durable, I'm embracing all the suggestions Jack makes.
![[IMAGE]](http://www.darrylsgarage.com/356/356pull3.jpg)
Entry: 2/8/14 - My cylinder heads are off to Walt Watson at Competition Engineering for a valve job and drilled for the second set of spark plugs so it's time to turn my attention to a problem on the other end of the car, the battery box. When the battery is removed, there's light showing through the bottom of the compartment. Easily solved problem, a new pressing from Stoddard should trim down nicely and weld in without a trace. The old battery hold-down was completely rusted away so a new one was also ordered. The one thing I didn't order until I could take a closer look at saving the original was the tow ring. A close look shows the old one is pretty much spent so I'll be ordering a new one of those with the reinforcing plate and rivets from Stoddard on my next order. Having the battery firmly held in place and with a good solid ground cable mounting point is a fun project that makes a nice improvement to the car.
![[IMAGE]](http://www.darrylsgarage.com/356/356batpan0.jpg)
![[IMAGE]](http://www.darrylsgarage.com/356/356batpan1.jpg)
![[IMAGE]](http://www.darrylsgarage.com/356/356batpan2.jpg)
Entry: 2/12/14 - Today's efforts focused on fabricating a patch to fill the notch cut out of the rotted section of the where the tow hook rivets and backing plate will be installed. The patch went in pretty easily and the MIG welds beads are dressed to a point where they don't interfere with the overlap of the battery box floor panel. Test fitting the new battery box floor pressing required disconnecting the headlights, horns and turn signals and pulling the wiring harness out of the conduit tubes to the headlight buckets so it didn't interfere with sliding the new sheetmetal pressing into place. It looks like there's a lot of extra material in the front part of the new pressing so I need to decide how much I'm going to remove before I start drilling holes and laying-up the panel using the Cleco clamps. The factory undercoating is so thick that hiding all the repairs is going to be very easy to accomplish. I'll also need to spot weld the battery bracket into place very soon but installing the tow hook (which is on order from Stoddard) will need to be done after welding the floor panel into place.
![[IMAGE]](http://www.darrylsgarage.com/356/356batpan3.jpg)
![[IMAGE]](http://www.darrylsgarage.com/356/356batpan4.jpg)
Entry: 2/13/14 - I stopped by Jack Morris' shop today and took a close look at a twin-plug motor he's in the process of assembling. A close look at the lower heads shows where the holes are drilled through the cooling fins and into the combustion chamber, then threaded for the second spark plug. My heads have been sent into the machine shop for a complete rebuild and drilling for the twin plugs and should be arriving back soon.
![[IMAGE]](http://www.darrylsgarage.com/356/356twinplug1.jpg)
Access to the additional spark plugs required a modification to the heater "flapper" boxes by removing the carburetor pre-heat ducts and fabricating plates with openings for the spark plug wires that are mated to the side of the box using standard sheetmetal tin cheesehead machine screws. The completed combination of head and heater box makes for a very sanitary installation and easy maintenance. I used some greasy old 912 heater boxes I had in my parts stash and saved the original and more rare 356C boxes so a modification of the cable arm is required on the 912 boxes. The conversion cable arm a part offered by the same guys who make the twin-plug distributor and full-flow oil filter, a company called Precision Matters.
![[IMAGE]](http://www.darrylsgarage.com/356/356twinplug2.jpg)
The full-flow oil filter from Precision Matters replaces the cable-driven mechanical tachometer drive plate on the oil pump so I've also acquired a later '65 356SC 6-volt electric tachometer to replace the cable driven model that came with the car. I'll be needing to run a wire from the engine compartment to the dash to supply the RPM signal to the electric tachometer. A full-flow oil filter will be a big improvement over the low-efficiency bypass oil filter which I'll also keep in order to have an additional quart of oil in the system. I've ordered the full-flow oil filter and twin-plug distributor from Precision Matters and look forward to its arrival from the UPS man.
![[IMAGE]](http://www.darrylsgarage.com/356/356fullflo1.jpg)
Entry: 2/15/14 - I almost used this 6-volt 356SC electric tach on my Okrasa oval window VW project but a little scrounging found a much better donor tach for that job and this one will actually be the perfect redline for the hotrod twin-plug engine that's going into this project so I'll be needing to run a wire and mount this tach before I get the engine back from Jack.
![[IMAGE]](http://www.darrylsgarage.com/356/356e-tach1.jpg)
Entry: 2/18/14 - The order arrived from Precision Matters today with the twin-plug distributor and full-flow oil filter. This is part of the the "get out your wallet" phase in the project twin-plug project. Next on the shopping list is a Scat lightened and counterweighted crankshaft and a set of Carrillo titanium connecting rods to make over-revving a non-issue, everything else is just a matter of machining. All the expenditures that make high-compression JE Pistons on big-bore cylinders a bulletproof set-up and one-time investment.
![[IMAGE]](http://www.darrylsgarage.com/356/356twinplug3.jpg)
Entry: 2/21/14 - Todays efforts focused on trimming and fitting the battery box floor pressing and then fastening it into place with Cleco clamps. I was able to get the back and sides clamped in and determine how much shaping will need to be done to fit the front edge of the new pressing with the front luggage compartment bulkhead. The battery retaining bracket is also partially spot welded into position but my spot welder had a problem about half way through. Some forming of the sheetmetal inside the patch made to the front luggage compartment bulkhead will be required to accommodate the notch for the tow hook and the backing plate riveted inside the compartment. For now a screw jack and wood blocks are forcing the new pressing into place and magnets are holding the tow hook into place so I can determine where and how big to make the bends in the front luggage compartment bulkhead.
![[IMAGE]](http://www.darrylsgarage.com/356/356batpan6.jpg)
![[IMAGE]](http://www.darrylsgarage.com/356/356batpan5.jpg)
![[IMAGE]](http://www.darrylsgarage.com/356/356batpan7.jpg)
Entry: 2/22/14 - I made an accidental discovery by posting a question on the 356 Registry BBS asking what color the electric tach wire was in the '65 model, since I have to run one, it might as well be the correct color. To my surprise, the answer was there's already a tach wire installed in the engine compartment, usually coiled up under the wire bundle below the voltage regulator with an empty spot on a 5-wire connector under the dash behind the mechanical tach. Sure enough, a little digging and there they are. A quick check with my Ohm meter confirmed the circuit. The cable end of the mechanical tach is visible in the foreground as the photo was taken through the tach hole in the dash.
![[IMAGE]](http://www.darrylsgarage.com/356/356tachwire1.jpg)
![[IMAGE]](http://www.darrylsgarage.com/356/356tachwire2.jpg)
I set the new 7000 RPM electric tach into place just to see how it looks. I'll be needing to find some additional instrument light sockets to fill in the missing ones and make some wiring extensions so the wires reach the lower warning light location on the new tach but all-in-all this one's going to be easy. I also ordered a 6-volt Optima gel battery and fake "cloaking" simulated vintage battery cover that fits the original style battery mount so they get here about the time I'm finishing up on the battery pan replacement.
![[IMAGE]](http://www.darrylsgarage.com/356/356e-tach2.jpg)
Entry: 2/25/14 - Funny thing when you put a car on a lift, things you didn't really notice from standing height become very obvious at ground level. The bottom door gap on the drivers door and a deep crack in filler below kept catching my eye as I was working on the battery box. So, first thing I try is taking an oak block and big hammer to it and sure enough, a consistent bottom door gap was easily established again, the problem was a huge hunk of pink BONDO popped off the car! So many hours of wire wheel grinding and all the filler 'slathered' over the rocker panel is dust and a rust-free but severely in need of some hammer dolly work section of metal remain. So here's a little experiment in blending a repair into an already filled area. My hope is that I can get a nice even surface a new coat of fresh paint will look good on and have my buddy Ken match the paint in the doorjabs so the car looks presentable but minimally restored and I can drive the hell out of that twin-plug engine this summer!
![[IMAGE]](http://www.darrylsgarage.com/356/356lfrkr1.jpg)
![[IMAGE]](http://www.darrylsgarage.com/356/356lfrkr2.jpg)
Entry: 2/28/14 - About 6 hours of stud welding, pulling, hammer and dolly work and the left rocker panel is looking great. I installed the rocker molding to see if there were any variances that drew the eye to them and it looks fantastic, like a 1/16" max filler depth only in the deep depressions.
![[IMAGE]](http://www.darrylsgarage.com/356/356lfrkr3.jpg)
![[IMAGE]](http://www.darrylsgarage.com/356/356lfrkr4.jpg)
It was also UPS delivery day, a radio delete plate arrived from Zims arrived with a fuel pump block-off plate for the motor (I'm going with an electric one) and a 6-volt Optima battery and a "cloaking" device called a dummy battery case which will fit perfectly in the stock battery bracket.
![[IMAGE]](http://www.darrylsgarage.com/356/356dash8.jpg)
![[IMAGE]](http://www.darrylsgarage.com/356/356optima1.jpg)
Entry: 3/1/14 - I got the workshop up to 72� F today so it was, "FILLER-TIME!" The left rocker panel looks pretty close to final sanding and priming this evening. I'm extremely thrilled with how thin the skim coat has ended up. The perfect day to be in a warm garage, outside it was in the low 40� F range and periodic snow flurries, March, in like a lion!
![[IMAGE]](http://www.darrylsgarage.com/356/356lfrkr5.jpg)
Entry: 3/2/14 - I left the heat on overnight to keep the workshop at 72� F so the filler could cure and make a proper physical and chemical bond with the bare metal. This morning I put the last coat of lighter filler over the entire panel and hand board sanded the entire thing to the final shape. A quick coat of Spies Hecker Priomat 3255 primer and it's ready for final paint prep and fixing a few very minor defects under the lower edge and not even visible without crawling under the car. The hours of effort this little project required makes me even more resolute in simply putting another coat of paint over the existing BONDO repairs and let sleeping dogs lie.
![[IMAGE]](http://www.darrylsgarage.com/356/356lfrkr7.jpg)
![[IMAGE]](http://www.darrylsgarage.com/356/356lfrkr6.jpg)
Entry: 3/5/14 - My old spot welder had bit the dust last week so finishing the battery pan was on hold until my new one showed up and I could finish spot welding the battery bracket into place on the bottom of the pressing, it finally arrived so I got back on it. I started by tenting off the area between the front wheels and floor of my garage so sand wouldn't fly everywhere when I used my handheld sand blaster to make the metal of the rusty old flanges inside the spare tire well nice and clean to weld to. Luckily the blasted sand stayed pretty well contained on the top of the plastic tarp tenting off the underside so cleanup wasn't too bad. The resulting blasted original sheetmetal on the top of the bare metal flanges was encouraging because they were so solid. It should be noted that I did not remove the original battery pan floor spotwelded on top of the original flange so I'm welding the new floor to the old floor and there will be an extra layer of metal in between. By sawing right up to the original flange when I removed the old panel gave me a very solid place to weld to. If I was doing a concours restoration, this wouldn't be good enough but for a driver, after seam sealing and undercoat, nobody will be the wiser and it will be a rock solid repair.
![[IMAGE]](http://www.darrylsgarage.com/356/356batpan13.jpg)
![[IMAGE]](http://www.darrylsgarage.com/356/356batpan8.jpg)
After carefully measuring the position of the tow hook and drilling the holes for the rivets, I punched the necessary plug welding holes into the perimeter of the pressing and then reinstalled it using the Cleco clamps.
![[IMAGE]](http://www.darrylsgarage.com/356/356batpan9.jpg)
On the bottom side I slid the jack tray on my 4-post lift to the front, put a copper plate on the top of a screw jack and put pressure under each section between the Cleco clamps from the bottom. On the top side I used a blunt tip on my air chisel and hammered the layers sandwich of metal supported by the copper plate together so there was no void between the plug weld hole and underlying flange metal, then plug welded it back into place.
![[IMAGE]](http://www.darrylsgarage.com/356/356batpan11.jpg)
Once the Cleco clamps were removed, I drilled the hole in the top layer out to a �" hole so the bottom layer was still the size of the Cleco hole and then plug welded that such that it made a good weld and filled the hole through the bottom layer. As it sits tonight, the plug welds inside the spare tire well are ready for grinding and ready to finish the installation of the tow hook reinforcing plate behind the patch I fabricated in the front luggage compartment bulkhead where the old one had rusted through and then figuring out how I'm going to peen the rivets. There are also a couple cracks in the original wall and flange sheetmetal that need to be filled but that's welding done from the bottom side.
![[IMAGE]](http://www.darrylsgarage.com/356/356batpan10.jpg)
![[IMAGE]](http://www.darrylsgarage.com/356/356batpan12.jpg)
Entry: 3/6/14 - A few little reminders of why I need to keep from getting too deep into body work arrived today. A set of lightweight Carrillo titanium connecting rods, a fuel pump block-off plate and a Pierburg electric fuel pump. At 6 volts, the fuel pump delivers a low enough pressure flow that no pressure regulator is required and the bowls of the Weber carburetors will be filled and accelerator pumps primed to insure cold starts are quick. The mechanical fuel pump will be removed and the block-off plate fills the hole quite elegantly, thanks to Zim's minimalist design, it looks like how the factory would have done it. The Carrillo rods are yet another little insurance policy that high RPMs won't result in disaster. A little devil with a pitch fork is whispering in my ear, "A hot rod, rust-free 356C is way more fun on the road than in pieces in my shop!" and I'm listening!
![[IMAGE]](http://www.darrylsgarage.com/356/356gofast1.jpg)
Entry: 3/7/14 - Some deep cracks in the BONDO on the nose of the car made me take the one-way trip with a wire wheel on an electric drill to see just how deep and bad the damage is. A mangled right front fender support bracket ripped from the sidewall of the front battery box wall had me suspicious of how hard of hit this section of the car had taken but the truth really comes out when the BONDO comes off. There's at least a 5 to 8 mm thick slathering of BONDO over the lower section of the right side and screw holes from the primative slide hammer dent pulling technique popular in the '70s across the top edge and more starting to expose themselves as I continue stripping the BONDO lower on the panel. Brazing around the bumper holes speaks to the degree of bending the bumper brackets sustained in the impact and how much they got pushed up and into the opening, causing actual tearing of the sheetmetal around the opening. UGH!!! I'll know more once I get the entire nose panel stripped.
![[IMAGE]](http://www.darrylsgarage.com/356/356nose1.jpg)
![[IMAGE]](http://www.darrylsgarage.com/356/356nose2.jpg)
![[IMAGE]](http://www.darrylsgarage.com/356/356nose3.jpg)
Entry: 3/8/14 - Once all the filler was removed it is obvious that there was a pretty significant impact to the right side below the bumper, inside the fog light hole and centerline of the car. The left side of the car is virtually undamaged, other than the bumper bracket holes (on both sides) being enlarged and brazed repairs to tears from a front impact that drove the bumper down and a row of holes drilled to remove a dent just below the hood opening at the center. I'm going to attempt to pull out the damaged area using all the tools in my arsenal and see what I can do. I'm thinking that I can patch this without buying any new sheet metal pressings since the damage is limited to such a small section and the repairs done were so primative.
![[IMAGE]](http://www.darrylsgarage.com/356/356nose4.jpg)
Entry: 3/9/14 - So now that I know the left side is virtually undamaged, "surveying" the depth of the damage right side is a matter of careful measuring and drawing grid lines using a Sharpie and a magnetic measuring tape to lay out a grid 2" apart. The first line was lined-up with the top edge of the bumper bracket holes and then the exact perpendicular centerline was found. After that, horizontal lines every 2" followed by vertical lines 4" from the centerline and then 2" over the worst areas of damage. I installed the bumper brackets to check to see that the underlying frame points are square with the outer nose panel and that everything is horizontal using plumb line string to compare the lines with the string and everything looks very straight.
![[IMAGE]](http://www.darrylsgarage.com/356/356nose5.jpg)
The primary tool for transferring the known, good contours of the left side to compare with the damage on the right side is this adjustable profile gauge I found at Eastwoods. A quick comparison of the horizontal grid line across the left as it met the fog light hole showed about how deep the BONDO was across the center of the damaged area on the right side. The difficult issue to solve here is how to pull out the metal since getting behind it to push it out is not possible with the inner spare tire well bulkhead in the way.
![[IMAGE]](http://www.darrylsgarage.com/356/356nose6.jpg)
The adjustable profile gauge made it easy to create cardboard profile templates for each of the 4, 2" apart vertical grid lines over the most damaged area. I'll do the same for the horizontal ones as well so that I can check progress as I begin the pulling process.
![[IMAGE]](http://www.darrylsgarage.com/356/356nose7.jpg)
![[IMAGE]](http://www.darrylsgarage.com/356/356nose8.jpg)
Entry: 3/11/14 - A few weeks ago I somehow managed to break off an M8 tap chasing threads in the forward bumper bracket captive nut on the right side, today was the day to fix that. I cut out the old nut plate as close to the size of the nut plate itself as possible and got really close. You can see in the following photo the size of the hole in the bumper bracket and the sheared-off lower mounting point of the fender support brace, a future repair project.
![[IMAGE]](http://www.darrylsgarage.com/356/356bbrak1.jpg)
Next I fabricated up a new captive nut by spot welding a new nut plate to a piece of sheet metal with the correct sized hole already drilled into it. I trimmed the sheet metal down to exactly the same size as the original that I cut out of the car figuring the width of the cutting wheel on the Dremmel tool would be the perfect gap to fill with MIG bead.
![[IMAGE]](http://www.darrylsgarage.com/356/356bbrak2.jpg)
Then after some creative clamping, I MIG welded the new captive nut into place and then again used the Dremel tool to grind down the welds. In the end it was solid, lined-up perfectly and everything works just like original. Installing the bumper brackets further confirmed that the left and right sides are perfectly aligned and I breathed a big sigh of relief.
![[IMAGE]](http://www.darrylsgarage.com/356/356bbrak4.jpg)
![[IMAGE]](http://www.darrylsgarage.com/356/356bbrak3.jpg)
My next task was fabricating a way to pulling the big dents behind the nose from the front. Out of a piece of �" thick by 2" wide strap metal, I formed a 2" x 2" dolly using an 80-grit disc on my 4�" grinder, contoured to the shape of what the worst horizontal section of the dents should be. It will be held on the end of my 5 pound slide hammer by a 6 mm bolt so that only �" holes need to be drilled in the sheet metal, and hopefully only about 4 or 5. Once I get the main dent pulled, I have a stud welder / puller that will do the fine brush strokes. Welding up holes is one thing I'm quite good at by now! Next I need to figure out how the brace the lower lip of the nose panel such that the pulling force is directed to the area I want to pull and not simply just pulling the whole panel forward. Good thing is that I have a 4-post lift and nice big landscape timbers as a starting point in building the brace.
![[IMAGE]](http://www.darrylsgarage.com/356/356dolly1.jpg)
Entry: 3/13/14 - So the final thing I needed to figure out before pulling out the big dents in the lower passenger side's nose was how to keep the bottom lip from moving forward with each blow from the slide hammer. Besides already having landscape timbers sized to support work across the 4-post life, I have a leather "panel beating bag" filled with about 100 lbs. of lead shot and placing it directly in front of the lower edge then pushing the car forward onto it provided more than enough unmovable anchor. It was time drill holes and start pulling.
![[IMAGE]](http://www.darrylsgarage.com/356/356nose9.jpg)
In the end, I was able to replicate the curve of the undamaged drivers side of the car to the passenger side using only 3 drilled holes for the slide hammer and dozens of stud weld pulls. Suffice to say, I'm estatic about the outcome and now just need to clean up the mangled bumper bracket holes and weld shut all the slide hammer holes, from this repair and the original one done by the ham-fisted bodyman from the disco era using a screw on the end of his slide hammer.
![[IMAGE]](http://www.darrylsgarage.com/356/356nose10.jpg)
![[IMAGE]](http://www.darrylsgarage.com/356/356nose11.jpg)
![[IMAGE]](http://www.darrylsgarage.com/356/356nose12.jpg)
Entry: 3/14/14 - I realized that I don't have any front bumper brackets so did my best faking up with the back ones I have to do a preliminary test-fitting of the front bumper. The profile looks pretty good but the bumper itself is slightly tweaked so it's really just to enjoy how much it hides all my pulling work! I worked a bit on trying to fit the front hood and did slightly improve the gap on the front lip but there's still much gap showing up the passenger side lip. The driver's side is nearly perfect. All together a pretty productive week considering I was stripping all the BONDO off the nose a week ago tonight.
![[IMAGE]](http://www.darrylsgarage.com/356/356nose13.jpg)
Entry: 3/15/14 - I worked a little more on pulling the kink out of the hood hinge mounting channel inside the hood. As you can see, it took 9 separate pulls with the stud welder but the channel is back in alignment and the hood seems to lay slightly better. A high spot in the middle of the passenger side still shows the slight spring but it's close enough for now. I'll wait to make any further adjustments to the hinge plate until I have the hood off the car.
![[IMAGE]](http://www.darrylsgarage.com/356/356hood1.jpg)
The front bumper bracket holes are cut back and ready to have patches fabricated and welded in. I traced the top profile into a piece of file folder cardstock and then flipped it over and aligned it 5 mm from the upper rim of the fog light opening as the the photo and measurements by Cliff Hanson answered a question I posted on the 356 Registry BBS. I tried to grind all the brass brazing out of the area and some cracks will need to be repaired but this is a very simple little patch if I use the Dremel grinder to radius the opening to match the top.
![[IMAGE]](http://www.darrylsgarage.com/356/356nose16.jpg)
![[IMAGE]](http://www.darrylsgarage.com/356/356nose14.jpg)
![[IMAGE]](http://www.darrylsgarage.com/356/356nose15.jpg)
Entry: 3/16/14 - Got the driver side bumper bracket hole patched back up this afternoon. After tacking the patch into place with a piece of crushed soft copper pipe backing it, I used the cutting wheel on my Dremel tool to grind away all the brass brazed into the existing cracks and then welded up those cuts and holes too. By the time I was done, "bi-focal neck" had set in from tilting my head so far back I could see through the welding hood through my glasses but the results are pretty good and I might go back and fill one more thin area in when my patience has returned.
![[IMAGE]](http://www.darrylsgarage.com/356/356nose18.jpg)
![[IMAGE]](http://www.darrylsgarage.com/356/356nose17.jpg)
I cut a piece of steel bar the width of the battery retaining bracket out of the �" x 2" strap metal and welded it to the end of the bracket to lengthen it. I tapped a 6 mm 1.25 pitch hole further back so the bracket would hold the bigger "cloaking" battery case hiding the 6-volt gel cell and modified the plastic top so it looks legit while not completely covering the battery all the way to the outboard side. With the ground strap and hold down strap in place the whole thing looks pretty legit. I also salvaged the large washers on the old rusty battery pan used for holding the rear rivets of the tow hook to the bottom of the battery pan and I need to figure out how I'm going to install the rivets to replace the bolts temporarily holding it in. The plug welds holding the battery pan in don't look particularly pretty with flash photography but once hidden with seam sealer and a thick coating of high-build undercoat, they won't be obvious at all.
![[IMAGE]](http://www.darrylsgarage.com/356/356batpan14.jpg)
Entry: 3/17/14 - The patch for the passenger side bumper bracket hole was a little more extensive and complex than the one for the drivers side. Instead of trying to rework an ancient repair; badly dented, cracked and sloppily brazed, I simply cut out the entire damaged area and started with a fresh piece of 20-gauge sheet metal. Making a cardstock pattern, transferring it to the sheet metal, cutting, fitting, forming and finally clamping into place resulted in the first photo below. Once tack welded at each corner and once in the center of each side so I could remove the clamps, I used the cut-off wheel on my Dremel tool to widen the gap between new and old steel on each seam a short section at a time, then clamped a piece of soft copper pipe crushed into a flat plate behind the gap and filled the gap with a thick MIG bead in short lengths at a time, cooling each with compressed air to keep the panel from warping. The result is the second photo below, thick MIG weld beads over the seams and cracks that were also cut wider with the Dremel tool and welded shut with copper plate clamped behind. Good penetration means that the beads can be ground off flush with the surface and blended into the old metal to make the patch disappear. I ran out of time today so grinding and cutting out the bumper bracket hole will be the first task next session.
![[IMAGE]](http://www.darrylsgarage.com/356/356nose19.jpg)
![[IMAGE]](http://www.darrylsgarage.com/356/356nose20.jpg)
Entry: 3/18/14 - Ok, the metal work on the nose it finished! On passenger side bumper bracket hole, I ground down the weld bead and cut out hole the this morning. Then used the shrinking disc on my grinder to knock down the high spots just under the hood opening after I welded shut all the old screw / slide hammer holes (and all the ones I made). I'm particularly happy with how the bottom lip turned out and the symmetrical view of the battery box corners. I think this little BONDO prospecting adventure will do me for this summer and I'll just get a cheap MAACO metallic silver paint job to seal the primer. Someday I'd love to have the whole car media blasted but with what I found under the nose, I'm thinking it would be years of metal work before I drive it again and a barn find as solid and rust-free as this car should be driven for a bit before taking it all apart. Especially when it's powered with a big-bore / twin-plug motor that's coming back together later this spring!
![[IMAGE]](http://www.darrylsgarage.com/356/356nose21.jpg)
![[IMAGE]](http://www.darrylsgarage.com/356/356nose22.jpg)
The mangled passenger side fender brace needed some attention since whoever did the BONDO repair back in the disco age probably didn't have a welder so he left it hanging, ripped from the side of the battery box. I jacked up the front corner, removed the wheel to get full access to the bracket and scraped the asphalt filling out of the 'U' shaped channels. With patience, I was eventually able to get the metal back to the point I could mend the torn base by welding the pieces back together and once anchored, I was able to really get good leverage for straightening. It's amazing how handy a Louisville Slugger baseball bat is for this particular job, I was able to feed it through the horn and driving light holes and give it a good whack with my big deadblow hammer. The 5 lb. slide hammer came in handy too with pulling the metal backwards. In the end, there's still some minor "squaring up" of the channels remaining when I find a piece of square rod and make a tool to form it with, but it's welded tight back into the original shape and everything is nice and solid for now.
![[IMAGE]](http://www.darrylsgarage.com/356/356rfbrk1.jpg)
![[IMAGE]](http://www.darrylsgarage.com/356/356rfbrk2.jpg)
Entry: 3/22/14 - Today's focus was on the passenger side door and rocker panel. The rocker panel had some very minimal rust through from behind the last trim strip bolt hole closest to the torsion bar access hole. I made a triangular patch out of 20-gauge steel and completely welded in the trim strip bolt hole, later redrilling it in the correct place once all the welding was done. I also cut out a small section of rust bubbling in the bottom rear corner of the door, welding in a patch from behind. A coat of Evercoat Metal-2-Metal completed both repairs before moving on to stripping the entire rocker panel with a wire brush on my drill. Once stripped, I gave the entire thing a coat of SEM Rust Converter to treat the rust pits that were uncovered by the wire brush and will cover the entire length with a light skim coat of filler in the coming days. The paint on the door had many defects that were sanded down to the point red spot putty would level the surface and have good adhesion. I'm nearing completion on the entire side after a few more sessions with the sander and red spot putty.
![[IMAGE]](http://www.darrylsgarage.com/356/356rtrkr1.jpg)
![[IMAGE]](http://www.darrylsgarage.com/356/356rtrkr2.jpg)
Entry: 3/21/14 - The reproduction front bumper brackets arrived from Stoddard today and fitting them further revealed the extent of the nose flex that a history of collisions reveal. So with the data gathered, a strategy for minimizing the visibility of such a sordid past, which would show under less fortunate circumstances.
![[IMAGE]](http://www.darrylsgarage.com/356/356frbmp1.jpg)
Entry: 3/23/14 - It was "FILLER-TIME" again today so I turned the heat up in the shop and started laying on the thin coats of Evercoat Rage Xtreme on the passenger side rocker panel and lower nose where I did all the metal work. After knocking it down with the pneumatic long board and random orbital sanders I finally have it down to the hand sanding point and soon ready for the final lighter skim coat filler. Nothing really exciting to report as filler work is more an exercise in patience and not taking too much off, going until the high points on the metal start "ghosting" through and stopping at that point and adding more filler where low spots show up. I'm doing the highest quality metal work in anticipation that someday I will be media blasting all this filler off and starting from scratch. Given that decision, I'm using cheap auto parts store primer and saving the expensive Spies Hecker Promat 3255 for the '56 Beetle project. I'm also going with gray primer so that the metallic silver paint doesn't have to cover a darker color and require more coats.
![[IMAGE]](http://www.darrylsgarage.com/356/356rtrkr3.jpg)
![[IMAGE]](http://www.darrylsgarage.com/356/356nose23.jpg)
Entry: 3/24/14 - A beautiful day outside made for a difficult time staying inside the heated shop but I did and have a completed passenger side between the wheel wells primed with gray primer to show for it. The patches welded into the rocker panel and rear bottom corner of the door are totally invisible to the non-superhero. I have the sanding on the nose repairs completed too and now need to sandblast some deep rust in the front lip of the trunk opening before giving that whole section a thin skim coat job.
![[IMAGE]](http://www.darrylsgarage.com/356/356rtrkr4.jpg)
![[IMAGE]](http://www.darrylsgarage.com/356/356rtrkr5.jpg)
For some sick reason, I wanted to see if the original mounting holes for the 'P-O_R_S_C_H-E' and 'C' emblems under the rear deck lid lip were still there. Figuring that if the bodyman didn't fill the sllde hammer screw holes on the nose, he wouldn't be welding up any trim holes on the back. In my 2-year apprenticeship in the Porsche restoration shop in Ballard, I collected a number of items; original 'C' emblems with the 50 year patina, NOS emblems still in the packages and most importantly a template I made of the hole locations on the tail panel from a 'C' coming back from paint. I carefully marked the locations of the hole from the template positions and with a wire wheel on my drill, I looked for the left most hole for the 'P-O_R_S_C_H-E' emblem first. Wouldn't you know it, there it was, just filled with BONDO and easy to open up. Then I went for the right side of the 'P-O_R_S_C_H-E' emblem and that's where I struck it rich in deep BONDO. I chickened out before trying to hit the metal underneath. Then some shallow holes looking for the 'C' emblem holes, now realizing this was a sleeping dog best left for that day in the future when I can media blast the entire car and probably be welding on an entire tail section like I will be doing for the right front nose section. After I weld shut the 'custom' license plate mounting holes, I will fill the divots in the BONDO with modern filler and drill and glue the old 'patina' emblems into position during this incarnation of the car. I've done a great job in putting the rocker panels back into perfect form but my summer could quickly disappear into this tail section and I want to paint my '56 Oval this summer!
![[IMAGE]](http://www.darrylsgarage.com/356/356tail1.jpg)
![[IMAGE]](http://www.darrylsgarage.com/356/356tail2.jpg)
One little handy thing I recently picked up off the internet throug a random Google query, a paint can shaker that hooks into my Sawsall like a blade to securely hold a rattlecan or quart paint can and shake it endlessly. It really worked great on the thick gray primer I used to do the right side panel.
![[IMAGE]](http://www.darrylsgarage.com/356/356mixkwik.jpg)
Entry: 3/25/14 - Today I further refined the nerf bar mount design by reducing the height of the mounting bar on the '68 and later VW nerf bar from 2" to 40 mm so it was evenly spaced top to bottom in the bumper bracket hole in the nose with 3 mm clearance on each end, like doors and hoods should have. Now that it can again fit through the smaller, repaired holes in the nose, I have the nerf bar clamped into place while I play around with how far out I would want it and level it better. I used my angle grinder to remove the excess material and it didn't take as long as I thought it would, so 3 more isn't gong to require that many hours of work.
![[IMAGE]](http://www.darrylsgarage.com/356/356nerf1.jpg)
Jack had the high performance 86mm (1720cc) big bore JE pistons and hi-tech Shasta Design cylinders machined out of a solid piece DURABAR cast iron for me when I stopped by the shop today. I'm getting really excited about how quickly we're going to be looking at a ready to build engine. I had better keep at getting the body work done and ready for a cheap metallic silver MAACO paint job!
![[IMAGE]](http://www.darrylsgarage.com/356/356eng5.jpg)
Entry: 3/26/14 - Today's main activity was finishing the repair to the huge dent in the left front fender just ahead of the wheel well that I had used my pneumatic planishing hammer to beat out when I first got the car in 2007. I finally used the shrinking disc on my angle grinder to heat and shrink the high spots and then prepare the area for filler using an 80-grit disc to scuff the surface up.
![[IMAGE]](http://www.darrylsgarage.com/356/356lfnd5.jpg)
![[IMAGE]](http://www.darrylsgarage.com/356/356lfnd6.jpg)
After filling with Evercoat Rage Xtreme filler and block sanding out, I used red oxide putty to fill the remaining defects in the surface and surrounding paint. In fact I spent most of the day sanding out paint chips and filling them with red oxide putty before block sanding them out as I work my way around the car prepping for a cheap MAACO metallic silver two stage paint job. I hope to have the majority of the car in gray primer soon.
![[IMAGE]](http://www.darrylsgarage.com/356/356lfnd7.jpg)
Entry: 3/30/14 - I finally received my order from skygeek.com with the rivet peening tool for a pneumatic air chisel that was the same size as the rivet head for the front tow hook. I drilled a small piece of 2x4 to hold the peening tool vertically and then pressed it up against the head of the new rivet using a screw jack on the jack tray of my 4-post lift. On the top side it was old-school, oxy/acetylene torch, heat the shaft to orange-hot, just less than liquid, let it cool to red hot and then hit it with the blunt tip of the air chisel. It usually took 4 to 5 interations to get the peened head flush with the surface.
![[IMAGE]](http://www.darrylsgarage.com/356/356batpan17.jpg)
![[IMAGE]](http://www.darrylsgarage.com/356/356batpan18.jpg)
The results are exactly like the rivets I ground down to free the big washers reinforcing the ends of the tow hook, which by the way I welded the big washers to the sheetmetal for just that much more security in the event somebody ever does try to tow the car using the hook. I'm extremely happy with the outcome and I've just coated both sides with a thick slathering of POR-15 so it would flow into the gaps between the layers of sheetmetal sandwiched between the seams. Once dry, I have some black Eastwoods seam sealer that I'll further protect the seams and hide the plug welds with. In the end, I'll texture and undercoat the entire inside and outside so it looks like the factory undercoating using the faux-factory undercoating technique I perfected on the 912 project.
![[IMAGE]](http://www.darrylsgarage.com/356/356batpan15.jpg)
![[IMAGE]](http://www.darrylsgarage.com/356/356batpan16.jpg)
Entry: 3/31/14 - The bottom side of the new battery pan floor is done and the "faux factory undercoating" is drying from the heat of a halogen lamp. I substituted black Eastwood's high-build seam sealer in place of the tan colored 3M product I used on my 912 project but repeated the same fingertip dabbing method of creating an irregular surface over a coat of POR-15. Once the seam sealer was dry enough, I sprayed a heavy coat of 3M rubberized undercoating to form the splatter pattern that looks very close to the original asphalt undercoating used at the factory. I had coated all the surface rust with SEM Rust Converter weeks back so all the nose sheetmetal is stabilized and won't be rusting from exposure to moisture anymore. I wish I could dip the car in that Rust Converter because the insides of the fenders is practically unreachable.
![[IMAGE]](http://www.darrylsgarage.com/356/356batpan19.jpg)
Entry: 4/2/14 - Another long day of filling, block sanding, welding up holes and sand blasting the rusty areas in the front trunk weatherstrip lip and under both rear quarter windows. I started using high build filler primer on the sides and have the weatherstrip around the windshield and rear window cut away from the outer lip where it meets the body in order for the painter to actually paint under where the new rubber will lay. Last step was starting the final skim coat and block sanding of the nose. I've been staying up until well after midnight working on this and getting very excited about the prospect of towing it over to MAACO soon for a metallic silver two stage paint job for less than $1000.
![[IMAGE]](http://www.darrylsgarage.com/356/356blast2.jpg)
![[IMAGE]](http://www.darrylsgarage.com/356/356blast3.jpg)
![[IMAGE]](http://www.darrylsgarage.com/356/356blast1.jpg)
Entry: 4/3/14 - Another day of filling and block sanding and completion of the nose panel and areas under the rear quarter windows that I sand blasted the rust out of yesterday. I lost count of the number of hours I have into making that nose panel perfect and know that each panel of the car could cost me that much time to do right now and I'd rather drive it for a few years first! The shadows of the evening sunset across a fresh coat of filler primer show off just how perfect the work turned out and will look fantastic with the nerf bars showing it off.
![[IMAGE]](http://www.darrylsgarage.com/356/356nose24.jpg)
Entry: 4/4/14 - Another long day of blocking, sanding and filler priming. As of tonight, all that remains is the top and there are a number of dents requiring filler. I blasted the last three digits of the VIN found inside the rain tray on the rear deck lid. Then I smoothed the transition to paint with spot putty in an effort to make it more visible, after a little sanding it won't look like there was anything done. I do believe the end is now in sight!
![[IMAGE]](http://www.darrylsgarage.com/356/356tail3.jpg)
![[IMAGE]](http://www.darrylsgarage.com/356/356tail4.jpg)
Entry: 4/5/14 - The last phase of the bodywork, the roof, had several deep dents that would be easy to lift out if the headliner was not in the car but stud welding into dry old rubberized horsehair insulation is a sure bet for a fire. Paving the pot holes with Evercoat Rage Xtreme filler was the only available solution so I took my 80-grit disc on the grinder to feather out the multiple coats of paint to get to the dents and leave enough room to feather out the filler. Hours later I finally had everything wrapped-up and ready for a thick coat of filler primer on the roof and rear half of the front hood. It's nice and warm in the shop tonight so the fumes can run their course and the finish harden and cure a bit before beginning the block sanding phase. I also want to clean up and paint the bumpers while the car is in the shop so I have the option of mounting them someday after the "outlaw" phase has run it course.
![[IMAGE]](http://www.darrylsgarage.com/356/356roof1.jpg)
![[IMAGE]](http://www.darrylsgarage.com/356/356roof2.jpg)
Entry: 4/7/14 - Now that the filler primer has dried up nice and hard, I took my LED bulb worklight and inspected every square inch of the car. I filled any missed defects in the primer, chips, small dents, air bubbles in the filler and sanding scratches with red spot putty which resulted in a car that looked like it has a bad case of measels. I'm letting the putty harden nice and thoroughly over night before starting the hand sanding with 320-grit on a block. The encouraging thing is that most of the defects are in corners and ends and the major open areas are perfect already.
![[IMAGE]](http://www.darrylsgarage.com/356/356paint1.jpg)
With the putty applied and drying, I started the restoration of the bumpers. First by running a tap through all the captive nuts used to mount them, then pressing out any dents using my 12-ton shop press or hammer / dolly and finally putting the initial coats of paint stripper on them. Only the top of the rear bumper has any filler, the rest of the paint on both is coming off easily.
![[IMAGE]](http://www.darrylsgarage.com/356/356bump2.jpg)
Entry: 4/10/14 - Over the last couple days I've been chemically stripping the paint and BONDO off the bumpers while block sanding the entire car. As it sits tonight the bumpers are bare metal after hosing and scrubbing the stripper off and giving them a spray down with Eastwood's Metal Wash to keep them from flash rusting.
![[IMAGE]](http://www.darrylsgarage.com/356/356bump3.jpg)
The entire car has had the "once over" and has another coat of filler primer over the entire thing. Things are looking pretty promising as the number of defects is minimal and a few low spots need some putty and blocking out. I'm hoping to be ready for paint by the end of next week once the bumpers are also finished.
![[IMAGE]](http://www.darrylsgarage.com/356/356paint2.jpg)
Entry: 4/14/14 - Getting the bumpers ready for paint is the next big push. I did a final pass on the body and filled any remaining low spots or blemishes with red spot putty. The bumpers got the complete treatment, final straightening and fitting with the bumper guards, 80-grit grinder to any areas needing filler, Evercoat Rage Xtreme filler, rust converter on the surface rust on the front bumper from rock chips and then final sanding with 220 then 320 grit. A good thick coat of filler primer. I am really tracking to an end of the week trip to the paint shop.
![[IMAGE]](http://www.darrylsgarage.com/356/356bump4.jpg)
![[IMAGE]](http://www.darrylsgarage.com/356/356bump5b.jpg)
![[IMAGE]](http://www.darrylsgarage.com/356/356bump6b.jpg)
Entry: 4/11/14 - The engine parts have just about all arrived with the exception of the repaired and twin spark plug modified 912 heads we sent into the machine shop. Both Jack and I are getting extremely excited but in my case also extremely motivated to get the car to MAACO for a coat of metallic silver paint! Since we're just putting a restored engine back together, the assembly time will be pretty minimal so the car has to be ready!
![[IMAGE]](http://www.darrylsgarage.com/356/356scat1.jpg)
Entry: 4/15/14 - I spent the entire day chasing down low spots with spot putty and filler primer on the body and bumpers and I'm getting very, very close to calling it ready for paint. The 4" x 8" spray out card sample from Willhoit Auto Restoration in Long Beach, CA containing a Glasurit paint sample of what is considered a perfect match to the factory color, "6206 - Silver Metallic" that originally came on the car. I taped it to the front fender and looked at it in both sun and shade. There is absolutely no tint in the clear coat and the metal flake is very fine so it should be an easy shade of silver to match from MAACO's broad selection of silvers in their paint book. I'll make a run over in the morning with my paint sample and talk about color and schedule a drop off of the car.
![[IMAGE]](http://www.darrylsgarage.com/356/356p6206.jpg)
Entry: 4/17/14 - Today is the day I rented the awesome tilt bed trailer from Del's Truck Rental and hauled the car to my nearby MAACO here in Woodinville. Once I got there, I spent quite a bit of time going over the car with Darren, the painter. He showed me a '64 Vette he's currently working on and told me he would start with block sanding the entire car out and give me the option of having him fix any major defects I missed in terms of low spots or dents. I'm feeling pretty confident that any additional work will be minimal but also realize these guys who do this day in and day out can make a few hours of their time really pay off in perfect reflections. The basic cost for a premium two stage metallic silver paint job to perfectly match the 6206 spray out card is just less than $1000 plus any additional elective surface prep @ $50/hour. So it's probably going to be in the paint shop about a month, perfect for cleaning all the dust out of my shop and getting ready for engine installation work. I might do the remaining metal repair and paint prep work on the media blasted and ready to go on my '56 Bug's hood and fenders first since they will be the same kind of mess and I have the time now to do them.
![[IMAGE]](http://www.darrylsgarage.com/356/356paint3.jpg)
![[IMAGE]](http://www.darrylsgarage.com/356/356paint4.jpg)
![[IMAGE]](http://www.darrylsgarage.com/356/356paint5.jpg)
Entry: 5/3/14 - While the car has been off at MAACO getting painted, I've done a thorough spring cleaning in the shop to get all the sanding dust off everything. Getting ready for the reassembly has me ordering all the rubber parts from Stoddard and International Mercantile in order to freshen up the weatherstrip, original trim and chrome pieces. The left front turn signal was missing a mounting stud so I drilled out the pot metal base to accept a 5 mm x 0.8 thread pitch tap. Then I purchased a piece of 7/32" diameter steel rod and "machined" the areas I wanted to thread with a file on my drill press until they were exactly 5 mm. I used my impact wrench and lots of oil to run the die down the shaft on both ends. The copper color on the shaft is where it came loose in the copper jaw caps on my bench vise. A little blue Loctite on the base threads to help it grip the pot metal and we're back in business.
![[IMAGE]](http://www.darrylsgarage.com/356/356fix1.jpg)
I had found a set of four "11/63" date code matching 4�" steel wheels a few years back and finally dropped them by my favorite media blaster in Marysville before painting them with dark machine gray paint on the insides and back and Eastwoods Silver Argent Rally Wheel Paint on the outside followed by a coat of Diamond Clear after they dried overnight. I have a set of Vredestein 165HR15 tires from Coker Tire ready to put on once the paint on the wheels dries hard enough to handle the tire machine's abuse. So the shoes will be on the horse and ready for when that new engine is done!
![[IMAGE]](http://www.darrylsgarage.com/356/356whl6.jpg)
Entry: 5/23/14 - After 4 weeks at the Woodinville MAACO, my car is finally painted metallic silver. I was allowed to come in and remove the doors, engine lid, hood and fuel filler door so a proper paint job could be done to get all the door jabs and the inside of the trunk and engine compartment. I also upgraded materials to use the best sealer and 2-stage color and clear coat products they offer. Matching the "6206 Silver Metallic" on the spray out card from Willhoit Auto Restoration required special ordering a non-standard paint from Sherwin Williams and I've got to say Josh went the extra mile to make sure we got exactly what we needed to make the results perfect. Justin the painter really laid down a beautiful paint job and I'm so pleased with the results, I'm going to have these guys do my '56 Oval Window VW when I get the remaining bodywork done later this summer.
![[IMAGE]](http://www.darrylsgarage.com/356/356paint6.jpg)
Entry: 5/27/14 - I stopped by MAACO this morning to drop off a couple glass jars for any extra paint Justin the painter had left over at his suggestion and checked on the progress with the cut-and-polish work was going on the paint that had been allowed to harden over the 3-day holiday weekend. I was shown how some "tiger striping" had shown up in the hood due to the metallic settling strangely on the contours, so it was going to be "re-shot" sometime in the next day or two. Meanwhile I was able to bring home the bumpers, rear deck lid, fuel filler door and A-pillar covers. The left side A-pillar cover with the serial number and paint code plates riveted to it turned out fantastic. The area inside the grills on the rear deck lid also turned out smoother than most I've seen from the best painters in the area. I've got to say that I've really enjoyed working with these guys and how they've let me be part of the process. I did all the tasks painters and bodymen usually don't like, disassembly and reassembly and take responsibility for damaged or lost parts and chips and scratches while reassembling the car. I have the car hauling trailer reserved for Thursday morning and I'll be bring the body and doors home then, the hood might take a little bit longer but there's plenty of leftover paint to experiment with to beat the "tiger stripe" effect.
![[IMAGE]](http://www.darrylsgarage.com/356/356paint7.jpg)
Entry: 5/30/14 - So I have everything safely home and in my shop ready for reassembly, including the front hood. The final cut and polish will be done once the car is all back together and has an engine in it, which will allow the paint plenty of time to cure and harden. I'm extremely pleased with how this whole experience went with the crew at MAACO here in Woodinville and really never expected to be expertly guided to such a superior outcome because of my preconcieved notions on how the MAACO franchise does business. I was allowed to see the project evolve from a minimal expense metallic silver paint job, step by step deciding where to spend more money and ending up with something that I'm actually very proud of and can't wait to get back together and on the road. I've made a bit of a fundamental change in how I look at my car projects and have let go of striving for what I thought was perfection because by the time I got done with the car I had so much money and effort invested, it made me not want to risk damaging it to drive it. Not wanting to drive a vintage Porsche because of rock chips and getting it dirty is almost like failing an intelligence test. All I was doing was delaying the gratification of having a fun toy for the next owner. I'm now following a different drum, make these cars functional and fun and leave the concours perfection to those anal retentive types who only drive their cars to and from shows and wonder why they run like crap. Life is too short to not enjoy the fruits of one's labors and I'm now going to simply use the cars like they were intended, consumable commodities.
![[IMAGE]](http://www.darrylsgarage.com/356/356paint8.jpg)
Entry: 6/5/14 - Reassembly finally started today after doing a complete reorganization of my shop to move tools from old toolboxes to the new blue one and then organize all my bodyworking tools into the old red toolbox. Finishing the interior of the spare tire well / battery pan was the first task, scuffing the Por-15 surface with a Scotchbrite pad and then spraying a heavy coat of Wurth Hi-Build Underseal onto it got the surface looking very similar to the surrounding original asphalt splatter coat without giving it too much effort since it's under the spare tire.
![[IMAGE]](http://www.darrylsgarage.com/356/356assy1.jpg)
Removing the plastic trunk liner and giving it a good "spa treatment" of Wurth Rubber Care and then cleaning up the compartment completed the day's work, the next step being pulling the wires back through the headlight conduit tubes, which will take a little creative effort.
![[IMAGE]](http://www.darrylsgarage.com/356/356assy2.jpg)
Entry: 6/7/14 - Today's big accomplishment was getting the brittle old headlight and turnsignal wires back through the conduit tubes and into the headlight buckets. Once I wrapped all the branches in the wiring loom up tight and streamlined with black electrical tape, I used about a 3' section of 1/8" aircraft cable with a loop clamped into the end to give me something to pull on. the other end was snaked backwards through the conduit tube and the wire harness was attached to it again using black electrical tape. Pulling them through required a saw-like motion as it started to bind but the aircraft cable sayed attached and the whole thing pulled through without needing to use any lubricant. I think using the wire brush on the drill back when I cleaned the conduit tubes made all the difference. 3 of the 6 bullet connectors had come off during disassembly so once all the wiring was freed of it's black electrical tape wrapper, I started soldering the new ones ( hich I found at Eagle Day parts) back on using a soldering iron to tin the wires and plumber's style propane torch to heat the bullet connector and filling it with solder before slliding it over the end of the tinned wire. Everything went smoothly and no paint was damaged. All that's left to button up the spare tire well is installling the battery and running the two sets of wires and ground cables out to the horns.
![[IMAGE]](http://www.darrylsgarage.com/356/356assy3.jpg)
Entry: 6/9/14 - Installing the new hood weatherstrip went without any drama and the new upper corner forming plates got a nice thick coat of the black enamel I use to paint engine tins so they should not rust. I used a hole punch to open up the holes for the 33 little #5 by 1/4" oval head sheetmetal screws with their tiny little trim washers. I have yet to use any glue because I like the idea of being able to use compressed air to get any trapped water out from under the rubber after washing but I will glue down any areas that don't lay right once I install the hood so I can use it as a clamp to hold the glue. Some little puckers in the upper corners should go way once some time with the hood holding them down goes by. Now I just need by buddy Jack to come over and help me install the hood, he's the only guy I would trust, we've done quite a few together.
![[IMAGE]](http://www.darrylsgarage.com/356/356assy4.jpg)
Entry: 6/10/14 - Today's focus was the back end of the car and I started with detailing the engine compartment to fix any overspray and dust issues. I replaced all the trim screws and washers around the rear perimeter after painting all the edges black to cover overspray and stains. I cleaned the wires for the engine compartment by wiping them down with thinner and then giving them a coat of clear paint. The wires to the tail lights got a bath in paint stripper prior to cleaning thinner. Finally I used my new vibrating parts cleaner to clean up the bolts for the rear deck lid and then installed that at the last step. I will need to touch up the bolt heads using the paint given to me by the MAACO painter so I'll wait to install the grills permanently until I can do the hood and door bolt heads in one mixing of the paint. I attempted to clean up the rear tail lights but the bulb housings were just too far gone to fix so I ordered reproduction units from NLA Parts and will use the original chrome rings and lenses over new bulb housings. I ordered all the remaining missing bits today and a new set of Koni shocks and steering damper, might as well have top notch suspension as well as engine.
![[IMAGE]](http://www.darrylsgarage.com/356/356assy5.jpg)
![[IMAGE]](http://www.darrylsgarage.com/356/356assy6.jpg)
Entry: 6/11/14 - Today my friend and Porsche mentor Jack Morris and his kids JB and Sara came out to help me put the hood on the car. If ever there was a definition of a "two man job" getting this thing on without damaging the paint is it. Things went quickly and perfect gaps were achieved with only a few adjustments. Now I'm stuck waiting for parts before I can finish the door thresholds and mount the doors.
![[IMAGE]](http://www.darrylsgarage.com/356/356assy7.jpg)
Entry: 6/14/14 - Over the last couple days I've installed the battery, headlights, front turn signals, hood latch, hood handle, fuel filler door and test fit the upper horn grills. I still have to hook up the grounding points for the front lights and find the correct 6-volt bulbs before I can test them. Once the parts shipments arrive, my next focus is going to be on the door thresholds and weatherstrip, hopefully within the next few days so I can get the doors mounted soon.
![[IMAGE]](http://www.darrylsgarage.com/356/356assy8.jpg)
Entry: 6/16/14 - The UPS guy delivered all the missing parts that were holding up the starting the assembly of the door thresholds and rocker panels this afternoon so I started putting the drivers side together about 5 PM and was finished by about 11 PM. I still need to glue in the door opening weatherstrip but I will certainly be mounting the doors before the end of the week. One thing that came as a surprise to me was the holes for the aluminum trim along the bottom outer edge of the door threshold and the metal 'U'-shaped bar that holds the big rubber lip under the door opening were nowhere near where the originals were so I ended up having to redrill new holes. Some new holes were very close to the old holes so on the other side I'm going to just start will all new holes and avoid the possibility of having hole that is ruined becauses the drill fell back into the old hole and made one that's too large.
![[IMAGE]](http://www.darrylsgarage.com/356/356assy9.jpg)
Entry: 6/18/14 - The door threshold work on the passenger side went twice as quickly as the drivers side as is usually the case once familiar with the job and all the tools are handy. The rubber that goes along the bottom of the door is not uniform on either side but I assume the doors will form them into the correct shape once installed.
![[IMAGE]](http://www.darrylsgarage.com/356/356assy10.jpg)
The real fun today was hooking up the new repro tail lights. I had hoped to use the original lenses and rings on the repro bodies but found one of the lenses was cracked but the original rings worked perfectly. The nomenclature on the repro ring isn't quite the same size and shape letters used in the stamp. I'm working on the backup light and seem to have misplaced the baggie of hardware sometime in the evening after looking right at it and knowing what it was. Sleep might help me find it since it's now about 1:30 AM!
![[IMAGE]](http://www.darrylsgarage.com/356/356assy11.jpg)
Entry: 6/19/14 - Another late night session in the shop, getting the doors all assembled and ready for my buddy Jack to come help me hang on the car tomorrow. I also gave the areas ahead of the door hinges a thorough spray down with Wurth Cavity Protection Wax, which explains the gold color over what was just silver paint before. I'm taking some pretty aggressive preservation actions to keep what I have in the rust-free department intact and yet drive this car in the rain and enjoy it for all the fun I can squeeze out of the original factory build.
![[IMAGE]](http://www.darrylsgarage.com/356/356assy12.jpg)
Entry: 6/20/14 - Another "two man job" checked off the task list thanks to the expertise and generosity of my buddy and Porsche mentor Jack Morris. Mounting the doors without damaging the paint is about as difficult of job as I can imagine and Jack's help made easy work of it. The driver's side door went on without much drama, but the passenger side needed lots of attention to the lower hinge bracket, removing one of the shims eventually got everything to line up perfectly. Now I just need to paint the hinge bolts, reinstall the hinge cover plates and then glue in the weatherstrip around the sides and top of the opening, install the outer door handles, door panels and inside crank and door pull handles before I can call this area of the car done.
![[IMAGE]](http://www.darrylsgarage.com/356/356assy13.jpg)
![[IMAGE]](http://www.darrylsgarage.com/356/356assy14.jpg)
Entry: 6/23/14 - Nearing completion of the drivers side and have a good start on the passenger side with both doors done on the outside and both rear quarter windows with new rubber seals installed. I masked off the dog leg shaped portion of the headliner between the quarter windows and rear window and redyed them with SEM Phantom White vinyl dye to cover the stains and discoloration and the results are very satisfactory. Once both rear quarter windows are installed, I can install the weatherstrip seal around the door openings. I should be wrapping this up with another day or two of work.
![[IMAGE]](http://www.darrylsgarage.com/356/356assy15.jpg)
![[IMAGE]](http://www.darrylsgarage.com/356/356assy16.jpg)
Entry: 6/29/14 - One more afternoon of work has the glass and interior complete. Once my new windshield comes, I'll pop out the front and rear glass and install the new window rubber with new chrome trim. I think the stock bumpers are the quickest way to a completed car so that's my next step, then mount the tires and install the new Koni shocks. The ball is in my buddy Jack Morris' court now as I'm ready for an engine! I asked my sweet new girlfriend Thu to model the completed interior for this photo, I am a lucky man!
![[IMAGE]](http://www.darrylsgarage.com/356/356assy17.jpg)
Entry: 7/1/14 - I decided that I'm much more motivated to assemble the original bumpers since the car is turning out so stunning. It would be a shame to not install the beautiful original bumpers since I have all the new rubber and trim ready to go. Fabricating nerf bars would require a major amount of fabrication and I'm just not that into them right now. I decided to start with the rear, so the most difficult thing was making the plastic trim that goes between the deco strip and bumper conform to the curve at the ends. My solution has always been to cut off the retaining lip molded into the plastic such that it's just a flat piece like a ribbon just in the curved area. Then I use massive amounts of Wurth Rubber Cement to hold the heated rubber "ribbon" section and clamp it using wax paper over paint stirring sticks and little spring clip clamps. Letting the rubber cement dry overnight is critical since there is so much tension in the bent plastic once it cools. Assembly of the license lights was pretty straight forward and routing of the wiring uses little tabs welded into the inside of the bumper so the wires can go out through the bracket holes in the body. A quick clean-up and painting of the original bumper brackets with gloss black paint and lots of careful work to bolt everything together got the bumper back on the car. The results are rather stunning and it appears the holes for the license plate are for a "European delivery" car since they're where the long, narrow German license plates would go. I'll need to drill new holes for the new license plate bracket I have and put some rubber plugs in the original holes to hold the license plate away from the paint.
![[IMAGE]](http://www.darrylsgarage.com/356/356bump5.jpg)
![[IMAGE]](http://www.darrylsgarage.com/356/356bump6.jpg)
![[IMAGE]](http://www.darrylsgarage.com/356/356bump7.jpg)
![[IMAGE]](http://www.darrylsgarage.com/356/356bump8.jpg)
![[IMAGE]](http://www.darrylsgarage.com/356/356bump9.jpg)
Entry: 7/3/14 - Installing the deco strip on the front bumper ran into a little snag because the ends had about 1/8" of space between them and the bumper once the retaining bolts were completely tightened. Figuring out a way to curl the last few inches of the aluminum took some creative tool making. First I fashioned a pushing block from a scrap piece of oak, cutting and filing an indentation to allow the block to push the aluminum but not the rubber strip. Then using the biggest 'C'-clamp I have, I put a piece of leather between the clamp face and the back of the bumper to protect the paint and pressed the oak block from the front. That alone didn't curl the end of the aluminum strip far enough so the next step was to fashion a "fulcrum" from a plastic BONDO spreader to bend the aluminum against. A few compressions with the 'C'-clamp and moving the "fulcrum" a couple times got the aluminum to conform to the curve of the bumper consistently on both ends and it was perfect. Installing the beading at the bases of the bumper guards went without any issues and before long I had a completely assembled front bumper, ready for the more challenging task, modifying the bumper brackets to compensate for the hidden collision damage on the inner nose structrure such that the straightened nose shell aligned perfectly with where the bumper brackets come through the holes I repaired since the last bodyman had simply elongated them to compensate for the flaws in the bracket's geometry.
![[IMAGE]](http://www.darrylsgarage.com/356/356bump17.jpg)
![[IMAGE]](http://www.darrylsgarage.com/356/356bump10.jpg)
Entry: 7/5/14 - Careful measurements when I was repairing the front bumper bracket holes determined the left side bracket was 18 mm lower than the hole and the right one was 10 mm lower. Fixing this correctly would require cutting the nose off the car and pulling out the inner nose structure on a frame bench, silly for a "driver" quality car that tracks perfectly. Fixing the problem such that nobody would be the wiser for a fraction of the effort involved simply modifying the bumper brackets. In a couple hours, I was able to mock-up and confirm the exact changes required to each bracket using a plywood template and then make the cuts and welds to accomplish the necessary modifications. I put the cuts and welds in a location that isn't easily visible and from the outside of the car everything looks perfect. Once welded and painted gloss black, the modified bumper brackets quickly bolted into place and the front bumper fastened to them. With the bumper mounted, I installed a couple other items, like the windshield wipers and called the post paint assembly phase complete. Now I'm waiting for the engine heads to come back from the machine shop with the modifications completed for the twin plugs. It seems there's been some kind of snafu with the machinist and he's gone off the reservation, nothing unusual for the shadowy vintage Porsche restoration community, it seems like all the best talent is getting old and suffer from failing health.
![[IMAGE]](http://www.darrylsgarage.com/356/356bump11.jpg)
![[IMAGE]](http://www.darrylsgarage.com/356/356bump12.jpg)
![[IMAGE]](http://www.darrylsgarage.com/356/356bump13.jpg)
![[IMAGE]](http://www.darrylsgarage.com/356/356bump14.jpg)
![[IMAGE]](http://www.darrylsgarage.com/356/356bump15.jpg)
![[IMAGE]](http://www.darrylsgarage.com/356/356bump16.jpg)
Entry: 7/12/14 - just like when I was a kid, the decals were the last thing you put on the completed model kit! The holes for the gold emblems on the back of the car were filled in so I had to "prospect" for them using a template I had made from a car going to paint way back in 2008 when I was working at Wolfsburg Motorwerks as an apprentice. I had used my dirty hands to telegraph the hole locations on a piece of computer printer paper at the shop. I had also scrounged a very old NOS set of emblems from the Wolfsburg Motorwerks inventory which was one of the benefits of working for the shop. Prospecting I had done for holes earlier in the bodywork phase told me to start with the left-most hole and measure carefully. What do you know, I found it and then all 4 of them, exactly where they had been originally and the filler wasn't all that thick anymore since the guys at MAACO had given the car the once over so I'm able to secure them with the original style speed nuts. The car looks very finished but still no engine and bad news, there won't be for some months into the future. A huge opportunity has presented itself to my buddy Jack Morris and he has decided to shut-down Wolfsburg Motorwerks here in Seattle and move his operations to Salt Lake City. I'll have to wait until Jack's shop is set-up down there before continuing this project so for now it's back in the showroom for the 356C and I'll turn my attention to some other projects in the meantime.
![[IMAGE]](http://www.darrylsgarage.com/356/356assy18.jpg)
![[IMAGE]](http://www.darrylsgarage.com/356/356assy19.jpg)
![[IMAGE]](http://www.darrylsgarage.com/356/356assy20.jpg)
Entry: 4/18/17 - After yet another 3 year break in the 356C project, the 356C's twin-plug ignition engine project is finally coming off the back burner. I should begin with explaining a lot has happened in that time, my buddy Jack Morris has moved his family and business from Seattle to Murray, Utah and he's shed the Volkswagen millstone and focused almost exclusively on building vintage Porsche engines, including those rare four-cam racing engines in a partnership called Morris Brothers Motorsports with his brother Chad. I married my "girlfriend" Thu (Jack was my Best Man) and now have a big family with 4 kids and 4 grandkids so my life is very busy and filled with world travel, grand babies and love. This year started with Jack calling me and telling me there was finally room in his schedule and to box up the 356C "normal" case that was having an oil leak problem and ship it to him. Once Jack got it, he sent the case out to Ollie's machine shop in Lake Havasu City, Arizona to have it inspected and machined. What turned out to be the cause of the oil leak problem was the center bearing saddle was out of round and allowed the crankshaft to vibrate just enough that the seal leaked at the flywheel. Fixing it required milling 1/100" off of each side of the case and then line boring it back to standard bore (thus cheaper and more readily available standard size bearings). This makes the assembled engine a little bit narrower so the 3rd piece was modified so it aligns correctly and 1/100" barrel shims added to the cylinder bases so the stroke is back to the desired throw. The first week of April, I packed up all the new parts; 1720 cc big-bore DURABAR cylinders and J&E pistons from Shasta, Scat lite-weight crank, Carrillo rods, Precision Matters full flow oil pump/filter and all the other original parts from the engine and drove them down to Salt Lake City in my new Mercedes E-350. When Jack gets the engine assembled, he'll ship the long block back to me for final assembly and installation of new Weber carbs before installing it in the car. My wife Thu is as excited about finally getting the 356 running as I am since we just met when I got it back from the paint shop!
![[IMAGE]](http://www.darrylsgarage.com/356/356MBM7.jpg)
![[IMAGE]](http://www.darrylsgarage.com/356/356MBM1.jpg)
![[IMAGE]](http://www.darrylsgarage.com/356/356MBM2.jpg)
![[IMAGE]](http://www.darrylsgarage.com/356/356MBM3.jpg)
![[IMAGE]](http://www.darrylsgarage.com/356/356MBM6.jpg)
![[IMAGE]](http://www.darrylsgarage.com/356/356MBM4.jpg)
![[IMAGE]](http://www.darrylsgarage.com/356/356MBM5.jpg)
Entry: 1/22/18 - I got a text from Jack with photos showing the progress he's making on my motor, the Carillo titanium rods protruding from the case and the relief channel being milled out of the oil pump chamber in the 3rd piece of the case for the Precision Matters full-flow oil filter. In addition to being a master Porsche mechanic, Jack is a card-carrying machinist and has assembled a complete machine shop at his disposal to do almost anything required to bring these old engines back to like-new condition. I've got to say it's been difficult here in Seattle for me since he moved, besides not having my best friend who was there for me during my darkest times before, during and after I lost my first wife to cancer. The void has also forced me to suck-it-up and dig into mechanical issues on my own that I would have cried "Help me Mr. Wizard" and relied on Jack to bail me out to avoid challenging myself on and as a result, I'm a better mechanic because of it. If I learned anything from Jack, it's how easy he makes it look, knowing how much I don't know and which jobs are truly above my pay grade, then making the investment in having a professional do it for me. Knowing this engine was assembled by a master is the cheapest insurance I could get to having one hell of an awesome, reliable and long lifespan engine in the most valuable car in my collection, my 356C.
![[IMAGE]](http://www.darrylsgarage.com/356/356eng8.jpg)
![[IMAGE]](http://www.darrylsgarage.com/356/356eng9.jpg)
Entry: 2/2/18 - I got a text from Jack with photos that JB had put the finishing touches on my twin plug engine and it was ready for me to come to Salt Lake City to pick up at my convenience. I can't believe how big JB has grown, he's wearing one of Jack's old Wolfsburg Motorwerks uniform shirts and his shoulders almost fill it out! I'm super stoked to finish up the engine on my Intermeccanica Speedster and break it in and then start on assembling this motor, a busy summer lies ahead!
![[IMAGE]](http://www.darrylsgarage.com/356/356MBM8.jpg)
![[IMAGE]](http://www.darrylsgarage.com/356/356MBM9.jpg)
Entry: 5/31/18 - Another late spring roadtrip to Morris Brothers Motorsports in Salt Lake City in the Mercedes E-350 to pick up the completed long block twin plug motor from Jack. JB had a few details to wrap-up, like installing and torquing the clutch pressure plate to the correct spec. Then we strapped it into the back of the Benz to keep it secure for the long trip home. I drove out alone in one day but picked up Thu at the airport on Saturday night so we could spend some time with Jack and the family before making it a two-day trip back home. Everything made it home with no problem and I started the summer of 2018 with three projects going, breaking-in the new Speedster motor, swapping the Solex carbs for Webers on the 914 and assembling this motor with the hopes of having it on the road before cold weather hits.
![[IMAGE]](http://www.darrylsgarage.com/356/356MBM10.jpg)
![[IMAGE]](http://www.darrylsgarage.com/356/356MBM11.jpg)
![[IMAGE]](http://www.darrylsgarage.com/356/356MBM12.jpg)
![[IMAGE]](http://www.darrylsgarage.com/356/356MBM13.jpg)
Entry: 6/22/18 - Over the last couple weeks I've ordered a set of Spanish Weber 40 IDF carbs from Redline with a kit designed to adapt to the stock Solex carburetor manifolds so I can use the later 356SC / 912 engine cooling tin components. I also wanted to use the Knecht-style air cleaners made by Flat-4 of Tokyo that hide a set of K&N foam air filters. I acquired all the stock 356C oil breather hose components and modified the top of the right side air cleaner to work just like a stock one, securing the breather elbow with an M6 rivet nut and standard cheesehead engine tin screw. After hunting down all the missing cooling tin pieces on eBay, I've sent all the rest of the parts off to the powder coater for a semi-gloss finish. I also ordered a new 4-hole pulley and bolt from Sierra Madre Collection since the old ones got misplaced somewhere over the last 4 years, I'm sure it will turn up eventually.
![[IMAGE]](http://www.darrylsgarage.com/356/356weber1.jpg)
![[IMAGE]](http://www.darrylsgarage.com/356/356weber2.jpg)
Entry: 7/11/18 - All the powder coated parts are back and installed and the custom pieces that cover the carburetor pre-heat horns have been fabricated so that the lower spark plug wires use that opening as an access hole to feed the spark plug wires and their bakelite connectors through to the bottom side. I'm still waiting on all the parts to make my own lower spark plug wires but have found the important matching bulk German 7mm copper core, silicone spark plug wire, as well as the correct size 27mm and 24mm NORMA hose clamps for the crankcase breather hose from a Mercedes restoration shop called Authentic Classics. I have the spark plug wire routing figured out but need to make longer wires to reach the lower sets of spark plugs.
![[IMAGE]](http://www.darrylsgarage.com/356/356oildel1.jpg)
Entry: 7/12/18 - I now have a dual sensor, wide band air/fuel meter in my bag of tricks that I used with great success on the Vintage Parts of Taiwan stainless steel muffler I chose for the 1776cc motor I put in the 1979 Intermeccanica Speedster. The Vintage Parts muffler came with the double oxygen sensor bungs installed, so I modified the Porsche sport muffler for this engine to have an oxygen sensor bung welded into the center of each end in a similar fashion. I also prepped and painted the muffler with high temperature gray exhaust paint so it looks nice, knowing that it will all be burned off within and few miles and won't matter but at least it looks good on the fresh engine build photos! Tuning the dual carburetors with an oxygen sensor dedicated to each one makes jetting, accelerator pump metering and syncing problems easy to pin-point and resolve.
![[IMAGE]](http://www.darrylsgarage.com/356/356afmeter.jpg)
![[IMAGE]](http://www.darrylsgarage.com/356/356bung1.jpg)
Entry: 7/18/18 - With a Precision Matters full-flow oil filter installed over the oil pump, filtering 100% of the oil that goes on to lubricate the engine, the idea of keeping the sadly inadequate stock bypass oil filter seems silly. Not to mention the addition of a second coil on the fan shroud makes it even more cluttered and presenting the pair more prominently makes it visible with the engine lid up, instantly conveying that this engine is different, almost begging to question, "is that twin ignition?" by people passing by it at car shows and such. My decision is to move the twin coils higher on the fan shroud and install a solid loop of tubing to preserve the oil flow required to get accurate readings from the oil temperature sender and do it in a minimalist and sanitary "bolt-on" restomod fashion. I used a length of 6mm copper-plated steel fuel line intended for the Wolfsburg West Okrasa kit that already has the 10mm banjo fitting soldered in place. The stock Porsche oil line ferrule and compression (union) nut fit perfectly and it mates without any stress on the fitting in the case and with the oil distribution block leaving plenty of clearance for the dual distributor. The large stock oil pressure sending unit will interfere with the dual distributor, especially should I decide to use the double terminal one that runs an oil pressure gauge I'm thinking of substituting the clock in the dashboard for, so a solution will need to be found but it should be a pretty easy retrofit. Having a stripped down 356 engine as a fixture to do this kind of fabrication on is really handy since any dirt or metal shavings are far from the new engine.
![[IMAGE]](http://www.darrylsgarage.com/356/356oildel3.jpg)
Entry: 7/20/18 - I chose to use a fancy spark plug wire set offered by Stoddard's that had longer straight brown connector (SKU NLA-109-954-00) as my normal primary spark plug wires and then a second set which I cannibalized for all the parts except with shorter bakelite connectors which I took off a set of Beru brand wires for the much longer lower secondary spark plug wires. Breaking down one of the Stoddard wires and comparing it to the 20' length of 7 mm copper core silicone bulk wire I got from the Mercedes restoration parts vendor showed that I had indeed found an exact match. To minimize waste, I started making wires on the end of the bulk wire starting from the distributor cap end and fed the length through the engine and cut them to fit within about an inch. What I love about the Stoddard set is that it has the cylinder number identification on the end that connects to the distributor cap, #4 wire in the usual position of #1 cylinder because the rotor is gear driven, thus runs in the opposite direction of the single rotor stock distributor. Now is a good time to experiment with tools to get at those smaller size lower spark plugs because they're pretty buried up in there!
![[IMAGE]](http://www.darrylsgarage.com/356/356wire5.jpg)
![[IMAGE]](http://www.darrylsgarage.com/356/356wire6.jpg)
![[IMAGE]](http://www.darrylsgarage.com/356/356wire3.jpg)
![[IMAGE]](http://www.darrylsgarage.com/356/356wire4.jpg)
Entry: 7/24/18 - I've finally reached the "ready to install" milestone on my new twin plug engine. Since I have to remove the new Weber 40 IDF carburetors to install the engine, I've ordered F-7 emulsion tubes (the carbs come with F-11) and a reasonable range of main gas jets (1.25 to 1.40) and air correction jets (1.80 in addition to the 2.00 that comes in the carb), for this project and my 914, before tearing down the carbs for a thorough cleaning, float level setting and installation of my best guess jets for the initial start-up and break-in run. If you look closely in the second photo below, you'll see the oxygen sensor wires running up the outside of the engine compartment of my 1979 Intermeccanica Speedster parked under my 914 on the 4-post lift. The dual sensor, wide-band air/fuel meter I use to tune the carbs under actual load conditions sits on the passenger seat and runs off a cigarette lighter adapter I have wired into the starter switch on the Speedster. Since the 356C is going to remain a 6-volt car, I'll have to carry a spare 12-volt gel cell battery in the place of the spare tire up front and run a wire into the cockpit to run the air/fuel meter temporarily. It's now midsummer and I'm super busy getting other projects done too, like also converting my 1974 914 from Solex 34-PDSIT to Weber 40 IDF carbs as well, fixing a drip coming from my 1974 911's dry sump oil tank and wrapping up the break-in of that new 1776 cc "double take" motor I just completed for the 1979 Intermeccanica Speedster. This is also the time of year I drain and refresh all the gas tanks of the cars in my collection so the ethanol-free fuel doesn't grow stale without the use of fuel stabilizer like Stabil, a technique that keeps them starting easily and running great without any stabilizer residue building up in the carburetor bowls. The year-old ethanol-free gasoline is transferred into the gas tanks of my daily driver cars in small amounts so it gets consumed quickly.
![[IMAGE]](http://www.darrylsgarage.com/356/356eng6.jpg)
![[IMAGE]](http://www.darrylsgarage.com/356/356eng7.jpg)
Entry: 7/30/18 - The two sets of F-7 emulsion tubes (the carbs come with F-11) and a reasonable range of main gas jets (1.25 to 1.40) and air correction jets (1.80 in addition to the 2.00 that comes in the carb), for this project and my 914 arrived from CB Performance today. Emulsion tubes are expensive since 4 are required per car, jets are not so bad but it still added up to almost $200 for two cars assuming that they're both different!
![[IMAGE]](http://www.darrylsgarage.com/356/356weber5.jpg)
Entry: 8/2/18 - I figured that now while the engine is on the stand and not in the car was the time to figure out which tools I'll need to use to get at those lower NGK DR6HS 18 mm marine spark plugs buried up under the cylinder heads between the push rod tubes and accessed by removing a panel added to the heater flapper boxes. I've also run into a little snag with the two little M6 bolts (the cheesehead engine tin screws won't work because the exhaust pipe is in the way) that hold those little panels, 8 mm long ones hit the exhaust pipes and those are the smallest ones I can find locally, 6 mm long ones are available online but I'll probably just end up cutting some down to as small as I can make them and then drilling them for safety wire so they don't back out. The lower spark plug's bakelite connectors are impossible to access without a proper set of specialized pliers and even then it's a challenge. The lower spark plug itself is quite small and a normal spark plug socket doesn't fit so a little research and I found this awesome Hazet (880 Mgt-18) that is compact, has a magnetic insert to stay on the plug once located and allows enough room to get a "wobble" 3/8" to 1/4" converter on it before sliding it up onto the spark plug. I then use another "wobble" 1/4" extension and a small 1/4" drive ratchet to snake up past the exhaust pipes and tighten or loosen the spark plug. I have tightened the lower spark plugs so they're good to go and will remove the easy-to-get-to stock spark plugs on the top side when the time comes to spin the engine over to establish oil pressure before the break-in run. I took a lot of detailed photos of which tools I used to refresh my memory when the dark day comes that I have to change those lower spark plugs!
![[IMAGE]](http://www.darrylsgarage.com/356/356sptool1.jpg)
![[IMAGE]](http://www.darrylsgarage.com/356/356sptool2.jpg)
![[IMAGE]](http://www.darrylsgarage.com/356/356toolsreq.jpg)
![[IMAGE]](http://www.darrylsgarage.com/356/356tooluse1.jpg)
![[IMAGE]](http://www.darrylsgarage.com/356/356tooluse2.jpg)
Entry: 8/4/18 - Today I finally came up with a solution to attaching the lower spark plug access panels to the sides of the heater flapper boxes since discovering that the exhaust pipes interfere with accessing standard cheesehead engine tin screws and M6 x 6 mm hex head bolts. My design goals were primarily to come up with a secure method so I wouldn't lose the access panels if the machine screw or bolt would happen to back out. Also because of how close it is to the exhaust pipe, any solution using red or blue thread loc would not work. Since the person who modified the flapper boxes had welded actual M6 nuts to the inside of the sheet metal, I was able to thread M6 x 15 mm socket head machine screws out through the hole from the inside and then use two thinner M6 lock nuts to "double nut" the access panel from the outside while holding the socket head machine screw tight from the inside using a 5 mm allen wrench. My skinny 10 mm "tune-up" wrench allows me to tighten each lock nut individually and they will not come loose once the outer one is torqued against the inner one. It looks like everything is ready to go on the underside of the engine now and I will have to remove the lower wires and rear engine tin when I install the engine since the lower spark plug wires must run through the carburetor pre-heat pipe holes in it, but for now it's one more thing checked-off the list. Next thing is figuring out how to get a dual wire oil pressure sensor to clear the dual distributor, but that's something that can be done with the engine in the car!
![[IMAGE]](http://www.darrylsgarage.com/356/356lowplt1.jpg)
![[IMAGE]](http://www.darrylsgarage.com/356/356lowplt2.jpg)
![[IMAGE]](http://www.darrylsgarage.com/356/356lowplt3.jpg)
![[IMAGE]](http://www.darrylsgarage.com/356/356lowplt4.jpg)
![[IMAGE]](http://www.darrylsgarage.com/356/356lowplt5.jpg)
![[IMAGE]](http://www.darrylsgarage.com/356/356lowplt6.jpg)
![[IMAGE]](http://www.darrylsgarage.com/356/356lowplt7.jpg)
Entry: 8/28/18 - After a long search and an even longer wait for a JEGS.com backorder to be filled, I'm holding the elusive 2-1/8" to 2-3/8" adapter ring for VDO insturments! Hot rod 356 Outlaws don't need to know what time it is, they need to know the oil pressure so that big old clock hole in the center of the dash is now filled with a proper VDO 356-style 6-volt oil pressure gauge using a legit piece of German hardware to do it, like it's supposed to be done. Now I just need to decide how I'm going to accommodate the dual terminal oil pressure sender in that crowded area between the fan shroud and dual distributor. I have all the pieces to build my own but still find myself searching for a proven "off-the-shelf" solution that reduces the number of possible leak points by using a single solid piece of steel instead of a hose and the problematic issues one introduces.
![[IMAGE]](http://www.darrylsgarage.com/356/356oilgauge1.jpg)
![[IMAGE]](http://www.darrylsgarage.com/356/356oilgauge2.jpg)
![[IMAGE]](http://www.darrylsgarage.com/356/356oilgauge3.jpg)
Entry: 4/23/19 - After a long search and a lot of pondering, I finally came up with a solution to mounting my oil pressure sending unit with two posts; one for the 0-70 PSI gauge that I'm installing in place of the clock on the dashboard and the second for the oil pressure warning light. This wouldn't be a problem except the twin-spark plug distributor interferes with installing even the smaller stock size oil pressure sending unit in the stock location. Last summer I fabricated a piece of copper plated steel tubing with a banjo fitting to allow some limited circulation of oil from the oil distribution block and back into the engine case which is required to get an accurate reading from the oil temperaure sending unit in such a way there were minimal leakage points and zero vibration. The last remaining task was achieving the same results with how I relocated the oil pressure sending unit. Luckily VDO actually produced a solution in a kit form (part number 150-758, now discontinued so very hard to find) with a length of proper high pressure oil tubing, correct fittings and a bracket to secure the sending unit to the fan shroud using the captive nut from the original coil mounting location. I ordered all new copper sealing washers from Stoddard and proceeded with the final installation of the oil distribution block. I chose to route the oil line to the oil sending unit between the twin coils and made sure to cover the sharp ends to the machine screws used to clamp the coils with cut-down vacuum line plugs so they wouldn't rub on the oil line. The length of oil line was perfect, a minimal loop back down over the coils to secure the oil pressure sending unit's clamp the the fan shroud with a M6 bolt using the stock coil mounting captive nut. The schematic shows how the "G" and "WK" terminals are wired to the oil pressure gauge and warning light and the stock oil pressure warning light wire will reach the new sending unit's location without modification. Now all that's left is running a wire to the new gauge in the clock hole in the dashboard. I have a couple tasks to complete on installing the twin-spark plug distributor and then it's time to install the engine in the car!
![[IMAGE]](http://www.darrylsgarage.com/356/356oilblock1.jpg)
![[IMAGE]](http://www.darrylsgarage.com/356/oilwasher.jpg)
![[IMAGE]](http://www.darrylsgarage.com/356/356oilblock2.jpg)
![[IMAGE]](http://www.darrylsgarage.com/356/356oilblock3.jpg)
![[IMAGE]](http://www.darrylsgarage.com/356/356oilblock4.jpg)
![[IMAGE]](http://www.darrylsgarage.com/356/356oilblock5.jpg)
Entry: 4/24/19 - The last step before installing the engine in the car is making sure the dual-spark plug distributor is as close to perfectly adjusted as possible while it's still easy to do at the workbench. I noticed that one of the condensors had a big dent in it like the unit had been dropped so I ordered a matching pair of standard cast distributor 356/912 condensors from Zims (part number 616.602.907.02.A) and shortened the wires and changed the connectors such that they fit exactly like the ones that came on the distributor from Precision Matters. Next making sure that both ignition point's gap was adjusted to .016" (.406 mm) exactly and that they opened and closed at precisely the same time as I rotated the distributor drive. This task proved to be rather challenging given the distributor lacks the eccentric style positioning screw original Bosch distributors have so they tend to move as they are tightened. Also assuring the points make complete contact with parallel surfaces made the task of uniform gaps a bit of a challenge. Eventually, thanks to a magnifying glass, a bright flashlight and lots of patience, I did get the points to do exactly what they are supposed to do in unison and to my complete satisfaction. Since the distributor is gear driven, the rotors spin counterclockwise so I made sure to put a small dab of Bosch distributor grease on the correct side of the phenolic blocks and wipe off any excess. I installed the distributor in the engine block and clocked the timing to exactly #1 TDC for the time being, notice the #3 spark plug wire is positioned where #1 would usually be on the distributor cap, this is due to the counterclockwise orientation. Once the dual-spark plug distributor was installed it's obvious why so much attention was paid to the oil distribution block and oil pressure sender as the condensor almost touches the oil line running out the top. While it was still easy to do, I pulled the crank pulley off and determined exactly where bottom dead center was located, scored a line with my Dremmel tool and painted it red, that will save some time when doing valve adjustments in the future. The diameter of the crank pulley is 145 mm, making the circumference 455.5 mm, so 7 degrees advanced will be a hair under 9 mm (8.9 mm to be precise) on the pulley and I'll static time it to that point prior to the break-in run of the motor. I have much to learn about how to offset the timing of both the distributors to take full advantage of the complete combustion two spark plugs will give me but given my dual sensor air/fuel meter set-up, I should have no problem dialing it in. Just as a note to myself, 25 degrees "all in" advance would be almost 32 mm (31.6 mm to be precise) right of TDC on the pulley, this seems to be the "recipe" for dual spark plug ignitions from what I have read on the 356 Registry bulletinboard.
![[IMAGE]](http://www.darrylsgarage.com/356/356dist1.jpg)
![[IMAGE]](http://www.darrylsgarage.com/356/356dist2.jpg)
![[IMAGE]](http://www.darrylsgarage.com/356/356dist3.jpg)
![[IMAGE]](http://www.darrylsgarage.com/356/356dist4.jpg)
![[IMAGE]](http://www.darrylsgarage.com/356/356dist5.jpg)
Entry: 4/25/19 - The day is finally here, stab that motor back in the car day! Using the floor jack and 4-post lift make this a pretty easy task, I just need to get the generator pulley over the engine compartment lip before attempting to push the heater box "horns" over the rear axles. One of the beautiful things about using the 4-post lift is that the engine goes in level, simply be patient enough to get the input shaft of the transmission lined-up with the ring on the clutch diaphram and then guide the studs on the bottom of the engine case into the holes on the bottom of the transmission bell housing, everything flat and vertical. When the car is on jack stands, there's a lot more tipping and last minute jacking involved, flat on the level, it's just a little up with the jack, a little down with the lift, check, repeat, slowly rotate the crank pulley bolt clockwise and STAB!!! Once I got all 4 of the bolts holding the engine in place tightened down, I just laid the Webers on the manifolds and some other "staging" for a nice photo since the first job will be installing the rear engine tin and routing those lower spark plug wires back to a connected and heater boxes back in place state and I'm going to be needing at least a nap before attempting that! It's starting to look like a fun summer lies ahead!
![[IMAGE]](http://www.darrylsgarage.com/356/356stab1.jpg)
![[IMAGE]](http://www.darrylsgarage.com/356/356stab2.jpg)
![[IMAGE]](http://www.darrylsgarage.com/356/356stab3.jpg)
![[IMAGE]](http://www.darrylsgarage.com/356/356stab4.jpg)
Entry: 7/16/19 - Today's project was installing the Pierburg electric fuel pump which is a high-pressure 12-volt version that delivers the desired 3-5 PSI when running on 6-volts. The installation was very easy, there's an existing hole in the front crossmembers behind the battery box and the bracket that is included with the fuel pump fit perfectly using an M6 bolt and nyloc nut. Wiring the pump was also very easy, no hole drilling required, just running it up through the steering box access panel in the trunk floor and grounding it to a fuel tank hold-down bolt and running the positive lead to the fuse block.
![[IMAGE]](http://www.darrylsgarage.com/356/356electric.jpg)
Entry: 8/10/19 - Today's task was running a wire (light green) from the engine compartment to the dash board clock hole for the oil pressure gauge. I chose to add extra protection to the wire by covering it with heat shrink tubing and then running it into the cabin via the hole where the mechanical tach cable used to run. Inside the cabin I simply tucked it under the rubber mat running outside the tunnel. I also piggy-backed the power feed (blue) from a key-on power feed to the combination gauge with a connector added for the new electric tachometer. A ground was required for gauge illumination (brown) and the original clock illumination power feed (gray) was retained. All the wires were connected to the dual connector oil pressure switch and a 911 RS/RSR spark plug wire holder was installed in the unused (usually plugged) M6 captive nut on the fan shroud. A test shows the gauge needle moves and the oil pressure warning light is illuminated when the ingnition switch is powered on and illumination inside the gauge is working when the headlight switch is pulled. Many of the warning and illumination lights were not working in the combination gauge and tachometer and it took a lot of time to fix all those issues but we're making progress.
![[IMAGE]](http://www.darrylsgarage.com/356/356oilgauge4.jpg)
![[IMAGE]](http://www.darrylsgarage.com/356/356oilgauge5.jpg)
![[IMAGE]](http://www.darrylsgarage.com/356/356oilgauge6.jpg)
Entry: 8/29/19 - So I'm now 60 years old, 6'4" tall and 240 pounds so it took a while but I finally admitted that I my days of snaking myself under a dashboard were over. I broke out my trusty milk crates and an old door and made myself a table to lay upon as I slid my head up under the steering wheel and got one arm up behind the instruments to tighten the thumbscrews holding the gauges in place. Replacing the mechanical 6000 rpm max and 5000 red line tachometer with an electric one that goes up to 7000 rpm and red lines at 6000 was really quite simple since the wiring harness already had a lead that sat curled up just below the voltage regulator in the engine compartment and an open spot on a multiple wire connector under the dash. All it took was a short lead of black 14-gauge wire and a couple soldered on pin style connectors and a male to male adapter with a couple standard female spade connectors on the other ends to connect to the coil and tachometer. It took a few weeks of puzzling but after adding some redundant ground leads to the instruments, all the lights magically worked as they are supposed to. God knows where the grounds are bad on the dash and any grounds I see, I will take the effort to clean them in the future. As it sits now, everything works and that's all that really matters. Now all I need is a running engine to see if the tachometer, which I tested on my 6-volt VW Beetle, and the 6-volt oil pressure gauge actually work and more importantly, doesn't leak!
![[IMAGE]](http://www.darrylsgarage.com/356/356dash9.jpg)
![[IMAGE]](http://www.darrylsgarage.com/356/356dash10.jpg)
![[IMAGE]](http://www.darrylsgarage.com/356/356dash11.jpg)
Entry: 9/7/19 - Static timing the twin distributors was the next item on my "to do" list of tasks remaining before firing up this new engine. I wasn't sure exactly how getting both counter-clockwise rotating distributors to fire at the same time was accomplished so I called my "Mr. Wizard" Jack Morris and he clued me in to how the distributors actually come apart by loosening the set screw that is used to fine tune the settings (the +/- 15 degree scale on the base of each distributor), pulling out each distributor and then realigning the teeth of the big gear under the rotor with the small gear in the base that is connected to the distributor drive and gear on the crankshaft. I had cut a piece of blue masking tape exactly 9 mm wide to approximate where 7 degrees BTDC would be on the right side of the "OT" (German "Ober Tote" translated to "Over Dead" what we call "Top Dead Center" or TDC in English) mark on the crank and then lining that up with the mark on the engine case. A little trial-and-error with base adjusting nut to rotate the entire unit and lining up the gears of each individual distributor and I eventually had both distributors at the desired point with the fine adjustment mark exactly at the center of the +/- 15 degree scale. Once the engine is running, I will use my timing light to get the exact timing point set at idle and insure both spark plugs in each cylinder are firing simultaneously. For now I know we're close enough for the first start and 20-minute break-in run at 2500-3000 RPM to bed the cam and begin seating those piston rings.
![[IMAGE]](http://www.darrylsgarage.com/356/356timing1.jpg)
![[IMAGE]](http://www.darrylsgarage.com/356/356timing2.jpg)
Entry: 9/8/19 - It's finally time to add the break-in oil, I use the oil SCAT recommended for the crate engine I bought from them for my Speedster, Brad Penn (now called PennGrade) 30 weight oil specifically formulated for engine break-in. Since I'll be working on setting-up the carburetors next and since I never actually bolted them in, taking them off the engine was simple and it gave me easy access to removing the spark plugs. One thing that concerns me is that the gap on #3 spark plug was pushed shut and I know it didn't go in that way... so I re-gapped it to .025" and we'll see what happens when I put it back in. I put in almost 3 quarts of oil until I could see it at the top mark of the dipstick and then the moment of truth, cranking over the engine and waiting for the oil pressure indicator on the combination gauge in the dash to go out. It seemed to take a long time but then there's an empty full-flow oil filter on the oil pump now so I let the starter cool off, topped off the oil to the top mark of the dipstick again and returned to cranking the engine while holding in the clutch pedal. Finally, the oil pressure indicator went out and I let out a little "Thank you Baby Jesus" before topping off the oil to the top dipstick mark one more time to a point just shy of 4 quarts total. Close inspection showed no leaks or drips anywhere, especially in my creative little reengineering project around the oil distribution block, everything is sealed tight but I'll retighten all the fittings once the engine is hot. So my to-do list is getting short and focused on fuel line, throttle linkage and carburetor set-up which I find extremely exciting, two more weeks before summer is officially over and my goal of driving this car this summer is in sight!
![[IMAGE]](http://www.darrylsgarage.com/356/356brk-in-oil.jpg)
![[IMAGE]](http://www.darrylsgarage.com/356/356todolist.jpg)
Entry: 9/13/19 - The stock steel fuel line that runs from next to the clutch, around the left intake manifold to the mechanical fuel pump was no longer correct for my application. I bought a 20" and 30" length of 5/16" steel (copper lined) brake line from NAPA and fabricated new lines that ran from next to the clutch up to the left carburetor and then a second one that ran between the two carburetors, behind the fan shroud such that it didn't come into contact with anything, especially the carburetor linkage. My logic was to keep each individual run of 6 mm inner diameter German cloth braided rubber fuel hose to 3" lengths so that simply cutting it to remove the carburetors was incentive to replace it cheaply and easily. Later I also added my signature in-line VDO 1-15 psi fuel pressure gauge to make troubleshooting and monitoring the proper 3 psi pressure easier and plus it looks cool! I also added 1 3/4" velocity stacks to the carburetors for any additional performance gains I can get in addition to the fact they make using the synchrometer so much easier.
![[IMAGE]](http://www.darrylsgarage.com/356/356hardline1.jpg)
![[IMAGE]](http://www.darrylsgarage.com/356/356hardline2.jpg)
![[IMAGE]](http://www.darrylsgarage.com/356/356hardline3.jpg)
![[IMAGE]](http://www.darrylsgarage.com/356/356pgauge.jpg)
Entry: 9/19/19 - The throttle linkage from the pedal rod to the back of the fan shroud was in need of some rebuilding so after replacing the ripped boot and connecting block and adjusting the rod from the transmission bellcrank, it's all good-to-go. I also replaced the 6 mm German cloth braided rubber fuel hose from the bulkhead to the back of the engine with new and used wire ties to secure the sending unit wire to the oil pressure gauge so it's well out of the way of any moving parts and secure. If the engine needs to be removed, the sending unit wire will need to be cut and a connector added but this is a future, perhaps never necessary task if all goes well. Connecting the lower spark plug wires to their respective spark plugs and securing the wire to the valve cover bales was the last task completed before declaring the underside of the car is ready for the break-in run, installing the heater box side panels can come later after readjusting the valves after the initial run.
![[IMAGE]](http://www.darrylsgarage.com/356/356trod1.jpg)
![[IMAGE]](http://www.darrylsgarage.com/356/356trod2.jpg)
![[IMAGE]](http://www.darrylsgarage.com/356/356botrdy.jpg)
Entry: 9/26/19 - The final stretch before starting the motor for the first time began with setting up the Weber IDF 40 carburetor float levels and initial jetting. Setting the float level is relatively simple, just bend the little tab on the float arm such that the needle valve engages when the floats are 10 mm from the bowl cover, which is about parallel. In the past I tried to do this with the float attached to the needle valve but have found it easier to just remove the float to get better access to the tab and then reassemble and assess how close it is, repeating as many times as necessary. These Webers are from the Redline 356/912 "conversion kit" using adapter plates instead of complete new manifolds. My initial jetting choice is swapping the F11 for F7 emulsion tubes, the 1.15 for 1.30 mains and keep the.55 idle jets, 2.00 air correction jets and .50 pilot jets that come in the kit. Once this was done it was time to install the velocity stacks and attach the fuel lines permenantly. I also installed the air/fuel testing equipment to the muffler at this time.
![[IMAGE]](http://www.darrylsgarage.com/356/356float.jpg)
![[IMAGE]](http://www.darrylsgarage.com/356/356brk-in1.jpg)
Adding fuel and pressure testing the fuel lines for seepage or leaks and checking the float settings to make sure the bowls didn't overflow was the next step. I had 10 gallons of fresh ethanol-free 92 octane "premium" fuel all ready to go in my gravity fed fuel can and emptied it into the car's gas tank. I decided to directly wire the electric fuel pump into fuse block position #1 since it controls the brake lights. It seemed logical, no fuel pump, no brake lights and vice-versa. It was time to see if my fuel system was tight so I turned the key, heard the bowls of the Webers filling up, then the fuel pump start straining and the reading on the in-line fuel gauge held at a hair above 3 PSI which was perfect. It was just about dinner time so the moment of truth will have to wait until tomorrow.
![[IMAGE]](http://www.darrylsgarage.com/356/356brk-in2.jpg)
![[IMAGE]](http://www.darrylsgarage.com/356/356brk-in3.jpg)
Entry: 9/27/19 - It was now the moment of truth, time to start the engine. I took a short length of light mechanic's wire and looped it under the screw which would have held the carburetor preheat horn on the right side of the engine tin. I made sure that the wire was long enough to loop over the upper throttle linkage arm so that I could secure it at exactly the 2500 RPM position when the time came. Then, I sat in the car and took a deep breath, turned the key to the first position to engage the fuel pump, pumped the throttle pedal a couple times and cranked the engine over. VAROOM!!! It fired up immediately so I ran back to the engine and wired the throttle arm down, playing with it a little before the tachometer was riding exactly on 2500 RPM, then hitting the start button on my digital watch's chronometer. I watched the 20 minutes tick off . I only noticed one bad thing, it seemed the lower spark plugs were not firing, yet the upper ones were functioning perfectly and the engine sounded great so why stop? The camshaft was bedding-in with the lifters and no odd noises or smoke so I let her run for the 20 minutes and once reached, I turned it off and smoked an "afterglow" cigarette. I immediately called Jack to let him know the break-in run was a success and figuring out why the lower spark plugs were not firing and the oil pressure gauge was not working would be tasks for the next day after it cooled overnight.
![[IMAGE]](http://www.darrylsgarage.com/356/356brk-in4.png)
![[IMAGE]](http://www.darrylsgarage.com/356/356brk-in5.png)
![[IMAGE]](http://www.darrylsgarage.com/356/356brk-in6.png)
Entry: 10/29/19 - I've been up to a lot since breaking-in the new twin spark plug engine in September. It ran fantastic for 20 minutes and the cam bedded as desired. It wasn't until later I discovered that the lower spark plugs were actually being touched and the spark plug gaps closed shut by the pistons on cylinder 2 and 3 (right sides of the heads) once the engine got warm. After working through all the stages of grief, I proceeded to drop the engine, pull the heads and then we sent them back to Walt Watson at Competition Engineering to have them reworked. Machine shop mistakes happen sometimes and it's always been one step forward / two steps back on this car even though we checked, re-checked and checked again. Over the course of 3 weeks, with the engine out of the car, I've cleaned and detailed the transaxle and surrounding area. I started with degreasing everwhere using xylene on the body to preserve the asphalt sound deadening pads and carburetor cleaner to strip the paint on metal parts like the axle tubes and shine up the trasaxle. I jacked up the transaxle to allow removal of the 'U' shaped yoke hanging bracket. I took the heater flapper boxes, channel funnels and transaxle yoke outside for sand blasting and them inside for painting with my usual high temperature semi-gloss engine enamel. Painting the components left in place on the car was achieved with the liberal use of aluminum foil for masking, which really makes it easy since it forms around parts and holds itself in place. I used Wurth Hi-Build Underseal on the body undercoating and asphalt sound deadening pads to freshen them up and black high-temperature engine enamel on the transaxle and suspension components. I installed new transaxle mounts on the yoke bracket which required cutting off the studs that protruce inside the bell housing becase interference with the flywheel teeth is a known issue with these reproduction parts. All the M8 hardware was replaced with the correct spec silver cadmium plated 14 mm hex head size used in early 356 cars, sourced from International Mercantile. Detailing the starter and heater cable hardware was the last step and acquiring the proper new 200 mm flywheel and clutch was done before reinstalling the engine when the heads returned from Competition Engineering.
![[IMAGE]](http://www.darrylsgarage.com/356/356bottom1.jpg)
![[IMAGE]](http://www.darrylsgarage.com/356/356bottom2.jpg)
![[IMAGE]](http://www.darrylsgarage.com/356/356bottom3.jpg)
![[IMAGE]](http://www.darrylsgarage.com/356/356bottom4.jpg)
![[IMAGE]](http://www.darrylsgarage.com/356/356bottom5.jpg)
![[IMAGE]](http://www.darrylsgarage.com/356/356bottom6.jpg)
![[IMAGE]](http://www.darrylsgarage.com/356/356bottom7.jpg)
![[IMAGE]](http://www.darrylsgarage.com/356/356bottom8.jpg)
![[IMAGE]](http://www.darrylsgarage.com/356/356bottom9.jpg)
![[IMAGE]](http://www.darrylsgarage.com/356/356bottom10.jpg)
![[IMAGE]](http://www.darrylsgarage.com/356/356bottom11.jpg)
![[IMAGE]](http://www.darrylsgarage.com/356/356bottom12.jpg)
![[IMAGE]](http://www.darrylsgarage.com/356/356bottom13.jpg)
![[IMAGE]](http://www.darrylsgarage.com/356/356bottom14.jpg)
![[IMAGE]](http://www.darrylsgarage.com/356/356bottom15.jpg)
![[IMAGE]](http://www.darrylsgarage.com/356/356bottom16.jpg)
![[IMAGE]](http://www.darrylsgarage.com/356/356bottom17.jpg)
![[IMAGE]](http://www.darrylsgarage.com/356/356bottom18.jpg)
![[IMAGE]](http://www.darrylsgarage.com/356/356bottom19.jpg)
![[IMAGE]](http://www.darrylsgarage.com/356/356bottom20.jpg)
![[IMAGE]](http://www.darrylsgarage.com/356/356bottom21.jpg)
![[IMAGE]](http://www.darrylsgarage.com/356/356bottom22.jpg)
![[IMAGE]](http://www.darrylsgarage.com/356/356bottom23.jpg)
![[IMAGE]](http://www.darrylsgarage.com/356/356bottom24.jpg)
![[IMAGE]](http://www.darrylsgarage.com/356/356bottom25.jpg)
![[IMAGE]](http://www.darrylsgarage.com/356/356bottom26.jpg)
![[IMAGE]](http://www.darrylsgarage.com/356/356bottom28.jpg)
![[IMAGE]](http://www.darrylsgarage.com/356/356bottom27.jpg)
Entry: 11/18/19 - After finishing the back of the car, it is time to turn my attention to the front suspension. Everything was caked with grease soaked dirt so the metal underneath was like brand new. Stripping it with carburetor cleaner revealed the trailing arms are actually VW parts that have an anti-sway bar mount welded to them. Once everything was stripped to bare metal I went ahead and painted the suspension parts with my usual black semi-gloss engine enamel. I also scraped away all the loose asphalt factory undercoating and used 3M seal sealing caulk to do my "faux factory undercoating" repairs by dabbing it on with my fingertip. Once the seam sealer was dry, the black painted suspension parts were masked-off with aluminum foil and the asphalt undercoating freshened up with a coat of Wurth Hi-Build Underseal. Stripping and repainting the brake backing plates and cleaning up the rotors and aluminum hub was the last step before reassembling everything and calling it done. New Koni shocks really look great against all the fresh paint and undercoating.
![[IMAGE]](http://www.darrylsgarage.com/356/356frsusp1.jpg)
![[IMAGE]](http://www.darrylsgarage.com/356/356frsusp2.jpg)
![[IMAGE]](http://www.darrylsgarage.com/356/356frsusp3.jpg)
![[IMAGE]](http://www.darrylsgarage.com/356/356frsusp4.jpg)
![[IMAGE]](http://www.darrylsgarage.com/356/356frsusp5.jpg)
![[IMAGE]](http://www.darrylsgarage.com/356/356frsusp6.jpg)
![[IMAGE]](http://www.darrylsgarage.com/356/356frsusp7.jpg)
![[IMAGE]](http://www.darrylsgarage.com/356/356frsusp8.jpg)
![[IMAGE]](http://www.darrylsgarage.com/356/356frsusp9.jpg)
![[IMAGE]](http://www.darrylsgarage.com/356/356frsusp10.jpg)
![[IMAGE]](http://www.darrylsgarage.com/356/356frsusp11.jpg)
![[IMAGE]](http://www.darrylsgarage.com/356/356frsusp12.jpg)
![[IMAGE]](http://www.darrylsgarage.com/356/356frsusp13.jpg)
![[IMAGE]](http://www.darrylsgarage.com/356/356frsusp14.jpg)
![[IMAGE]](http://www.darrylsgarage.com/356/356frsusp15.jpg)
![[IMAGE]](http://www.darrylsgarage.com/356/356frsusp16.jpg)
![[IMAGE]](http://www.darrylsgarage.com/356/356frsusp17.jpg)
Entry: 12/2/19 - Over 3 days I've cleaned all the rust flakes and dust out of the center tunnel and around the pedals. Once everything was wire brushed and prepped, I sprayed down the entire area with Eastwood Rust Converter to seal the surface rust and then painted the entire area including the area under the gas tank with Wurth Satin Trim Paint. I am really pleased to see there is rock solid with no rot in this area and all the rust was just the typical surface rust areas that were not painted at the factory are prone to.
![[IMAGE]](http://www.darrylsgarage.com/356/356pedals1.jpg)
![[IMAGE]](http://www.darrylsgarage.com/356/356pedals2.jpg)
![[IMAGE]](http://www.darrylsgarage.com/356/356pedals3.jpg)
![[IMAGE]](http://www.darrylsgarage.com/356/356pedals4.jpg)
![[IMAGE]](http://www.darrylsgarage.com/356/356pedals5.jpg)
![[IMAGE]](http://www.darrylsgarage.com/356/356pedals6.jpg)
![[IMAGE]](http://www.darrylsgarage.com/356/356pedals7.jpg)
![[IMAGE]](http://www.darrylsgarage.com/356/356pedals8.jpg)
![[IMAGE]](http://www.darrylsgarage.com/356/356pedals9.jpg)
![[IMAGE]](http://www.darrylsgarage.com/356/356pedals10.jpg)
![[IMAGE]](http://www.darrylsgarage.com/356/356pedals11.jpg)
Entry: 12/18/19 - Restoring the horns took a couple days using the Stoddard's hore rebuilding kit that includes the new repoduction nomenclature plates. The horns were mummified in asphalt undercoating so very well preserved. Cleaning and sand blasting went quickly and repainting with my usual semi-gloss engine enamal cleaned them up like new. Reassembly with the new gaskets, hardware and nomenclature plates went quickly and a quick test to confirm they still beeped was all it took before reinstalling them on the car.
![[IMAGE]](http://www.darrylsgarage.com/356/356horns1.jpg)
![[IMAGE]](http://www.darrylsgarage.com/356/356horns2.jpg)
![[IMAGE]](http://www.darrylsgarage.com/356/356horns3.jpg)
![[IMAGE]](http://www.darrylsgarage.com/356/356horns4.jpg)
![[IMAGE]](http://www.darrylsgarage.com/356/356horns5.jpg)
![[IMAGE]](http://www.darrylsgarage.com/356/356horns6.jpg)
![[IMAGE]](http://www.darrylsgarage.com/356/356horns7.jpg)
![[IMAGE]](http://www.darrylsgarage.com/356/356horns8.jpg)
![[IMAGE]](http://www.darrylsgarage.com/356/356horns9.jpg)
Entry: 2/1/20 - So during the months of waiting for my heads to return, I completely detailed the underside of the car front and rear. Had the muffler ceramic coated as well as a new set of heater boxes / j-tubes. I upgraded the old 180 mm clutch flywheel to a new 200 mm version with a new cluctch disc and pressure plate, all balanced by my local machine shop. Added new Koni shocks and moved the painted steel wheels from my 1966 912 to this car since the tires are about 10 years old but balanced. The 912 got new Stoddard reproduction chrome steel wheels and 165/15 Michelin XZX radials. I also fabricated a radio-delete switch plate using machine-turned aluminum with the blue lit switch for Hella 118 driving lights, yellow lit switch for Hella 128 fog lights, a momentary switch for an electric windshield washer pump and on-to-off switch as an electric fuel pump cut-off switch. I fabricated mounts for the driving lights since I didn't want to drill holes in the front bumper. I also found a cool Heuer 3 stopwatch set that I mounted with 2-sided tape on the glovebox door to cover where a previous owner had glued an exterior PORSCHE emblem and damaged the paint. There's also a new aircraft magnito switch added in place of the cigarette lighter to isolate the coils on the twin ignition system. The crowning piece to the dashboard was a "clock size" 6-volt oil pressure gauge from North Hollywood Speedometer to properly fill the hole for the clock. It should be noted that all my modifications are reversible since no new holes were made anywhere, keeping the option of putting the car back to bone stock and saving all the original pieces with the car.
![[IMAGE]](http://www.darrylsgarage.com/356/356front.jpg)
![[IMAGE]](http://www.darrylsgarage.com/356/356heuer.jpg)
![[IMAGE]](http://www.darrylsgarage.com/356/356switch.jpg)
![[IMAGE]](http://www.darrylsgarage.com/356/356Hella118.jpg)
Entry: 2/14/20 - Once the heads were finally returned from Competition Engineering, Jack and his "crew" which includes his quick-study 23-y-o apprentice Cole Bradburn and now 10-y-o son JB (a.k.a, Jack Morris IV) came over from from Spokane for a "bromantic" Valentine's weekend to "swarm" the engine, leaving me with a drivable car! I really appreciated Jack adjusting my throttle linkages which were totally hacked by a prior "mechanic" with access to a torch and brazing rod to shorten the rod between the bellcranks to fit rather than adjust it correctly and I just happened to have a new one on hand that was too long prior to this! My wife Thu is such a sweetheart, she loved having a house full of men to cook for and fuss over, she really blew-away my friends with some amazing food! The next week I drove the car out to the Co-op in Snohomish, Washington for some ethanol-free 92 octane gas and now I have almost 200 miles as of today and zero oil leaks! All I can say is "WOW!" what a difference 1720 cc at 10.2:1 compression and twin ignition make over the stock 1600 cc in my 912! This thing just pulls and pulls right up to redline and will be perfect for mountain driving with all the torque! Next step is the interior which is taking an exciting direction since I won a complete, original factory correct red leather interior as the only bidder on an eBay auction, which is what originally came in the car and is specified on the COA. I plan to use the best leather rehab products available to re-dye the faded red back to factory fresh and add headrests since the mounting points are on these seats. I've also ordered the factory original red German wool square-weave carpet kit for the car so that will become my next focus. I also have a set of 11/63 matching date code KPZ (Kronprinz) steel wheels getting blasted for paint and a new set of 165/15 Michelin XZX radials waiting to be mounted and balanced once the wheels are ready. I've also got a drop-off date at the glass shop to have the new windshield and rear window installed with new factory weatherstrip. I'm going to let the photos speak for themselves, 5 months of work without all the gory details while I took a break from blogging.
![[IMAGE]](http://www.darrylsgarage.com/356/356JBat10.jpg)
![[IMAGE]](http://www.darrylsgarage.com/356/356swarm.jpg)
![[IMAGE]](http://www.darrylsgarage.com/356/356bottom.jpg)
![[IMAGE]](http://www.darrylsgarage.com/356/356gasup.jpg)
Entry: 3/18/20 - Over the last couple weeks I've been making progress while hitting the 400 mile point on the new motor break-in process. The major milestone was having perfect blue skies for driving the car over to EuroGlass in Redmond to have Jeff and Bruce install the new SIGLA windshield and new rubber seals on the windshield and rear window that I ordered way back in 2014 right after getting the car out of paint. A little problem popped-up when I picked the car up from them, it wouldn't go into reverse and by the time I got home it wouldn't go into 1st and 3rd either so I have to tear it apart and see what's up with the linkage, hopefully just something worn out or loose. Other than that, the new seals look great with the original headliner and look like a "glass out" paint job since I had cut the old seals back during the paint prep stage, exposing the pinch weld lip for fresh paint. Jeff's work is meticulous, he even polished both sides of the original rear window with 0000 steel wool and glass cleaner to make it look as clear and crisp as the new windshield glass against the new rubber seals. The real cherry on top was that the original 56-year-old and quite brittle headliner wasn't harmed at all and will be ready for some additional SEM vinyl dye to cover the rust stains from the wire retaining hoops.
![[IMAGE]](http://www.darrylsgarage.com/356/356euroglass1.jpg)
![[IMAGE]](http://www.darrylsgarage.com/356/356euroglass2.jpg)
![[IMAGE]](http://www.darrylsgarage.com/356/356euroglass3.jpg)
Something I didn't notice until a started running the car without hubcaps, the wheel studs on the right front hub were about 5 mm shorter than the other 3 corners of the car. I found a source for 45 mm wheel studs on eBay since Stoddard wasn't able to fulfill my order and installed them on the right front wheel hub so all 4 corners of the car are now the same length. Kind of a satisfying little job and another opportunity to use my 16-ton shop press that insures the stud splines are going out and back in perfectly perpendicular and aligned so the holes in the aluminum hub don't get damaged. I see YouTube how-to videos of guys doing it with a hammer and then using a lug nut and impact gun to seat the longer wheel studs on their cars and just shake my head, a popular fad that's probably destroying hubs by the thousands.
![[IMAGE]](http://www.darrylsgarage.com/356/356rfstud1.jpg)
![[IMAGE]](http://www.darrylsgarage.com/356/356rfstud2.jpg)
I noticed the driver's side wing vent frame wasn't attached on the top hinge only to realize somebody put an earlier one in place of the original and it doesn't attach the same way. I was lucky to find a NOS one dated 1970 on eBay and snapped it up so I can remove the door window frame and replace the wing vent while I've got it apart for the red interior work. Luckily the wrong vent is actually in fantastic shape so I should be able to recoup my cost for the NOS correct one by selling this rarer, earlier one on eBay.
![[IMAGE]](http://www.darrylsgarage.com/356/356wrongvent.jpg)
![[IMAGE]](http://www.darrylsgarage.com/356/356vent1.jpg)
In addition to receiving the used original red leather interior I won on eBay, I ordered and received a red German square-weave wool carpet kit from K & H Upholstery since the price was $400 less than GAHH and $200 less than the one from Stoddard and it turned out to be perfect. I edited the exploded drawing from the online Porsche PET catalog and removed all the pieces that didn't apply to the 1964 356C coupe and learned there were less pieces since they went with a more simplified front cowl pocket on the C, that really helped understanding the pieces in the kit and their orientation. Now it's starting to warm up outside so I can do the gluing with the garage door open and with good ventilation of the toxic vapors.
![[IMAGE]](http://www.darrylsgarage.com/356/356newint.jpg)
![[IMAGE]](http://www.darrylsgarage.com/356/356carpet1.jpg)
![[IMAGE]](http://www.darrylsgarage.com/356/356carpet2.jpg)
![[IMAGE]](http://www.darrylsgarage.com/356/356carpet3.jpg)
I finally found where I put the rods for the heater box linkages and hooked up the heater and it works great. I didn't replace the cable since it requires removing the shifting mechanism, something done much easier when I have the interior stripped for installing the new carpet. For the time being I just made creative use of some brass welding rod and cable clamps to make up the distance somebody in an earlier time clipped off rather than messing with the hard to get to clamps when pulling the motor.
![[IMAGE]](http://www.darrylsgarage.com/356/356heaton.jpg)
The matching 11/63 date coded wheels needed to be redone because the Eastwood's Diamond Clear clear coat I had used on them 5 years ago had yellowed. I also noticed there were some "hub cap divots" from the hubcaps rubbing against the wheel and eroding a circular groove into them. So back to the media blaster in Marysville just to reblast the fronts, I threw in a non-matching date code wheel to be the new spare. Once back from the blaster, a little sanding beginning with 80-grit paper on my random orbital sander had the area smoothed so the "divots" were gone. When I was satisfied with the defect-free face and the blasted surface wire brushed to a high shine, I applied a fresh coat using PlastiCote's argent silver wheel paint. After some time passed to let the paint cure, I installed new Michelin XZX 165/15 radial tires from Coker Tire but ordered via JEGS.com to take advantage of the free shipping. It's always gratifying to save about $150 per set to have them mounted and balanced by having my own vintage Coats tire machine and modern Snap-On dynamic wheel balancer. Plus I can take the time to only mount the weights on the inside of the rims so they look much cleaner once on the car.
![[IMAGE]](http://www.darrylsgarage.com/356/356divot.jpg)
![[IMAGE]](http://www.darrylsgarage.com/356/356nodivot.jpg)
![[IMAGE]](http://www.darrylsgarage.com/356/356datewhls1.jpg)
I also played with making a magnetic Pegasus for each cowl of the car using some sheet magnetic stock I purchased from Eastwoods years ago. After sticking the Pegasus sticker on the magnetic sheet, I cut it out with an Exacto knife and them painted the edge white using a paint marker (they come in yellow, white or black and work just like a Magic Marker but use paint instead of ink). I rather like how the Pegausus looks on a silver car but would never actually stick anything to the paint that wasn't designed to come off easily with just some heat.
![[IMAGE]](http://www.darrylsgarage.com/356/356datewhls2.jpg)
![[IMAGE]](http://www.darrylsgarage.com/356/356pegasus.jpg)
The original red leather driver's seat bottom cushion had a ripped stitch so I dropped it by my buddy Tim at MDM Upholstery in Marysville last week to have him work his magic on it. He thought a whole new leather cover was probably going to need to be installed since I'm such a big guy and hard on the seats but it should be undetectable once I re-dye the entire red leather interior including the new head rests so everything has the right tint and shade of the original red. I sent in a sample of the red leather that Steve Shepp gave me for color matching and ordered enough water-based dye and kits for prep and repair from Leather Magic and should be receiving that order any day now.
![[IMAGE]](http://www.darrylsgarage.com/356/356rip.jpg)
Entry: 3/20/20 - The results of my diagnosis of why the car was not shifting into reverse, 1st and 3rd on the way home from the glass shop seems to all boil down to a loose clamp between the shift rod to shift coupler. I have to admit, I tend to over-think problems and while disassembling everything to hunt for worn bushings and such, I found everything actually looked like it had been replaced fairly recently while John Walker had the car. Letting my emotions really get ahold of me, I really needed to talk through the issue with Jack and as usual he reassured me that if I could shift the transmission with only the coupler attached to the shaft coming out of the nosecone of the transmission, the problem could only be in the linkage. I found it possible to shift as Jack had instructed and then started from scratch with adjusting the gear shift as per the Porsche workshop manual, eventually getting it to work perfectly again. My theory is that while wrestling with the glass seals, roping in the new front or rear seals, Jeff at EuroGlass must have leaned, braced against or laid on the gear shift lever just hard enough to push the shift rod into the coupler and a loose clamp allowed it to actually shorten the length of the shaft and thus shorten the throw of the shifter so it couldn't reach the forward positions. Hearing the reverse and 1st gear grind was completely unnerving and luckily I had the instincts to immediately only use 2nd and 4th to get home. Funny thing is I drove the car for nearly 60 miles, taking the long way home from EuroGlass and the problem with 1st and 3rd surfaced all the way out in Duvall! I ran some stop signs and was able to keep from lugging the engine too much with only one start from a complete stop in 2nd gear because traffic was so light due to the Corona virus keeping people at home. The silver lining to all this is while I had the driver's seat and gear shift out I went ahead and installed the new heater cables and have all that hooked up like it's supposed to be!
![[IMAGE]](http://www.darrylsgarage.com/356/356heatcable.jpg)
The other exciting news item is that the custom "color-matched" leather repair and re-dye kits arrived from Leather Magic! I had sent them a swatch of the red leather my now passed buddy Steve Shepp had given me as a sample of original color of my car's interior prior to aging and fading. I'm still waiting for a new set of red leather head rests, also matched to a piece of Steve's sample to arrive from Heritage Upholstery. My buddy Tim at MDM Upholstery in Marysville called this morning to let me know his work on the driver's seat bottom cushion should be done in a day or two. Tim ended up just having a whole new leather seat cushion cover sewn up for him by GAHH Upholstery which should be a perfect match. Getting just one piece out of a seat cushion set custom sewn up for you is something only an upholstery shop with a good relationship with GAHH can get so that speaks to Tim's street cred for sure! Tim told me that buying a pre-made piece that GAHH has a perfect pattern of the original for saved me about 50% of what he would have to charge to tear the old one apart and make a pattern from it, plus ordering leather and sewing it. I'm all for fast and cheaper, plus I want a seat that I don't feel guilty about destroying with my 240 pound weight. I'm very excited to use the old leather seat cushion cover as the perfect test subject for the Leather Magic products so if there are any issues, I find them on the test piece first.
![[IMAGE]](http://www.darrylsgarage.com/356/356reddye1.jpg)
Entry: 3/21/20 - I got a call from my buddy Tim at MDM Upholstery in Marysville yesterday to report that the special order red leather GAHH lower seat cushion cover had arrived and he had torn-down the ripped original. In the process he caught something I had missed, the outboard seat mount rail was quite bent and had he not caught it, would have been impossible to install the seat in the car! Luckily I had the original to the car driver's side seat pan already stripped with the seat spring also removed so I ran it up to him. He also asked me to bring the passenger seat so he could measure the depth of the indentation that secures the seat cushion to the metal pan. The pull is just enough to lightly crease the channel in the pleats of the leather cover but not so much that it becomes a fold in the leather (a mistake I see on so many reupholstery jobs). The rubberized horse hair pad was also pretty much turning to dust so he will make me a new lower cushion out of hard foam like I saw done so many times by Steve Shepp. I'm quite pleased with how closely the color of the new GAHH leather matches the eBay passenger seat and by restoring the old leather and distressing the new leather it should be a very close match that will only improve with usage. Being 240 pounds, I would have destroyed the already ripping original drivers bottom seat cushion so this is something that is just best done right while I've got access to the correct dye and talents of Tim. I want a driver's seat that will be "guilt-free" and I can use it without being concerned that I'm going to damage it. Seat back cushions seem to hold up much better than the seat bottoms and the passenger seat won't get much use and with my tiny little wife, its odds of staying intact improve dramatically. Tim let me bring home the torn old driver's seat cover so I can experiment with the Leather Magic products on a piece that will teach me everything I need to learn.
![[IMAGE]](http://www.darrylsgarage.com/356/356seat3.jpg)
![[IMAGE]](http://www.darrylsgarage.com/356/356seat4.jpg)
Entry: 3/24/20 - Tim at MDM Upholstery in Marysville called to let me know my driver's seat bottom cushion was done. He had blasted and repainted the rusty but still solid metal seat pan that was originally in my car but moved the springs and adjusting handle from the eBay set because they were in better shape. A completely new foam pad sculpted out of dense open cell foam had to be made since the rubberized horse hair (coconut coir) one from Reutter had begun to fall apart as is common on driver's side seats this old. I'm so pleased we went with a brand-new GAHH leather seat cushion cover because they have the best patterns and side-by-side it looks identical to the original passenger seat. In sunlight and under flourescent light the color of red looks identical, the differences in sheen and sun fading between the eBay cushions and the brand-new driver's cushion is going to make distressing the new and restoring the old prior to re-dye of all using the Leather Magic products a fun challenge. I also look at all my cars and see how hard I am on seats since I'm 6'4" and 240 pounds, it won't be long before the new GAHH leather has a "broke in" look to it. My next task is to experiment with the Leather Magic products on that old driver's seat cushion leather, the perfect practice surface because it's the exact leather but without any risk to the actual pieces going into the car just in case results aren't as advertised.
![[IMAGE]](http://www.darrylsgarage.com/356/356seat5.jpg)
![[IMAGE]](http://www.darrylsgarage.com/356/356seat6.jpg)
Entry: 3/25/20 - So all my orders have arrived and with rainy weather piled upon the Corona Virus stay at home order, it's "go time" on stripping out the black interior and getting to work on turning it red! I was quite pleased with how easily the gray perlon carpet I glued in back in 2007 (when my goal was simply to make the car presentable with the desire to drive it while working on the mechanicals) pulled right up. The original Reutter gold-colored glue is still visible on the areas where the German square-weave carpet goes and the original padding is still intact in the rear compartment where the leather covered panels cover the sides and rear bulkhead. I was able to get the speakers out of their holes in the left and right cowl and I will simply cover that area thin aluminum plate so if there's ever a desire to put music back in the car it will be easy to cut through the carpet and hit aluminum to find the holes again. I'm afraid not backing the speaker holes with aluminum will result in a noticible dip or crater since I'm going to be using steam to form the carpet to the indentations that forms the back side of the cowl pockets. After getting the black and gray out of the interior, my next task was pulling the chrome door frame out of the drivers side and getting that wrong, earlier wing vent out. I am continuously amazed at how little corrosion there is on this car, all the hardware inside the door was still silver plated with no surface rust. I always use penetrating fluid regardless of how clean things are so it all came apart like it was built yesterday and I got that little upper hinge out of the vent window frame so putting the new, correct one in is going to be a piece of cake. I ordered new window channel felts from Stoddards and it will be delivered in a couple days. The old, earlier wing vent looks like it was NOS when installed because there's no corrosion on it either. I did a minimal amount of cleaning the chrome with NeverDull wadding and I think I can detail it to look like NOS when I sell it on eBay for top dollar, that's got to be a rare item and frequently destroyed when thieves break into locked cars.
![[IMAGE]](http://www.darrylsgarage.com/356/356int1.jpg)
![[IMAGE]](http://www.darrylsgarage.com/356/356int2.jpg)
![[IMAGE]](http://www.darrylsgarage.com/356/356wrongvent2.jpg)
Entry: 3/27/20 - The original Reutter-installed headliner in the car has all the normal stains from 56 years of rusting bows and condenstation turning the rubberized horse hair (coconut coir) padding into a tea bag. Otherwise it is undamaged, no rips, just one minor flaw, the stitch right next to the passenger side coat hook had pulled loose. I was able to carefully remove the glue holding it in around the door and rear quarter window opening and repair it by gluing the flaps back together. It turned out very nicely and nobody would ever guess there was a problem after the re-dye it and installing a new coat hook.
![[IMAGE]](http://www.darrylsgarage.com/356/356stitch1.jpg)
![[IMAGE]](http://www.darrylsgarage.com/356/356stitch2.jpg)
The major task in a re-dye is masking off the windows and everything else I didn't want to be white. Nothing exciting other than one hell of a "core workout" doing sit-ups while practicing precise eye-to-hand coordination as I applied strips of masking tape. Once all masked off, I wiped down the entire headliner with lacquer thinner to clean and remove any oil. Spraying with SEM 15003 Phantom White flexible coating required about half an aerosol can and went quite quickly, remembering less is more and thin coats so I didn't lose any of the texture of the material. Only one rust stain proved a bit stubborn so I had to spray it more than most areas but only I notice the loss of material texture in that one spot. I made sure to redye all the headliner material, especially under the back window so that if even a sliver of it is seen behind a red leather panel, it looks perfect. By the end of a long day, I had the masking materials removed and was quite satisfied with the results, no more stains and the splitting seam by the right coat hook is no longer there. Now to begin the red leather re-dye phase of the project because the first pieces in the car are the rear quarter panel covers, over the bases of which the red German square-weave carpet is glued.
![[IMAGE]](http://www.darrylsgarage.com/356/356headliner1.jpg)
![[IMAGE]](http://www.darrylsgarage.com/356/356headliner2.jpg)
![[IMAGE]](http://www.darrylsgarage.com/356/356headliner3.jpg)
![[IMAGE]](http://www.darrylsgarage.com/356/356headliner4.jpg)
![[IMAGE]](http://www.darrylsgarage.com/356/356headliner5.jpg)
Entry: 3/31/20 - Over the last couple days I've focused on mastering the Leather Magic re-dye process and feel great about my choice to use their products. Leather is very similar to wood in how it reacts to moisture, drying out and taking stain or dye. The eBay leather I'm working with has been well cared for and not dried out but the bottom cushion of the driver's seat showed that deterioration from use was starting to tear the seams and break down the padding. The passenger seat still looks like new and Tim at MDM was able to replicate the shape of the passenger's seat bottom cushion perfectly with the new driver's seat bottom. The only problem was the new leather didn't match the old in both color and shine and that's where the Leather Magic products come in. Prepping the leather for re-dye is much like staining wood, first deep clean then lightly scuff with 220-grit sandpaper or a fine 3M Scotchbrite pad to give the dye something to physically bond with. I pre-cleaned everything well with professional leather cleaner called "Car Brite Xtra" then used the Leather Magic prep solution to completely strip any oils or waxes from the surface. My first "experiment" was with the old "disposable" driver's seat bottom cushion and I Iearned a lot about handling the water-based dye with great results, first coat brushed on with a foam brush and second coat sprayed on to cover the brush marks. The match of the Leather Magic dye to the sample leather swatch I got from Steve Shepp was amazingly perfect (it's sitting on the original passenger seat in the photos below). The time came to commit to the product with re-dying the new GAHH leather on the new driver's seat bottom. Same process and same result except for a lot of problems with the cheapo PRE-VAL aerosol applicator the second time, I suspect it might have been a viscosity issue with running to the end of the first bottle of dye. I solved the problem by buying a 120cc HVLP touch-up spray gun from Harbor Freight and will toss the problematic PRE-VAL junk. The nice thing about water-based dye is the clean-up is done in the kitchen sink just using hot water. The following photos shows left to right; the original passenger seat with the sample swatch of leather used to color match the dye to, the re-dyed original drivers seat bottom cushion (note rip) and the GAHH new driver's seat cushion before and after re-dye (actually still wet in the creases and seams which lightened up once dry).
![[IMAGE]](http://www.darrylsgarage.com/356/356seat7.jpg)
![[IMAGE]](http://www.darrylsgarage.com/356/356seat8.jpg)
Side-by-side comparision of the re-dye match; left side is eBay driver's seat and right side is the new GAHH driver's seat. The old driver's leather seat cover had been removed from the springs and is just sitting on top and not pulled tight so the non-matching shape of the padding is a distraction in this photo. Side-by-side on the inboard edges of the new driver's seat and eBay passenger seat will be the true test of padding shape once that re-dye task is complete. Color match is excellent and a consistent shine between old and new will be achieved using a leather dressing since the GAHH leather is virgin.
![[IMAGE]](http://www.darrylsgarage.com/356/356seat9.jpg)
Entry: 4/1/20 - Over the last couple days I've cleaned, polished, rust sealed and reassembled the driver door using the NOS wing vent window I got on eBay and using one of the NOS seals, part of a set I found in the box rubber bits that came with the car. While I had everything apart I cleaned and treated the surface rust in the door bottom and any surface rust on the winding mechanism with SEM Rust Seal. I thoroughly degreased and lubricated the window winder mechanism and sliding track, installed new window felt channels and all new metric hardware. It always makes me happy to finally use parts that have been waiting 50 years to be part of a beautiful moving whole car instead of slowly decaying on a dark shelf someplace. The sticker on the vent window showed a manufacturing date of March 9, 1970 (Euroean dates are day-month-year) so this part has just turned 50 years old. The winder mechanism and vent wing window now open and close like a brand new car!
![[IMAGE]](http://www.darrylsgarage.com/356/356vent2.jpg)
![[IMAGE]](http://www.darrylsgarage.com/356/356vent3.jpg)
![[IMAGE]](http://www.darrylsgarage.com/356/356vent3b.jpg)
The vent window seals were surprisingly supple and the one I used cleaned up beautifully with a little Wurth Rubber Care. I felt that I should capture the look and feel of 50 year old parts for posterity since they're becoming extinct. The tags go back to the days I used to buy parts for my first car, a 1962 Volkswagen at the VW / Porsche dealership since Porsche was marketed by Volkswagen of America back in the '70s and I remember drooling over 911s on the showroom floor. The door glass was covered with overspray so I cleaned that up with paint stripper and a razor blade. Installing the new window felt channels was simply a matter of cutting to fit, then running a bead of black 3M Weather Strip Cement down each channel. I used the door window glass and paint stirring sticks as clamps to keep a slight pressure on the felt so it formed perfectly to the channel and avoiding later binding by the window glass. Installing the rubber vent wing seal was very easy but required trimming about 5 mm off the end of the bottom side to fit it without having it pucker and fit flush against the vent wing and no glue was required. I made sure to keep the passenger side assembled as a reference as to how the brackets and winder went back together. After letting the glue for the felt channels dry overnight I was able to remove the clamp, door glass and paint stirring sticks and clamp the whole assembly in my workbench vise so I could easly install the female upper hinge, finally mating it with its proper mirror-image male companion attached to the new NOS vent wing frame.
![[IMAGE]](http://www.darrylsgarage.com/356/356vent5.jpg)
![[IMAGE]](http://www.darrylsgarage.com/356/356vent6.jpg)
![[IMAGE]](http://www.darrylsgarage.com/356/356door5.jpg)
![[IMAGE]](http://www.darrylsgarage.com/356/356door4.jpg)
![[IMAGE]](http://www.darrylsgarage.com/356/356door6.jpg)
![[IMAGE]](http://www.darrylsgarage.com/356/356door7.jpg)
Entry: 4/3/20 - Getting the panels around the rear of the car ready to install is required because the carpet goes over the side panels. The eBay rear bulkhead panel was extremely warped and wrinkled and needed to be completely rebuilt since there are 11 studs that go inside it and are fed throught the rear bulkhead into the engine compartment to secure it. My first task was replicating the 11 studs to match the original I have removed from the car as an example. I used the little metal "slugs" that are the round punch-out discs found on an electrical switch box that we tried to use in coin-operated candy and pop machines as kids. I found the diameter of a 3" roofing nail is the same as the original stud and should give me enough length to feed them through the bulkhead and cut to length once secured. I simply drilled a hole in the center of the "slug" and feed the roofing nail through, then soldered it tight using a propane torch to heat it. Before disassembling the old panel, I deep cleaned it using Car Brite Xtra aerosol cleaner and the photo shows how it strips the oil and wax on the left side of the photo below. I used the old backing panel as a pattern and cut a new one out of black waterproof backing board I sourced at PerfectFit upholstery supply in Renton. A lot of patience, clamping, heat and various shaped tools were used to work out the wrinkles and stretch the original leather back into shape. The last step was using staples to attach the leather to the new backing panel. A little flex to simulate how the panel is bent over the rear bulkhead showed how any remaining horizontal wrinkles are stretched once the panel is installed in the car. Now all that remains is cleaning up the side panels, fixing a small tear and filling some stratches using the Leather Magic repair products prior to re-dying several pieces in a bigger batch than I usually do and trying out my new HVLP touch-up spray gun.
![[IMAGE]](http://www.darrylsgarage.com/356/356redrear1.jpg)
![[IMAGE]](http://www.darrylsgarage.com/356/356redrear2.jpg)
![[IMAGE]](http://www.darrylsgarage.com/356/356redrear3.jpg)
![[IMAGE]](http://www.darrylsgarage.com/356/356redrear4.jpg)
![[IMAGE]](http://www.darrylsgarage.com/356/356redrear5.jpg)
![[IMAGE]](http://www.darrylsgarage.com/356/356redrear6.jpg)
![[IMAGE]](http://www.darrylsgarage.com/356/356redrear7.jpg)
Entry: 4/4/20 - I noticed that the captive nut for the left rear jump seat had been twisted from its brazed in mounting point on the left rear jump seat. Luckily the hole was left intact and near perfectly round so I carefully measured the diameter and depth as well as the amount the right side protruded from the surface and its diameter. My solution was to "machine" a plug-shaped replacement out of 5/8" diameter steel bar stock that was slightly larger diameter than the hole so it would take a little hammering to force it in to the point where it hit the back side of the channel. I'm going to put a little JB Weld epoxy around the outside of it as a little insurance but I really don't think I could even pull it out at this point. I had machined an M7 - 1.0 threaded hole into it before turning it on my drill press and shaping the plug with a file. Test installation of the eBay rear seats confirmed that everything is in the right place and moves between the up and down position without any difference in symmetry.
![[IMAGE]](http://www.darrylsgarage.com/356/356pivot1.jpg)
![[IMAGE]](http://www.darrylsgarage.com/356/356pivot2.jpg)
![[IMAGE]](http://www.darrylsgarage.com/356/356pivot3.jpg)
![[IMAGE]](http://www.darrylsgarage.com/356/356pivot4.jpg)
![[IMAGE]](http://www.darrylsgarage.com/356/356pivot5.jpg)
Entry: 4/8/20 - Carpet installation has begun with the challenging rear center hump and all its compound curves. I purchased a nice heavy-duty garmet steamer from ULINE a month ago knowing that's the trick for convincing that stiff German square-weave to do my will. A lot of 1/2" thick jute felt padding was required to properly fill the voids surrounding the seat cushions and once I glued the first piece in, I placed the two pieces ahead and behind it in place as well as the yet to be re-dyed seat cushions to see how everything fits and covers the first piece. There will be some trimming and cutting darts to relieve wrinkles but I'll wait until I'm ready to glue the last pieces on so I know how far I can cut. Next step will be the front cowls before which I'll need to make covers for the speaker holes.
![[IMAGE]](http://www.darrylsgarage.com/356/356carpet4.jpg)
![[IMAGE]](http://www.darrylsgarage.com/356/356carpet5.jpg)
![[IMAGE]](http://www.darrylsgarage.com/356/356carpet6.jpg)
The task that needs to be completed before I can finish carpet installation is repairing and re-dying the rear side panels since the carpet is glued on top of them. There were some small tears and areas where defects in the leather hide have become more pronounced due to years of UV exposure. Leather Magic's repair kit provided a type of "leather BONDO" filling material that I have been using to fill holes and cover defects on the dash pad and rear side panel. It takes several days to build up enough material to give me something higher than the surrounding leather to sand flush and feather out. The dash pad and rear side panel are to a point where I've given them the first coat of dye using a foam brush. I made some stimpling patterns with the foam brush to break up the smooth areas and will use my HVLP spray gun to create an "orange peel" effect when I apply the second sprayed-on coat of dye. All-in-all I am really happy with the results and think the repairs won't draw any attention since the entire interior has a bit of patina from being 56 years old and isn't intended to look brand new.
![[IMAGE]](http://www.darrylsgarage.com/356/356leather1.jpg)
![[IMAGE]](http://www.darrylsgarage.com/356/356leather2.jpg)
![[IMAGE]](http://www.darrylsgarage.com/356/356leather3.jpg)
![[IMAGE]](http://www.darrylsgarage.com/356/356leather4.jpg)
![[IMAGE]](http://www.darrylsgarage.com/356/356leather5.jpg)
![[IMAGE]](http://www.darrylsgarage.com/356/356leather6.jpg)
![[IMAGE]](http://www.darrylsgarage.com/356/356leather7.jpg)
![[IMAGE]](http://www.darrylsgarage.com/356/356leather8.jpg)
Entry: 4/9/20 - Working on the logitudinal carpet pieces that run the entire length of the cabin and the underlying pieces that form the backside of the cowl pockets was today's task. The first thing I realized is that reusing the existing holes for the screws holding the front edge of the cowl pocket formed from the longer piece over the piece that forms the backside of the pocket is not possible, so my focus became making this K & H Upholstery carpet kit look as good as possible. My answer was making some small jute felt pads to fill voids that would cause big gaps or wrinkles in the bigger piece of carpet once installed. Once I got those jute felt pads glued in place, I turned my attention to the ready to re-dye leather.
![[IMAGE]](http://www.darrylsgarage.com/356/356carpet7.jpg)
![[IMAGE]](http://www.darrylsgarage.com/356/356carpet8.jpg)
![[IMAGE]](http://www.darrylsgarage.com/356/356carpet9.jpg)
Brushing on the first coat and then spraying on the second went well enough but I'm still having issues with my spray gun clogging, probably the nature of water-based dye. I quickly abandoned the small HVLP touch-up gun I purchased at Harbor Freight last week and went with my full-blown HVLP gun. Now I have all the rear panels and bulkhead cover done as well as the dash pad and one of the door caps. I stripped a black one that was in better shape than the red one that came with the eBay interior and wanted to see if I could re-dye it to match and the answer is yes! I will strip the other one as well because both are better than the ones that came with the eBay interior. The dash pad turned out fantastic and I'm very pleased with how the repairs blend in!
![[IMAGE]](http://www.darrylsgarage.com/356/356leather9.jpg)
![[IMAGE]](http://www.darrylsgarage.com/356/356leather10.jpg)
Entry: 4/10/20 - Today two more pieces of red German square-weave were glued into position, the two cowl pocket backs. My work making jute felt padding yesterday paid off today with smooth fitting pieces that met the piece that forms the door threshold and outer cowl pocket edge perfectly. Once shaped with steam and glued into place and all the excess material trimmed off the bottom edge so it won't leave lumps under the covering piece, I prospected for the unsupported area of cowl pocket on the outer piece. Stiffening panels were cut out of waterproof panel board and glued into place, drying overnight so I can continue with installing the long pieces that runs from the front footwell to the back firewall. I also placed the freshly re-dyed dash pad on the top of the dashboard to safely cure for the required 48 hours before I install it.
![[IMAGE]](http://www.darrylsgarage.com/356/356carpet10.jpg)
![[IMAGE]](http://www.darrylsgarage.com/356/356carpet11.jpg)
![[IMAGE]](http://www.darrylsgarage.com/356/356carpet12.jpg)
![[IMAGE]](http://www.darrylsgarage.com/356/356carpet13.jpg)
Entry: 4/11/20 - After curing for 48 hours, the re-dyed leather rear side panels and dash pad were ready for handling. The rear side panels went into place easily enough with the big black washers of the shoulder belt mounting points holding them in the correct position as well as pinch clamps along the B-pillar weatherstrip channel. The question and challenge is getting the long longitudinal carpet piece that runs the entire length of the passenger cabin to form around the curve where it meets at the bottom of the leather panel. The carpet appears to be lacking about 1/2" that would make it a perfect fit so I'm going to have to pad behind the leather panel or under it to make up some of that space. The carpet ahead of the A-pillar fits nicely with its pocket supported with a backing piece but there's a bit of a wrinkle at the base of the A-pillar that will also require some sort of additional underpadding and a lot of steam to smooth out. Working both sides at the same time, alternating one to the other as I steam and work them should assure I have symmetry and starting from the door opening, gluing the section inside of where the polished stainless steel base plate runs first, should give me a good firm anchoring point to start steaming and stretching the carpet from. The area around the rear seats is going to take a lot of trimming as I form it but so little shows once the covering carpet pieces are installed, I'm not too worried. The area under and ahead of the front cowl pockets should be fairly easy to glue, only the area behind the trunk release and hand brake might call for another method besides 3M aerosol adhesive. I also installed the newly re-dyed dash pad in place and it seems the screw holes are not even close to the old ones so drilling new ones is probably going to be required, not a big problem as nobody will ever notice. My leather repairs on the dash pad and right rear compartment panels look quite good, a huge improvement, however now that it's all one color I see a few more dents in the dash pad that could have been filled. I must remind myself that I have yet to apply any leather conditioner to the eBay pieces since I needed to strip the leather of all oils and waxes to re-dye it, so once everything has cured I can start feeding the hide and let useage and heat from sun exposure relax the indentations from years of storage.
![[IMAGE]](http://www.darrylsgarage.com/356/356carpet14.jpg)
![[IMAGE]](http://www.darrylsgarage.com/356/356carpet15.jpg)
Entry: 4/13/20 - I added some new weapons to my carpet laying arsenal with a run up to Cabelas in Marysville where I bought four 25 pound canvas bags of lead shot. Once that weight was placed on the carpet to hold it in the door threshold, it allowed me to steam and form the carpets on both longitudinal channels so completely that it held itself in place without the need for magnets. Once I worked the carpet area that runs along the lower end of the leather rear side panels, I saw how much additional padding was needed and where I needed pull the leather out to in order to meet the carpet. Then it was "glue time" which began with the A-pillar and gluing the vinyl strip that attaches the cowl carpet to the weatherstrip channel and jamming cardboard strips into the channel to hold the back side of the vinyl as tightly as possible to the inside until the glue dries. Next trimming the carpet at the base of the A-pillar as close to it as possible so it would not telegraph its location through the covering carpet and then sealing the threads with clear GOOP automotive glue to keep it from ever unraveling. Then I turned my attention to the leather rear side panels by first removing them and preparing the front edge that glues to the weatherstrip channel on the B-pillar by gluing a strip of linen fabric that would provide just a little bit more surface area for the glue that pulls the panel towards the door opening. I reused the edge trim clamp method to hold the leather to the weather strip channel while gluing as I had done on the A-pillar to temporarily hold it during carpet installation. Next step was gluing the leather flaps at the bottom to the longitudinal channel and along the back to the rear bulkhead, using clear automotive "GOOP" cement and spray 3M cement where appropriate. Final step was filling several uneven and low spots on the longitudinal channel with thin closed cell foam and hammering down any sharp edges on the tar board insulations to resolve the resulting deformaties that were seen in the carpet when steaming. Once I finish with the remaining few low spot corrections, it will be time to glue in the longitudinal carpet pieces and once they're in, the rest of the carpet is easy and will go quickly so I had better get busy on re-dye work on the rear seats!
![[IMAGE]](http://www.darrylsgarage.com/356/356carpet16.jpg)
![[IMAGE]](http://www.darrylsgarage.com/356/356carpet20.jpg)
![[IMAGE]](http://www.darrylsgarage.com/356/356carpet21.jpg)
![[IMAGE]](http://www.darrylsgarage.com/356/356carpet18.jpg)
![[IMAGE]](http://www.darrylsgarage.com/356/356carpet19.jpg)
![[IMAGE]](http://www.darrylsgarage.com/356/356carpet22.jpg)
![[IMAGE]](http://www.darrylsgarage.com/356/356carpet23.jpg)
![[IMAGE]](http://www.darrylsgarage.com/356/356carpet24.jpg)
![[IMAGE]](http://www.darrylsgarage.com/356/356carpet25.jpg)
![[IMAGE]](http://www.darrylsgarage.com/356/356carpet26.jpg)
Entry: 4/15/20 - "Glue Day" finally arrived for the longitudinal carpet pieces and I feel like I rode a mechanical bull afterwards, I'm rather large for this type of work and my hands are very sore. Everything in the forward section of the car is done including installation of the re-dyed red leather dash pad. I ran into an issue with the size of the rear seat pivot screws being 8M and the holes in my car seemed to be 7M so I have to drill and tap them to the next larger size requiring a long 17/64" drill bit because I can't get a drill close enough with a normal length bit. That long drill bit is supposed to arrive via UPS this afternoon. The remaining carpet is a cake walk compared to the work it took to make the cowl pieces turn out perfect. The upper corner of the cowl pocket requires a finish washer and #6 screw to hold it as well as a carpet tack at the base. Drilling a hole through carpet is a no-no because if a thread gets wrapped around the bit it pulls out the adjacent loops of that row of the carpet like a zipper so lacking a proper tool, substituted a couple of the roofing nails I used for the rear bulkhead panel studs and it worked like a charm. It is kind of strange to drive a nail and tack into a car but that's how it was done and I actually reused two of the factory carpet tacks at the base of the pocket panels below where I put the screws. I dabbed a bit of red touch-up paint on the tack head and it's invisible to the casual observer. I can always remove the screw and add glue to the back edge of the cowl pocket if it droops but with the panel board glued inside I don't think gluing will ever be necessary. I drilled and installed the 4 finish washer and #6 screws that hold the dash pad's rear edge and restored the original Hella logoed map light that goes into the center of the dash after "harvesting" the white knob for the switch from a reproduction one and JB Weld-ed it into place after some fancy Dremel work to make it fit. I'll polish the stainless steel door threshold strips and install them as well as the heater vents next while I'm waiting for my drill bit. I'm also going to get those rear seats re-dyed today too so they have time to cure a little before I need to install them. The end of the carpet installation phase is well within sight now so I should start working on the door panels as well since there's a little leather repair work there to do.
![[IMAGE]](http://www.darrylsgarage.com/356/356carpet27.jpg)
![[IMAGE]](http://www.darrylsgarage.com/356/356carpet28.jpg)
![[IMAGE]](http://www.darrylsgarage.com/356/356carpet29.jpg)
![[IMAGE]](http://www.darrylsgarage.com/356/356carpet30.jpg)
![[IMAGE]](http://www.darrylsgarage.com/356/356carpet31.jpg)
![[IMAGE]](http://www.darrylsgarage.com/356/356carpet32.jpg)
Entry: 4/16/20 - I worked on putting the front half of the passenger compartment together today, beginning with buffing and polishing the door threshold strips and installing them. Next came the heater vents, which took quite a bit of time since trimming them perfectly so they didn't show any carpet when they were screwed into place and doing the necessary flat black touch-up painting was a lot of detail work. My 17/64" long drill bit showed up about 3 PM so I went ahead and drilled and tapped the rear seat pivot holes for M8 - 1.25 instead of what I thought they were based on a M7 - 1.0 fitting perfectly in the corroded existing hole. Lastly I installed the new toeboards, as the old ones were warped and the rubber floor mats didn't lay right over them. That brought the rubber mats out and finally the new red dot over black coco mats. The rear seats and door panels are on my to-do list as a side project while I finish installing the carpet. Now what I'm getting really excited about is installing the leather rear bulkhead panel which comes next after the carpet behind the rear seats.
![[IMAGE]](http://www.darrylsgarage.com/356/356carpet33.jpg)
![[IMAGE]](http://www.darrylsgarage.com/356/356carpet34.jpg)
![[IMAGE]](http://www.darrylsgarage.com/356/356carpet35.jpg)
![[IMAGE]](http://www.darrylsgarage.com/356/356redrear25.jpg)
![[IMAGE]](http://www.darrylsgarage.com/356/356carpet36.jpg)
![[IMAGE]](http://www.darrylsgarage.com/356/356carpet37.jpg)
![[IMAGE]](http://www.darrylsgarage.com/356/356carpet38.jpg)
Entry: 4/18/20 - My attention turned to the rear area of the passenger compartment today and the completion of the gluing of the side longitudinal pieces next to the rear seat cushions and the piece that drops down into the rear seat cushions from behind. The big milestone was installing the rebuilt and re-dyed leather rear bulkhead panel which I had pondered how I could do without help for quite a while before coming up with a pretty ingenius solution if I say so myself! The results are shown in the following photos with the rear seat cushions and the piece that lies in front of them down to the floor simply set into place to show how much of the underlaying carpet is visible once installed.
![[IMAGE]](http://www.darrylsgarage.com/356/356carpet42.jpg)
![[IMAGE]](http://www.darrylsgarage.com/356/356carpet43.jpg)
I put M8 studs into the rear seat back pivot mounts and punched a corresponding holes in the carpet so they would be fed through to the right position once I started gluing. A lot of steam forming and cutting a couple reliefs got the longutidinal piece formed around the footwell and rear seat lip. I glued it in with two passes, first the footwell and second the seat side. The 25 pound bags of lead shot came in really handy, keeping the carpet snug against the compound curves while steamng and the glue drying. The piece behind the rear seat cushions was relatively simple, just a lot of steam to form it into the "bowl" and use of all 4 shot bags to hold it firmly in place while the glue set up. Clearly a carpet steamer and four 25 pound shot bags are almost required tools if attempting German wool square-weave carpet , I've never worked with anything so stiff and that seems to reharden after steaming and retaining the new shape.
![[IMAGE]](http://www.darrylsgarage.com/356/356carpet39.jpg)
![[IMAGE]](http://www.darrylsgarage.com/356/356carpet44.jpg)
![[IMAGE]](http://www.darrylsgarage.com/356/356carpet40.jpg)
![[IMAGE]](http://www.darrylsgarage.com/356/356carpet41.jpg)
The true feat was getting the rebuilt and re-dyed leather bulkhead panel in "almost" by myself. My wife Thu did help me with the last clamping of the vise grips holding the studs by pushing from inside the car so I could use both hands to pull and clamp from the engine compartment side so it wasn't 100% a one-man-job but damn close! I came up with the idea of using that strapping tape that is used on packages that can't be cut without a knife and wrapping it around the shaft of the 3" roofing nail stud and once to the end, creating a short length of "rope" by wrapping it around itself. The passing it through a loop in a length of mechanic's wire before wrapping it around the mechanic's wire to for a smooth transition that wouldn't catch as it passed through the hole in the bulkhead and into the engine compartment. I got the wires through the holes and then twisted a loop around washers so they couldn't pull back through when I was working inside the car. I had to hand feed the wire through the hole from the inside of the car so it wouldn't kink or hold up and started with the bottom first. Once the four bottom 3" nail studs where through on the bottom, I pulled them tight and used small vise grips to hold them as tight as possible. I put all 4 bags of lead shot against the bottom of the panel so it would brace it while I was forming the bend with the seven top nail studs. I could feed, pull and vise grip the studs from outside the car through the rear window openings for the top row of wires and it didn't take long to be at the point where Thu could give me the final push from inside and I could use both hands to secure the vice grips as tight as possible. I'm going to let it sit for a bit before I install the speed nuts on the engine compartment side and remove the vise grips so the bend in the panel starts to relax. You can also see why it was so critical to re-dye the headliner under the rear window since a sliver of it is visible behind the bulkhead panel through the rear window, the only reason the factory would put it there in the first place!
![[IMAGE]](http://www.darrylsgarage.com/356/356redrear9.jpg)
![[IMAGE]](http://www.darrylsgarage.com/356/356redrear10.jpg)
![[IMAGE]](http://www.darrylsgarage.com/356/356redrear11.jpg)
![[IMAGE]](http://www.darrylsgarage.com/356/356redrear12.jpg)
![[IMAGE]](http://www.darrylsgarage.com/356/356redrear15.jpg)
![[IMAGE]](http://www.darrylsgarage.com/356/356redrear16.jpg)
![[IMAGE]](http://www.darrylsgarage.com/356/356redrear13.jpg)
![[IMAGE]](http://www.darrylsgarage.com/356/356redrear14.jpg)
Entry: 4/21/20 - Over the last couple days I completed gluing of the carpet in the rear of the compartment with the final 3 glued pieces, the section down the center hump after the shifter, the footwell panel under the rear bottom seat cushion and the shift coupler access cover. I also installed all the luggage strap loops and the washers with speednuts on the engine compartment side of the rear bulkhead panel. Cutting the strapping tape off the 3" nail studs and then sliding the washer and speednut on leaving enough room to grab the end of the nail with a vise grip and using a small wrench to push the speednut completely into place before clipping the nail off to the length the factory ones were previously. I was going to paint them black but after getting them all installed, I rather like the new look since they're exactly like what was there, but rusty, before and I can always paint them later.
![[IMAGE]](http://www.darrylsgarage.com/356/356redrear17.jpg)
![[IMAGE]](http://www.darrylsgarage.com/356/356redrear18.jpg)
![[IMAGE]](http://www.darrylsgarage.com/356/356redrear19.jpg)
![[IMAGE]](http://www.darrylsgarage.com/356/356redrear20.jpg)
I have been working reparing the leather on the rear seats, panel caps and door panels, getting them ready to be the next dye batch and one of the things that needed to be fabricated is the little panel board flap that is tacked to the back bottom of the rear seat back to bridge the gap between the seat and body where the carpet lays over it. This panel board is required to bend so it needs a "hinge" pressed into it. I copied an idea I saw on Heritage Upholstery & Trim's website and made a tool that allowed me to use my 12-ton shop press to push a 1/8" diameter brass rod into a 3/8" gap between two 1/8" thick strap iron stock that was countersunk wood screwed into a 2x4. Once I got the "hinge" pressed into the panel board, I cut out the shapes of the flap and have been flexing the hinges by hand to soften them so they will lay smoothly under the carpet once tacked to the back of the seat back and installed in the car.
![[IMAGE]](http://www.darrylsgarage.com/356/356redrear21.jpg)
![[IMAGE]](http://www.darrylsgarage.com/356/356redrear22.jpg)
![[IMAGE]](http://www.darrylsgarage.com/356/356redrear23.jpg)
![[IMAGE]](http://www.darrylsgarage.com/356/356redrear24.jpg)
Entry: 4/24/20 - Over the last couple days I've re-dyed a big batch of leather, the rear seats, door panels and the panel caps and needed to let them sit 48 hours for the dye to dry and cure to avoid marring the finish while installing. That gave me an excuse to take apart the passenger door and replace the wing vent seal and door window felt channels as well as clean, polish and lubricate everything to make it look and work like new. We're 5 weeks into the COVID-19 quarantine so my selection of work clothes is getting to the bottom of the "clean" pile and fashion seems to be the casuality but it's always a good day when I get a door all reassembled without marring the paint or breaking an unobtainable part no matter how poorly I am dressed!
![[IMAGE]](http://www.darrylsgarage.com/356/356leather11.jpg)
![[IMAGE]](http://www.darrylsgarage.com/356/356door9.jpg)
![[IMAGE]](http://www.darrylsgarage.com/356/356door10.jpg)
![[IMAGE]](http://www.darrylsgarage.com/356/356door11.jpg)
Entry: 4/26/20 - Today I finally hit the "DONE" milestone on the carpet with the installation of the last 2 pieces on the backs of the rear seat backs. I started with gluing in the seat bottoms using 3M 90 spray glue on both surfaces and then holding them down with the bags of lead shot, 50 pounds per side. I then installed my "homemade" panel board "gap flaps" using carpet tacks, followed by glueing the carpet pieces to the seat back to the point where it meets the "hinge" on the bottom. I also reinforced the glue with carpet tacks on the stress points at the top and bottom by the ends of the "hinge" areas, giving each a dab of red paint to blend them into the carpet. New seat pivot screws were part of a kit from Stoddards that included the correct washers and the final step was installing the seat backs and the 4 trim screws that hold the flap over the underlying carpet back to the rear bulkhead.
![[IMAGE]](http://www.darrylsgarage.com/356/356carpet50.jpg)
![[IMAGE]](http://www.darrylsgarage.com/356/356carpet45.jpg)
![[IMAGE]](http://www.darrylsgarage.com/356/356carpet46.jpg)
![[IMAGE]](http://www.darrylsgarage.com/356/356carpet47.jpg)
![[IMAGE]](http://www.darrylsgarage.com/356/356carpet48.jpg)
![[IMAGE]](http://www.darrylsgarage.com/356/356carpet49.jpg)
Entry: 4/27/20 - Today I finished with the re-dye of the leather except for the yet to be delivered head rests but that won't keep me from getting the car back on the road! The metal passenger seat pan needed to be cleaned up and repainted prior to the dye work but that didn't take long and the results were very nice. Since I needed to spray both sides at the same time, I used small M5 bolts in the headrest bracket holes to wire the back cushions with mechanic's wire so I could semi-hang them on my chain "clothesline" that I use when I paint parts and supported them on stacks of milk crates covered with garbage bags to protect them from overspray. The new GAHH leather kit recovered driver's seat bottom cushion has been dyed for over a month so it's ready to go as soon as these last pieces cure for 48 hours. I'm really happy with the coat I was able to give them with my new HVLP paint gun and can't wait to put the car back together in the coming days.
![[IMAGE]](http://www.darrylsgarage.com/356/356redleather12.jpg)
![[IMAGE]](http://www.darrylsgarage.com/356/356redleather13.jpg)
![[IMAGE]](http://www.darrylsgarage.com/356/356redleather14.jpg)
![[IMAGE]](http://www.darrylsgarage.com/356/356redleather15.jpg)
![[IMAGE]](http://www.darrylsgarage.com/356/356redleather16.jpg)
Entry: 4/28/20 - Today I "harvested" the original seat recliner mechanisms that came on the seats in the car when I purchased it back in 2007. In addition to being the correct date code for the car, since they were on it originally, they were complete and working but the recliner mechanisms were difficult to engage and just not crisp. Like the window mechanisms, a simple disassembly and thorough cleaning and lubrication fixed them right up. I also straightened any dents on the mechanism covers and sealed any areas where the chrome had flaked off using SEM Rust Seal. The chrome really did polish up nicely and the outboard ones actually look very presentable, not perfect but with that look of being well cared for at 56 years old. I also installed the seat belt bolts and clipped in the seat belts so when the dye has hardened its full 48 hours, I can proceed with assembling the seats and door panels and installing them in the car!
![[IMAGE]](http://www.darrylsgarage.com/356/356seat10.jpg)
![[IMAGE]](http://www.darrylsgarage.com/356/356seat11.jpg)
![[IMAGE]](http://www.darrylsgarage.com/356/356seat12.jpg)
![[IMAGE]](http://www.darrylsgarage.com/356/356seat13.jpg)
Entry: 4/29/20 - Finally, 48 hours of curing time had passed on the red dye on the seats and door panels, time to assemble them and install them in the car! I let my wife have the honor of being the first one to sit on the new driver's seat cushion. Before I put the door panels on, I made sure to give each door bottom an ample coat of Wurth cavity wax since I had cleaned them out and sealed all the surface rust with SEM Rust Seal when I had the window frames out for rebuilding and lubricating the mechanisms. The seats went together easily and I got out my seat part "boneyard" to find the best hardware for the pivots and replaced the countersunk oval head Phillips machine screws securing the backs with new stainless steel ones sourced from Stoddards which I buffed to a high shine first. I swapped the seat backs so the less used passenger side is now on the driver's seat and vice-versa. All-in-all the seats and their recliner mechanisms really look great and while not exactly the same, the new GAHH leather seat cover on the driver's seat and its rebuilt cushion look extremely close in shape and perfect in color match due to the re-dye efforts. What makes me happy is knowing I can use the driver's seat without worry of damaging it and it won't break-down under my size and weight because the cushion is new, modern dense sculpted foam like a modern Recaro sport seat would have. I still have to work on the door weatherstrips, especially on the passenger side because they have more material under them than before and are keeping the doors, especially the passenger door from closing all the way but that's just taking the time to trim any extra leather back and working the seal into the slot, it's the same everything as before, just new carpet so I know I can make it work OK, it just takes adjustments. The rear quarter windows are a bit of a problem since I only have a new seal for the left side and the right is on back order with Stoddard and I've ordered a second from 356 Devotion in hopes it will come quickly. The special switch plate I made for where the radio sits is also now installed permanently and the wiring harness I made run under the dash and into the trunk next to the outboard end of the fuse block for the next phase of wiring up the auxillary lights, fuel pump cut-off and electric windshield washer pump.
![[IMAGE]](http://www.darrylsgarage.com/356/356redleather17.jpg)
![[IMAGE]](http://www.darrylsgarage.com/356/356redleather18.jpg)
![[IMAGE]](http://www.darrylsgarage.com/356/356redleather19.jpg)
![[IMAGE]](http://www.darrylsgarage.com/356/356redleather20.jpg)
![[IMAGE]](http://www.darrylsgarage.com/356/356seat14.jpg)
![[IMAGE]](http://www.darrylsgarage.com/356/356seat15.jpg)
![[IMAGE]](http://www.darrylsgarage.com/356/356seat16.jpg)
![[IMAGE]](http://www.darrylsgarage.com/356/356seat17.jpg)
Entry: 5/3/20 - So I've temporarily abandoned the idea of installing the factory rubber seals in the rear quarter windows for the time being and just went back to the flexible edge trim since it could be weeks before seeing the backordered right one from Stoddard or 356 Devotion during the COVID-19 pandemic. Pulling the quarter windows back out is a 15 minute job, I want to get the car back on the road so I can continue breaking in that new engine! Now watch, it will probably come in tomorrow's mail! Anyway, I'm calling the interior swap project "DONE!" at this point and want to move on to wiring up my auxillary lights and replacing the steering coupler as my next project. I also need to test drive the car and make sure my shift linkage adjustments actually work, they feel good in the car but I really won't know until I get it out on the road. It's also now May so the boat, garden and promise to paint my wife's salon during the lock-out for the pandemic is still in effect are all calling my name!
![[IMAGE]](http://www.darrylsgarage.com/356/356redleather24.jpg)
![[IMAGE]](http://www.darrylsgarage.com/356/356redleather21.jpg)
![[IMAGE]](http://www.darrylsgarage.com/356/356redleather22.jpg)
![[IMAGE]](http://www.darrylsgarage.com/356/356redleather23.jpg)
Entry: 4/22/21 - Over the last couple months, I've added a few modifications to make the car a little more fun to drive. I found a beautiful reproduction Carrera 2 style wood steering wheel which is exactly like the stock plastic one with the exception of the thicker laminated wood rim which is much more comfortable to grip than the thin plastic one. The other area is upgrading the handling using the thicker John Willhoit 17.5 mm front stabilizer bar and Vic Skirmants rear "camber compensator" bar. The difference in cornering is profound, the car feels more "planted" on undulating roads at speed and the body lean in corners makes the car feel more like my 912, no feeling of the swing axles tucking and lifting the rear of the car. I have to say I'm totally in love with this car and other than some nibs in the paint that you have to look closely to find, it really gets a lot of positive feedback (thumbs-up and compliments) when I have it out on the public roads. Total cash outlay for all the modifications was less than $2K with sales tax and shipping.
![[IMAGE]](http://www.darrylsgarage.com/356/356mod1.jpg)
![[IMAGE]](http://www.darrylsgarage.com/356/356mod2.jpg)
![[IMAGE]](http://www.darrylsgarage.com/356/356mod3.jpg)
![[IMAGE]](http://www.darrylsgarage.com/356/356mod4.jpg)
![[IMAGE]](http://www.darrylsgarage.com/356/356mod5.jpg)
Entry: 2/16/21 - We're over a year since the pandemic started and back in February 2020, with the help of my good friend Jack Morris, I finally got my 1964 Porsche 356C project back on the road powered by its twin spark plug big bore engine. I was able to put over 2,000 miles on it by September and consider it fully broken-in and running better each time I take it out. The time stuck at home was also put to good use by restoring the interior of the car to the original red leather as it left the factory with back in December of 1963. I posted a few of my progress pictures on my chapter of the Porsche Club of America's Facebook group page and got a lot of interest in the build. Since all the club events were shut down because of the pandemic, Dennis Rood, the Chairman of the Concours Committee asked me if I would be interested in helping him add some interesting content to his column in the monthly club magazine named "Spiel" (German for "Play") by chronicling the 13 year project in 5 installments. Well the first 5 articles were met with so much interest, Dennis asked me to write 2 additional ones outlining the products and tools I used. About the time the last article was submitted, Dennis visited me out in the shop while I was doing the last stage of the 356C project, finally "de-nibbing" the paint, to present me with an award for my contribution to the club during the pandemic.
![[IMAGE]](http://www.darrylsgarage.com/pandemic1.jpg)
![[IMAGE]](http://www.darrylsgarage.com/pandemic2.jpg)
I've really enjoyed writing the articles and have made a lot of new local Porsche buddies by "putting it out there" and sharing my hobby with them. My 356C was never intended to be a "concours" show car but it still seems to attract a lot of attention when I take it out and drive it. I think people seeing such a relatively rare car out on the road is what having it is all about to me, especially at the local ethanol-free gas station. I've added links to each month's article if you're interested in reading them and also seeing what our local Porsche Club of America is all about. Since I currently own 5 different models of antique air-cooled Porsches that I've done the majority of the work on, I have a lot of knowledge to share with fellow car guys in my area. I'm also extremely delighted to help the next generation of collectors coming up behind me as the old guys I've learned from are starting to fade away. At 61 years old, it's looking like it's my turn to step up and pass on what they've taught me.
![[IMAGE]](http://www.darrylsgarage.com/July2020Spiel.jpg) Link to July 2020 Spiel Article
Link to July 2020 Spiel Article
![[IMAGE]](http://www.darrylsgarage.com/August2020Spiel.jpg) Link to August 2020 Spiel Article
Link to August 2020 Spiel Article
![[IMAGE]](http://www.darrylsgarage.com/September2020Spiel.jpg) Link to September 2020 Spiel Article
Link to September 2020 Spiel Article
![[IMAGE]](http://www.darrylsgarage.com/October2020Spiel.jpg) Link to October 2020 Spiel Article
Link to October 2020 Spiel Article
![[IMAGE]](http://www.darrylsgarage.com/November2020Spiel.jpg) Link to November 2020 Spiel Article
Link to November 2020 Spiel Article
![[IMAGE]](http://www.darrylsgarage.com/December2020Spiel.jpg) Link to December 2020 Spiel Article
Link to December 2020 Spiel Article
![[IMAGE]](http://www.darrylsgarage.com/January2021Spiel.jpg) Link to January 2021 Spiel Article
Link to January 2021 Spiel Article
![[IMAGE]](http://www.darrylsgarage.com/356/356done.jpg)
![[IMAGE]](http://www.darrylsgarage.com/356/356joy.jpg)
Entry: 4/22/21 - As a "numbers guy" when I finish a project, I like to see where I spent my money and how close my results track with my inital budget. So here's what I got for slightly less than $60K over 14 years of on-and-off work.
![[IMAGE]](http://www.darrylsgarage.com/356/356costdist.JPG)
![[IMAGE]](http://www.darrylsgarage.com/356/356costbkdn.JPG)
![[IMAGE]](http://www.darrylsgarage.com/356/1964race.jpg)
1964 Porsche 356C Showroom Brochure - Here's a fun little time capsule, clearly marketed towards the technical/engineer mindset, no nonsense, just the facts.