![[IMAGE]](912dream.jpg)
Darryl's 1966 Porsche 912 Project - Interior Restoration Page
PROJECT JOURNAL ENTRIES IN CHRONOLOGICAL ORDER
Entry: 3/1/07 - Ok, this ugly little job had to cost me a few brain cells! Spraying carburetor cleaner and scrubbing while sitting in the door opening was just a bit too confined of space for all the vapors, even with my charcoal canister face mask! However, you've gotta admit, that back seat sure is clean! I scraped away all the loose PVC undercoating and exposed all the surfaces requiring treatment with SEM Rust Seal to stop the surface rust. I'll let it all dry out overnight and start with the rust treatment in the morning and then apply my "faux factory undercoating" and then a coat of Wurth high-build underseal once the rust treatment has dried. This should look stunning with a light misting of Bahama Yellow... almost too pretty to cover with carpet and trim panels!
![[IMAGE]](http://www.darrylsgarage.com/912/912rdek3.jpg)
Entry: 3/2/07 - I was able to apply SEM Rust Seal to the exposed surface rust last evening so this morning everything was ready for "faux factory undercoating" work. I leveled and textured the voids created by scraping the cracked and lifting factory PVC undercoating with beige-colored 3M seam sealing caulk. Bare metal areas were also covered with a very thin layer of the caulk and then textured with fingertip "dabbing" as I've done on the wheelwell areas in previous undercoating repairs. Instead of black colored Wurth high-build underseal, I've decided to use another Wurth product, beige-colored SKS Stone Guard which is applied using a "shutz gun" applicator. The "shutz gun" tends to be a bit messy, so I prepared the car by masking off all the areas I didn't want stray "globs" to land while spraying the rear interior area. Once the masking work was done, I placed my heater inside the car and covered the rear window openings with a moving blanket to help hold in the heat and accelerate the drying (and shrinkage) of the 3M seam sealing caulk before spraying it with the Wurth SKS Stone Guard. In the following photos you can see how the car is "rigged" for drying and also how the windshield weatherstrip lip cleaned up. All the surface rust on the inside of the roof and pillar areas has been sealed with SEM Rust Seal and will be further treated to keep it from activating and staining the new headliner vinyl if it gets moisture built-up.
![[IMAGE]](http://www.darrylsgarage.com/912/912rdek4.jpg)
The rear parcel shelf area had the thickest repairs using the 3M seam sealer caulk and should look just fine with the Wurth SKS Stone Guard applied. I decided to use the Wurth SKS Stone Guard simply because the color more closely approximates the color of the original material and as a light color will take less Bahama Yellow paint to cover and look back to original. I'm trying to keep in mind all this area is hidden under the carpet and trim panels but a few extra pains taken now will make it easy for the painter to make it look perfect with less masking and such on their part. I will need to be more careful with primer overspray when working on the outside of the car once I get the interior area all finished.
![[IMAGE]](http://www.darrylsgarage.com/912/912rdek5.jpg)
Entry: 3/3/07 - The actual "shutzing" of the Wurth SKS Stone Guard was over in just a few minutes, it fact it took longer to clean the gun than spray the rear seat & parcel shelf area! I had about half a bottle of beige SKS left over from when I restored my 914's steel front and rear aprons and I figured that would be just enough. The Wurth "shutz gun" is a pretty basic piece of equipment, set the air pressure at about 60 PSI and spray at about 12" from the surface.
![[IMAGE]](http://www.darrylsgarage.com/912/912shutz.jpg)
My hunch about having just enough was right, I was able to give the entire area one generous coat and the patched areas just a little thicker second coat. Since SKS is water-based, I try to avoid spraying it on bare metal but this application was the perfect surface, a thin recoat over existing undercoating. Now just imagine this area with a coat of Bahama Yellow paint and how nice it's going to look all put back together!
![[IMAGE]](http://www.darrylsgarage.com/912/912rdek6.jpg)
![[IMAGE]](http://www.darrylsgarage.com/912/912rdek7.jpg)
Entry: 3/13/07 - I finally got around to peeling the masking tape off this set of dash fascia I've had since late January, CNC machined out of a sheet of 0.050" thick brushed aluminum. This is a locally produced part I purchased from Fast Freddies in nearby Kent, Washington. I think they do beautiful work and are sized exactly the same as original except a little thicker than stock, which will make them much more durable and easy to fix if dinged. I can't wait to install them on a freshly painted dash once I get the car back from the painter and I can start doing the interior trim and upholstery work (my favorite phase of car restoration projects).
![[IMAGE]](http://www.darrylsgarage.com/912/912dash2.jpg)
Entry: 3/14/07 - Here's a little "pet project" I've been working on, a factory style radio blank-out plate as shown in the original brochure photos.
![[IMAGE]](http://www.darrylsgarage.com/912/912dash0.jpg)
So I was able to create a detailed drawing with help from Brian Mendel on the 912 BBS, who provided detailed measurements and photos of an original radio blank-out plate. I ordered a sheet of 0.177" thick black cast acrylic sheeting from McMaster-Carr (item number 8505K813 for $5.17 for a 12" x 12" sheet) and a 4" chrome "PORSCHE" decal for $3.50 from 928porsche.net and with about half and hour's effort with my table saw and belt sander, I have this little gem:
![[IMAGE]](http://www.darrylsgarage.com/912/912blank.jpg)
I'm planning on having my Blaupunkt Frankfurt radio repaired and installed eventually but I wanted something cheap to fill the space temporarily. Plus, I took one look at the original and said, I can make that! Sure looks great on that new aluminum dash fascia, eh?
![[IMAGE]](http://www.darrylsgarage.com/912/912dash3.jpg)
Entry: 4/15/08 -With the help of Steve Shepp, I've also stripped-down the dash pad and seats. The seats are very solid and will require a minimum of work to refurbish. The dash pad on the other hand has had a bit of exposure to moisture over the years and it appears the right (passenger side) is a bit of a "potato chip" from deep rust.
![[IMAGE]](http://www.darrylsgarage.com/912/912dash4.jpg)
A closer look shows the tabs that retain the edge of the vinyl over the front section of the pad are completely rusted away. This will require a bit of fabrication, use of fiberglass and treatment with rust arresting chemicals. Blasting this section would result in a completely destroyed original piece. I'll keep a watch out for a better replacement piece but I wouldn't bet on finding one in a timeframe that would keep this project from hanging up so I'll give saving this metal piece my best shot. The good thing is all the rubberized horsehair padding that glues to the sheetmetal shell is still intact and can be reused.
![[IMAGE]](http://www.darrylsgarage.com/912/912dash5.jpg)
Entry: 7/2/08 - I just happened to be at the right place at the right time at work on Monday as a '66 912 was being parted out by Nick, the owner of the bodyshop a block up the alley from the shop I work at and he gave me the complete dash pad. After stripping the vinyl and padding off, I found a slightly surface rusted but completely intact sheetmetal subframe so I don't have to try and save the badly rusted one that was on my car! So how about that, a "FREE" dash pad? WOO-HOO!
![[IMAGE]](http://www.darrylsgarage.com/912/912dash6.jpg)
Entry: 7/6/08 - A trip to the bead blasting booth confirmed the healthy state of the sheetmetal of the new "FREE" dash pad subframe hidden under the thin layer of surface rust.
![[IMAGE]](http://www.darrylsgarage.com/912/912dash7.jpg)
Brushing on a coat of POR-15 and a new windshield weatherstrip should protect the sheetmetal from moisture damage for another 40 years. Once the top side dries, I'll give the underside a similar coat to protect it. As luck would have it, the original surface was a gloss black just like the POR-15 so it looks very factory correct, as well as totally hidden under new padding and vinyl!
![[IMAGE]](http://www.darrylsgarage.com/912/912dash8.jpg)
Entry: 9/7/08 - Today I crossed one more thing off the list of tasks to be completed before going into the upholstery shop! The area on the dash sheetmetal that is visible where the dash pad, defroster ducts and window seal meet was originally painted matt black by the factory, now it sports a fresh coat of matt black Wurth Trim Paint, applied to maintain the original factory Bahama Yellow paint. I don't know why this stuff is important to me but I love to preserve or replicate the original factory appearance wherever possible. I've made the appointment with Steve Shepp and the new headliner will be installed before the end of the month!
![[IMAGE]](http://www.darrylsgarage.com/912/912assys.jpg)
Entry: 9/13/08 - Getting the dashboard ready for a new dash pad is the next step in the restoration process. The original paint had several areas where surface rust had formed under the paint and some deep scratches so stripping to the bare metal is required to produce a flawless paint surface. I used aircraft-type paint stripper, sanding, Dremmel tool and Scotchbrite pads to remove the paint and surface rust. As it sits tonight, the dashboard is ready for a thick coat of the same matt black Wurth Trim Paint that I used on the doors. I can't wait to see the whole thing together with new brushed aluminum strips and reupholstered dash and knee pads someday soon!
![[IMAGE]](http://www.darrylsgarage.com/912/912dash9.jpg)
Entry: 9/14/08 - Spraying 4 thin coats of matt black Wurth Trim Paint went on without any issues today. Now all the major tasks that needed to be completed before towing the car into the upholstery shop are done! I will be towing the car down to the shop this Friday and Steve Shepp will install the GAHH headliner kit on Saturday morning... assuming of course it isn't raining!
![[IMAGE]](http://www.darrylsgarage.com/912/912dasha.jpg)
Entry: 9/20/08 - Yesterday evening I once again borrowed the tow dolly from my friend Roger at Eurotech and towed the 912 down to Steve Shepp's shop in Ballard to get the GAHH headliner installed. This morning I got up early and showed-up at Steve's shop to find him already hard at work on the installation, which he completed in about 6 hours of labor, including all the black vinyl down the window pillars and the sound insulation foam padding glued to the roof of the car.
![[IMAGE]](http://www.darrylsgarage.com/912/912head2.jpg)
Of course it rained today so getting the car back home as dry as possible took a bit of creative use of black plastic with the help of my new 912 friend Matt, who showed up just in time to drink Pacifico beer with Steve and I! I also installed the rear quarter windows, this time with the chrome strip that goes inside the bottom edge of the window.
![[IMAGE]](http://www.darrylsgarage.com/912/912head3.jpg)
Once home the car was dried off and as you can see from the photograph below, Steve did a perfect job. New dome lights finished off the installation and the trim around the rear quarter windows was re-dyed using SEM vinyl dye that Steve custom blended to match the color of the new headliner material. As usual, I learned a bunch of stuff about installing headliners, or more precisely, why one should pay a professional to do it!
![[IMAGE]](http://www.darrylsgarage.com/912/912head1.jpg)
Entry: 10/12/08 - If you're wondering why it's been a little quiet on the old 912 project the last three weeks, well, I've been in sunny Italy! Yes that's me wearing a Ferrari hat pushing over the Tower of Pisa in the following photo! So after enjoying the food and sights in Tuscany and Umbria, renting a car and driving on European roads, watching my life savings disappear on CNN and lusting after vintage Vespas and Fiat 500 cars, I come home to see a banner at the top of my webpage informing me that wonderful AOL is discontinuing the hosting of my website! So it looks like time for getting my DarrylsGarage.com web address and my own ISP has come... stay tuned. Ciao!
![[IMAGE]](http://www.darrylsgarage.com/912/912italy.jpg)
![[IMAGE]](http://www.darrylsgarage.com/912/fiat500.jpg)
Entry: 10/31/08 - Today's entry is the first to appear on my new domain name "darrylsgarage.com" after weeks of battling with EarthLink to get their act together and get it set up! So today I spent most of my time out in the garage preparing for installation of the windshield and rear window so the car can be sealed from rain and returned to the bodyshop for the cut-and-polish of the paint. First task was cleaning the rear window glass and polishing the marks left in the lower edge where acid rain had etched the glass as well as a couple minor scratches using cerium oxide glass polishing compound on a special pad that mounts on my electric drill.
![[IMAGE]](http://www.darrylsgarage.com/912/912rgls1.jpg)
Once the glass was polished and cleaned, I installed a new OEM rubber window seal and new OEM anodized aluminum trim strips. The old glass cleaned up very nicely and looks stunning mounted in the new rubber and anodized aluminum trim!
![[IMAGE]](http://www.darrylsgarage.com/912/912rgls2.jpg)
Finally the matter of repairing the rear window defroster ducts needed to be addressed. The ducts were originally dipped in some kind of plastic liquid that became brittle and cracked, allowing moisture to form rust on the underlying steel duct. One of the hooks that hold the duct over the rear window weatherstrip lip had also rusted away and a new one needed to be fabricated and welded in place. As the ducts sit now, they have been stripped of the plastic coating, blasted and the hook fabricated and welded on. Next I need to blend some Rustoleum paint to a shade of gray that matches the original plastic coating and attempt to apply a thick enough coat to look like the original plastic coating by repeatedly dipping the ducts in the gray paint and baking it on using low heat in my oven. Luckily only about �" of the duct is visible once the rear window upholstery is in place.
![[IMAGE]](http://www.darrylsgarage.com/912/912rgls3.jpg)
Entry: 11/10/08 - Things have been difficult in the computer department around here, it seems my Windows XP box has caught a virus and is off at the PC hospital to get cured. This situation leaves me with my notebook computer that runs on Vista and I have yet to upgrade any of my graphics software so posting to my website requires very clever use of the extremely primative photo editing tools that come standard with Windows, the Paint program! Here goes... I've finally assembled all the necessary parts for my defroster vents and have done the customary "freshening-up" before installing them on the dashboard so now the car is ready for a new windshield! The speaker and dash pad can and will be installed after the windshield is installed. I'm still not finding a source for an all clear windshield besides the $400 one at Stoddard's but the guy who I've been buying all my windshields from over the last 10 years said he will install one I source for me as well as the rear window.
![[IMAGE]](http://www.darrylsgarage.com/912/912dfro1.jpg)
As for finding a solution to the rear defroster duct coating, I mixed a custom blended batch of gray paint, approximating the original color using dark gray and white Rustoleum enamel. The coating effect was achieved by dunking the metal duct into the paint and letting it dry with as thick of coating as possible pooled on the top side of the duct. I used a dry "model" type paint brush and my breath to blow and move the paint drops around so they wouldn't flaw the portion of the nozzle that would be visible. I'm pretty happy with the way these turned out in the following photo, compared to the original in the photo below them. Once the paint cures, the ducts will be ready for installation in the rear window and then the rear window can be installed at the same time as the windshield!
![[IMAGE]](http://www.darrylsgarage.com/912/912dfro2.jpg)
![[IMAGE]](http://www.darrylsgarage.com/912/912dfro3.jpg)
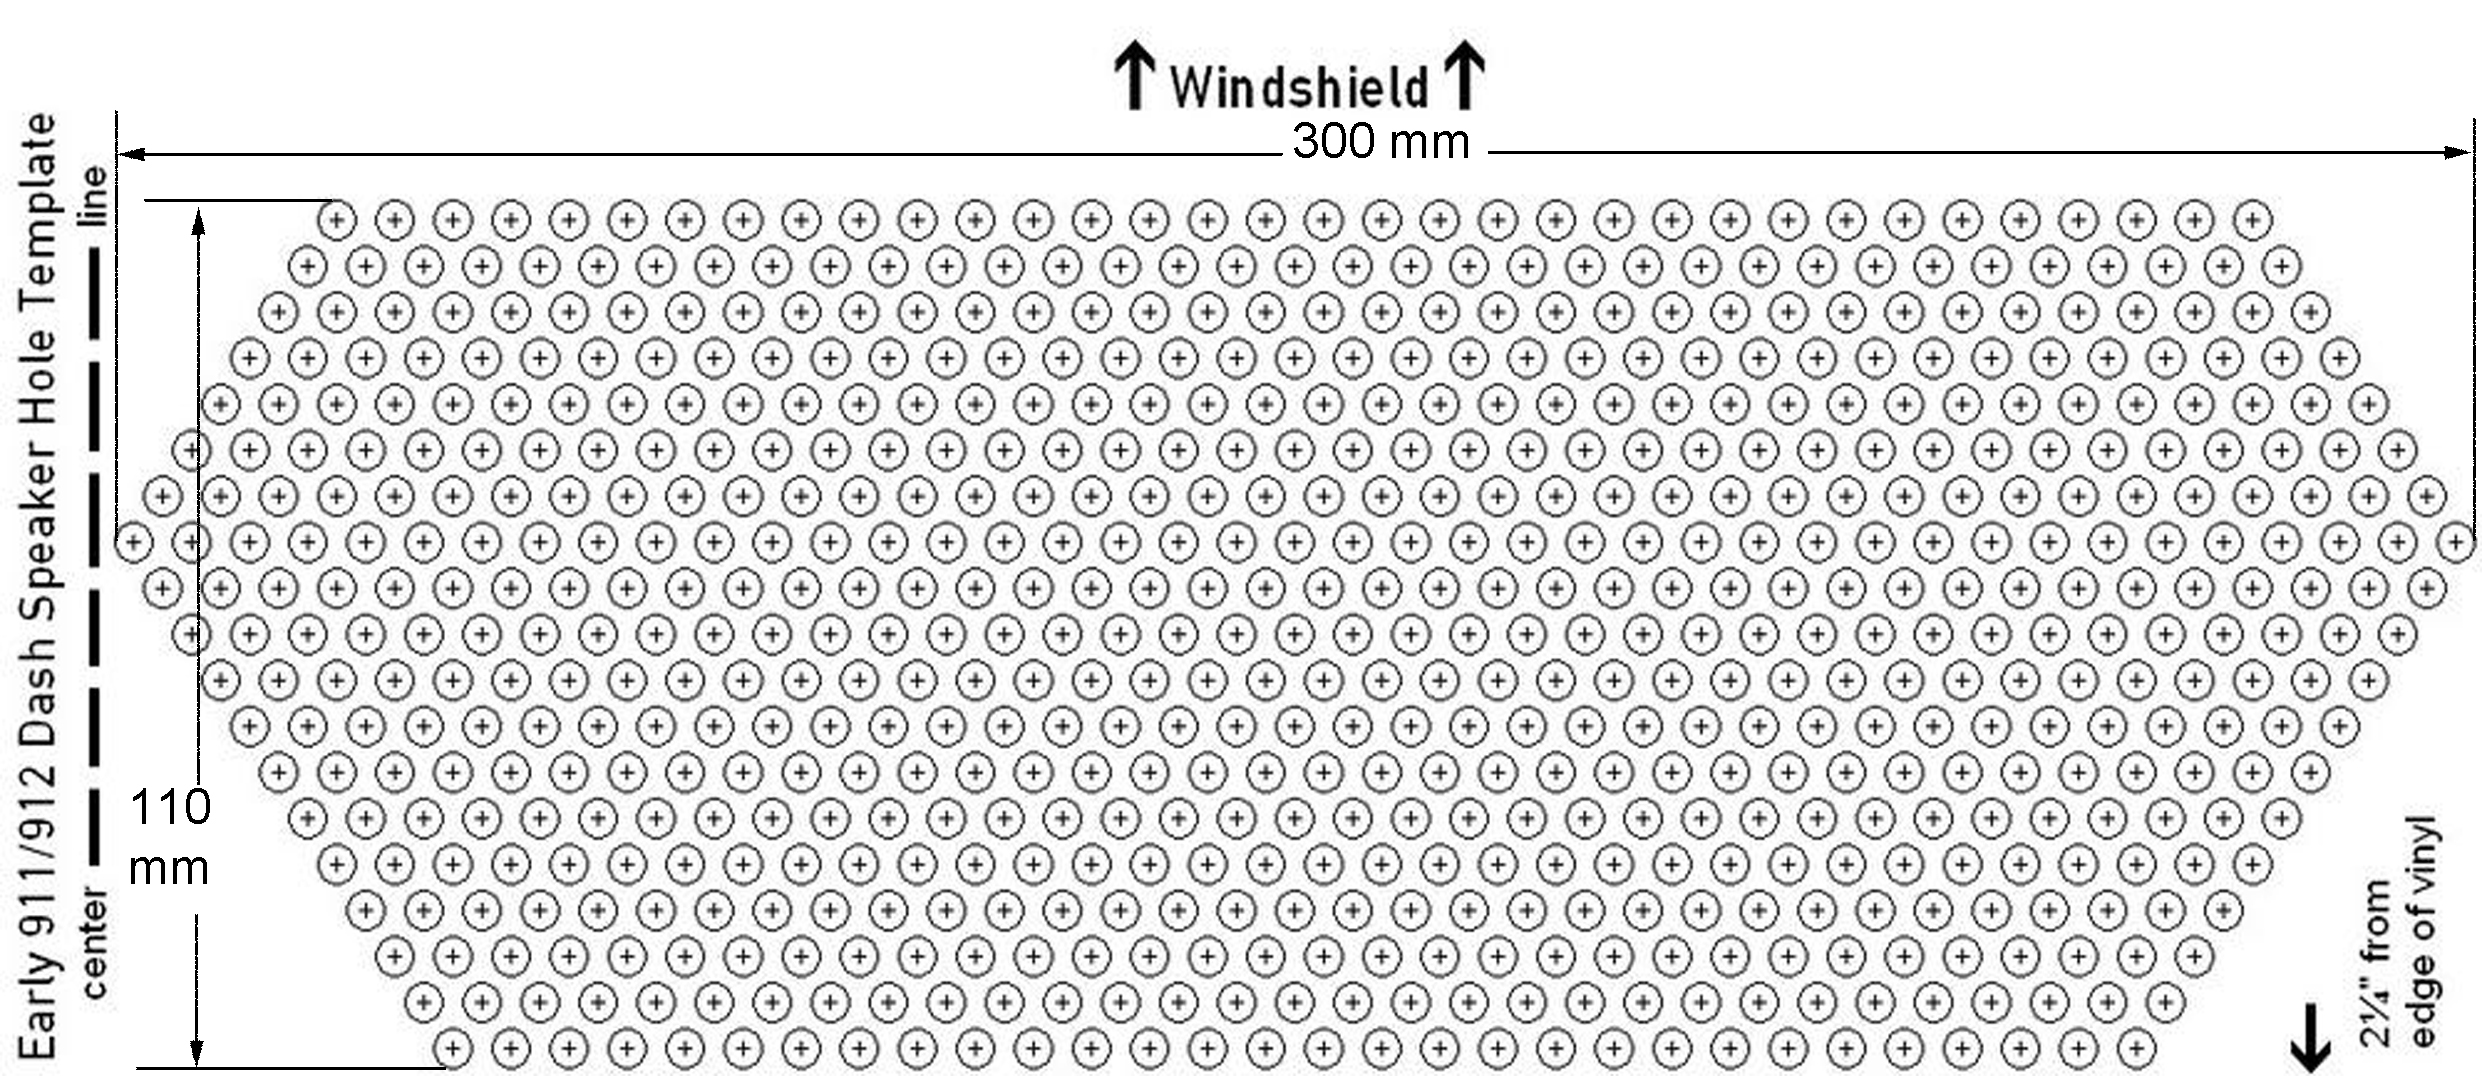
Entry: 11/11/08 - I've been working on a solution to reproducing the original radio speaker grill holes in the dash pad and thanks to my 912 buddy Matt, I was able to use some aluminum foil to take an impression of the original one in his car. From the impression I was able to draw a perfect pattern using the Windows "Paint" program on my computer. Now all I have to do is figure out how to use the pattern to actually put the holes in the vinyl, my current thinking is drill holes in a piece of sheetmetal to form a template for a gasket making hole punch. I'll wait until I talk to Steve Shepp to see what his thoughts are. I also just got off the phone with Maurice at Stoddard's and the German-made Sekurit brand clear (non-tinted) windshield has been ordered at my 10% discount and should arrive by the end of the month. You can see the full-size speaker grill hole template (recently updated for use with current printing technology with the help of my buddy Bill Sargent) by clicking on the smaller one below:
Entry: 11/13/08 - Today the paint on the rear window defroster ducts was finally cured hard enough to install. I thought this would be a pretty straight-forward operation, the rubber grommets went into place without much fuss but it became obvious that inserting the defroster duct tube into the grommet wasn't going to work since the best angle I could get at it was about 45� and the tube caught up on the grommet and cut into it. My solution was to make a tool! I found a piece of old broomhandle about the same diameter as the duct tube and filed it down to allow about �" of it to fit inside the duct tube. Then I used the broomhandle and pushed it up through the grommet from the engine compartment side, lubricated it with KY-Jelly, forced it to a 45� angle so I could push the duct tube onto it and slid both back through the grommet as one piece.
![[IMAGE]](http://www.darrylsgarage.com/912/912dfro5.jpg)
Suffice to say, it worked! Now both rear window ducts are installed without messing up the fresh gray paint! Once the rubber window seal and the rear deck upholstery are in place only about �" of the gray duct is visible. A lot of work to go through for such a small detail but it's the little things visible from outside the car that are so important to judges.
![[IMAGE]](http://www.darrylsgarage.com/912/912dfro4.jpg)
Entry: 12/20/08 - I'm snowed-in here in Seattle so what better time to stay huddled close to the computer and play with changing the color of a bright red 912 in a vintage factory photo to Bahama Yellow! Through the wonder of online banking I also noticed that Stoddards charged the cost of the all clear SEKURIT windshield on backorder to my Visa card on 12/16 so it will probably be here before Christmas!
![[IMAGE]](http://www.darrylsgarage.com/912/912play5.gif)
Entry: 12/26/08 - I'm halfway done restoring the seat pans with the first of the two media blasted and repainted with gloss black paint. As you can see by the unrestored one on the left, the pans were very solid with only some slight surface rust where the original lacquer paint started to flake off. I masked off the tracks to preserve as much of the original plating as possible and sanded off the few rust spots that were there prior to sealing the bare metal from future rust with clear paint.
![[IMAGE]](http://www.darrylsgarage.com/912/912seat1.jpg)
Entry: 1/26/09 - With the cold weather, I didn't feel like standing out in the cold shop and working on the engine today so I decided to tackle a big job I've been putting off. The original dash radio speaker grill is pretty minimalist, 745 individual 9/64" holes punched a diamond shape in the vinyl and it looks like the one in the following photo.
![[IMAGE]](http://www.darrylsgarage.com/912/912dashd.jpg)
I had created a pattern using the "Paint" program that comes free with Windows (see 11/11/08 entry lower on this page) and printed it out in portrait mode on my HP printer using legal-size paper. I decided to keep my approach to implementing it simple so I found a source for legal-size label sheets that I could also feed through my HP printer. I figured out where it should be positioned on the material (and added that information to my pattern) in relation to the center line of the dash. I cut the excess label material off around the grid of holes and stuck the label directly to the vinyl in the position I had determined from my measurements. I found a 9/64" punch at a local leather shop and used a dead-blow hammer for each individual hole punch. It took nearly 2 hours this evening (through the local & national news and most of Wheel of Fortune) sitting in front of my DTV at the kitchen table (I'm ready for the shut-down of analog TV are you?).
![[IMAGE]](http://www.darrylsgarage.com/912/912dashb.jpg)
Here's a close-up of the 9/64" (a.k.a. "#3") leather punch tool, which had to be "emptied" every 4th punch so the "chads" (flashback to Florida and the 2004 election?) wouldn't clog the tool. You can see the "chads" collected in the glass bowl. Hanging "chads" which didn't happen often, were removed by carefully reinserting the punch tool in the the hole and twisting it.
![[IMAGE]](http://www.darrylsgarage.com/912/912dashe.jpg)
The only draw back to using the label sheets is that the longer the sheet stays stuck to the vinyl, the more adhesive that transfers. After removing the label material pattern it was necessary to use Windex to get the sticky residue off the vinyl. As you can see in the following photo, my 745 holes lined-up very nicely and once the white backing on the vinyl has been painted black and fine black mesh speaker cover material is glued on to the back side of the vinyl, it will be an accurate copy of the original factory dash pad. I'm glad to have this little task done for Steve Shepp and my efforts saved me 2 hours at his shop rate of $90/hour or $180! Next step is dropping the roll of dash vinyl back off with Steve so he can install it on my dash.
![[IMAGE]](http://www.darrylsgarage.com/912/912dashc.jpg)
Entry: 2/22/09 - Well as luck would have it, Jack didn't have a set of already reconditioned rockerarms in his inventory when I stopped into the shop on Friday. I have to send my rockerarms into yet another machine shop for reconditioning, but this delay won't slow down work on my engine's bottom end so no worries. I negotiated the opportunity to recover my own dash pad with Steve Shepp as my tutor (and provider of materials) so I could learn how to do it from the master himself. Well, I was there for about 4 hours and with only one boo-boo requiring rescue by Steve, I got the front half of the dashpad completed. It is really quite amazing how easily the vinyl fits when someone who's probably done this hundereds of times tells you exactly what to do! The original rubberized horsehair factory pad was pretty rough but a 1/8" thick layer of closed-cell foam glued over it should give it one more round inside the car. I can't wait to the next phase where I install the piece of vinyl that I punched the 745 holes into it for the speaker grill a few weeks back!
![[IMAGE]](http://www.darrylsgarage.com/912/912dashf.jpg)
I also got an eBay purchase delivered yesterday, a complete set of rechromed seat brackets for an early 912 I won for $225 with shipping!!! What a score, having one of those pieces rechromed probably costs that much with taxes around here! The amazing thing is that I outbid the only other bidder 12 minutes before the auction closed... is the economy that bad? I am just so stoked that my freshly reupholstered seats will be assembled with freshly chromed brackets! I just don't look too forward to reassembling that coil spring that holds the seat back... I've helped with that at the shop and I think it's a 3-man job!
![[IMAGE]](http://www.darrylsgarage.com/912/912seat2.jpg)
Entry: 2/23/09 - Today I went back down to Steve Shepp's shop in Ballard to finish installing the upholstery on my dash pad. I measured and cut the vinyl with the 745 speaker holes punched into with great care so I didn't lose all that work. The vinyl covering the front part of the dash pad is retained by an inch-wide metal strip that follows the contour of the pad covering the gauge pod / passenger dash face and it is glued to the vinyl and then held in place with tabs cut into the underlying steel skeleton. I placed 1/8" open-cell foam on top of the dash before pulling the vinyl tight over it and gluing it to the back side of the steel skeleton. Some of the metal tabs are visible as bumps, through the foam under the vinyl, which is a bit of a disappointment with as hard as I worked to make them flat beforehand... oh well, still looks pretty good to me. Steve told me that the foam tends to flatten out over time so the bumps are not as pronounced so I guess we'll see. Now I can't wait to see how it looks installed in the car!
![[IMAGE]](http://www.darrylsgarage.com/912/912dashg.jpg)
Entry: 2/25/09 - Over the last couple days, I've left the dash pad in the warmest room in my house to allow the glue to cure. Tonight I installed it into the car with only a few fitting issues to resolve. I am extremely happy with how my first attempt at reupholstering a 912 dash pad turned out! Now I am excited to see how that brushed aluminum trim and lower pad will look when it is installed. I also am starting to consider that it's time to send the instruments into North Hollywood Speedometer for a complete restoration, I should get quick turn-around if the economy is hurting business.
![[IMAGE]](http://www.darrylsgarage.com/912/912dashh.jpg)
Entry: 6/15/09 - Over the weekend I worked on restoring the dash knee pad. The tasks required to make this piece usable again began with drilling out the two center studs (of four total) and MIG welding in M5-0.8 x 20 mm bolts so they could be used again. All the surface rust was sealed using SEM rust converter and the whole thing was run down to Ballard so Steve Shepp could teach me how to recover it. As you can see in the following photo, other than some minor bumps telegraphing themselves along the top edge of the pad, it looks like new original again. I've been worried about old Steve though, he's just started radiation for a tumor found by his voice box. I've always thought the vapors were kind of strong in his shop. As he said, the good thing is he only needs radiation and it doesn't interfere with his cigar smoking and beer drinking... I'll drink to that!
![[IMAGE]](http://www.darrylsgarage.com/912/912dashi.jpg)
Entry: 7/10/09 - Today I think I made the milestone of having all the parts needing blasting and painting completed. The pieces in the paint booth drying are from all areas of the car; glovebox door, brake backing plates, pre-heater pipes and many others with the intended exception of the snorkle air-cleaner filter housings. The glovebox door was a pretty ambitious blasting task as there was rubber glue on the front from the aluminum trim and vinyl cement on the inside from the trim piece with elastic straps for holding things like sunglasses. I just love how freshly-blasted pieces look like and snapped this picture of the naked glovebox door to show you what I mean. Tonight it hangs with two thick coats of Wurth Satin Black Trim Paint drying on it. Assembling that dashboard with the fresh instruments and aluminum trim is starting to look like it's not very far off!
![[IMAGE]](http://www.darrylsgarage.com/912/912dashj.jpg)
I can't drive the car without a steering wheel so I had better get cracking on the fancy wood one that came on the car. It appears that the finish has completely worn through on the outside edge of the wheel and crazed varnish appears to be clinging for life on the inside. I'd love to media blast and repaint the spoke/hub assembly and probably need to figure out how I'm going to approach that task. First, I'll ping the gents on the 912 Registry BBS to see if anybody has any suggestions.
![[IMAGE]](http://www.darrylsgarage.com/912/912swhl1.jpg)
Entry: 7/18/09 - I've been making steady progress on restoring my wooden steering wheel over the last couple days. I started with buying a quaility chemical stripper used for furniture which was specifically forumulated to not soften wood joining glue. The old crazed and flaking varnish came off very quicky with the stripper but some stains (shown as the dark / light areas in the following photo) remained but the wood hidden under the old finish still looks very solid and presentable.
![[IMAGE]](http://www.darrylsgarage.com/912/912swhl2.jpg)
A very light sanding with 320 grit wet-dry paper and "double-O" (00) fine steel wool lightened the stains significantly but not completely. I found a light cherry colored stain that I will use to mask the blotting and give the wood a redish hue to match what I see in the photos of the original finish. I was afraid to attempt bleaching the wood for fear of damaging the dark stripe that runs around the center of the wheel. Once I got the wood pretty much prepped for staining, I used aluminum foil tape over a layer of blue masking tape to mask off the spokes for media blasting. The wood further away from the spokes was "shrink-wrapped" with kitchen-type plastic wrap and then covered with normal duct tape. Blasting went very quickly and rather than risk leaving any sanding marks, I simply blew off any remaining dust from the blaster and applied 3 thick coats of Eastwood's Extreme Chassis Black Satin paint and will let it cure in the heated paint booth for at least 48 hours so it gets nice and hard. I'll carefully mask and shrink-wrap the spokes before I start staining and varnishing the wood with UV-resistant marine spar varnish. I anticipate at least 4 coats of varnish with "quad-aught" (0000) super fine steel wool scuffing between each step with the intent of having a glass-like finish. I think this is going to turn out extremely pretty due to the encouraging early results.
![[IMAGE]](http://www.darrylsgarage.com/912/912swhl3.jpg)
Entry: 7/20/09 - My patience in letting the Eastwood's Extreme Chassis Black Satin paint cure in the heated paint booth for a couple days paid off! I now have an extremely hard and chemical-resistant coating on the spokes of the steering wheel. More patience was required to carefully remove the aluminum foil and blue masking tape from the wood without pulling wood grains off with it and still a little grain damage will need some sanding to fix. The results look pretty stunning though, a flawless coat of black paint, ready for the next step, staining the wood with a light cherry color furniture stain.
![[IMAGE]](http://www.darrylsgarage.com/912/912swhl4.jpg)
Entry: 7/22/09 - Now the patience requirement is really starting to ramp up on my steering wheel restoration. I've stained the wood using a dark walnut color after learning about the evolution of the wood colors and that a redish hue wasn't seen on an early 912 like mine. After letting the stain dry for 24 hours, the first coat of an aerosol, UV-resistant marine spar varnish has been applied and now my eyes are on the prize! I can see the color and grain detail the finish results with and as the following photo shows, it's pretty, especially in bright daylight. The flash photograph also shows the surface has many little wood grain pits that the varnish will eventually have to fill as the layers are applied and polished using "quad-aught" (0000) super fine steel wool between each minimally 24-hour cured coat of varnish. I'm just taking a page from classic boat brightwork finishing techniques applied to car restoration, how fun is that! It's also time to move the car itself onto the 4-post lift and begin with installing the brake system.
![[IMAGE]](http://www.darrylsgarage.com/912/912swhl5.jpg)
Entry: 8/2/09 - My steering wheel restoration is progressing slowly, which is as quickly as it can with a 24 hour cure time between coats of marine spar varnish. The first 4 coats of varnish were "scuffed" between each coat with "quad-aught" (0000) steel wool before building a thick enough layer of varnish to start wet-sanding with 1000-grit paper. What you see in the following photo is the 6th coat, ready for another wet-sanding and the 7th coat. The wood grain marks are quickly disappearing and I figure should be like glass by the 10th coat. I just turned 50 two days ago and can see that patience is definitely something that comes with age!
![[IMAGE]](http://www.darrylsgarage.com/912/912swhl6.jpg)
Entry: 8/7/09 - Just when I thought I was getting close to having my wooden steering wheel finished I take a step backwards. I felt that I had hit the point of diminishing returns with the 8th coat of marine spar varnish and was happy with the glass-like finish. I removed the masking tape and clear kitchen stretch wrap on the metal spokes to discover that the black paint's finish had been marred by it! I suspect that I hadn't let the paint cure long enough and it was still soft enough and "off-gassing" enough to allow the plastic wrap to bond with it. It's not really tragic, just some very careful wet-sanding and an additional layer of paint after I let it cure for a few weeks so I don't damage the varnish with masking tape. The point where the varnish meets the metal spokes could use a little more clean-up work anyway so it's all going to result in a better looking job. I'm actually quite pleased with how my first attempt at this type of work is turning out and will simply prime the metal before the wood finishing phase and paint the spokes last on the next one I do. I've also been hunting down, inventorying and cleaning up all the new and used brake system parts over the last couple days and starting with bending new brake lines and mounting the rebuilt calipers on new rotors.
![[IMAGE]](http://www.darrylsgarage.com/912/912swhl7.jpg)
Entry: 9/5/09 - Today I started work on reinstalling all the electrical switches and wiring to the dashboard. I took lots of detailed photos and made thorough notes when I took this all apart so hooking up the wires should be just a matter of verifying the wire colors against the wiring diagram. All the switches have been thoroughly cleaned with Electrosol and compressed air prior to lubrication and reassembly. The first piece of new brushed aluminum dash trim has also been rubber cemented into place so the ignition and headlight switches could be installed and it looks quite sharp against the fresh black paint. I've got to get busy on finishing the wood steering wheel restoration because remounting it is quickly approaching!
![[IMAGE]](http://www.darrylsgarage.com/912/912elec1.jpg)
Entry: 9/7/09 - Today I finished installing the new aluminum dash trim, radio block-out plate (temporarily until the radio is fixed), ash tray, cigarette lighter, glovebox door, new glovebox liner and upholstered knee pad. I also installed the restored seat rails so they are ready to install the temporary seats I purchased off eBay when they arrive. Next step is hooking up all the wiring.
![[IMAGE]](http://www.darrylsgarage.com/912/912dashl.jpg)
Entry: 9/8/09 - Today it was time to finally hook up all the dash wires. I started with the "front office" inside the passenger cabin which went very quickly thanks to the foresight of taking lots of digital photos and making notations on them at the time I took it all apart. Click on the thumbnail image below to see the full-size photograph.
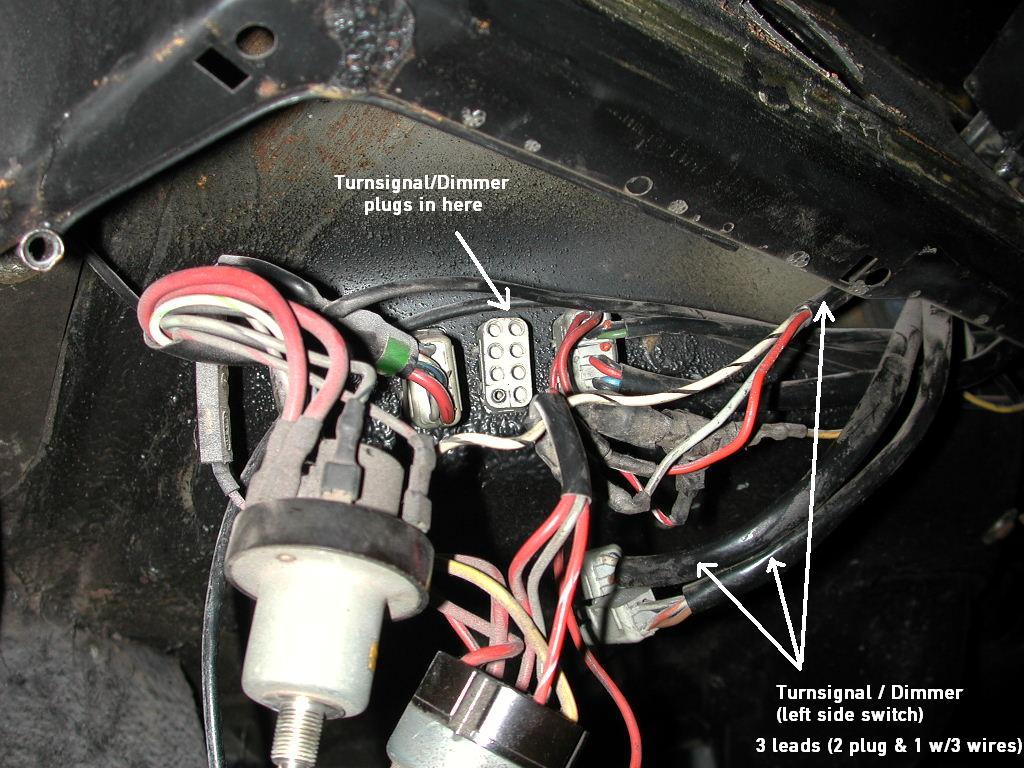
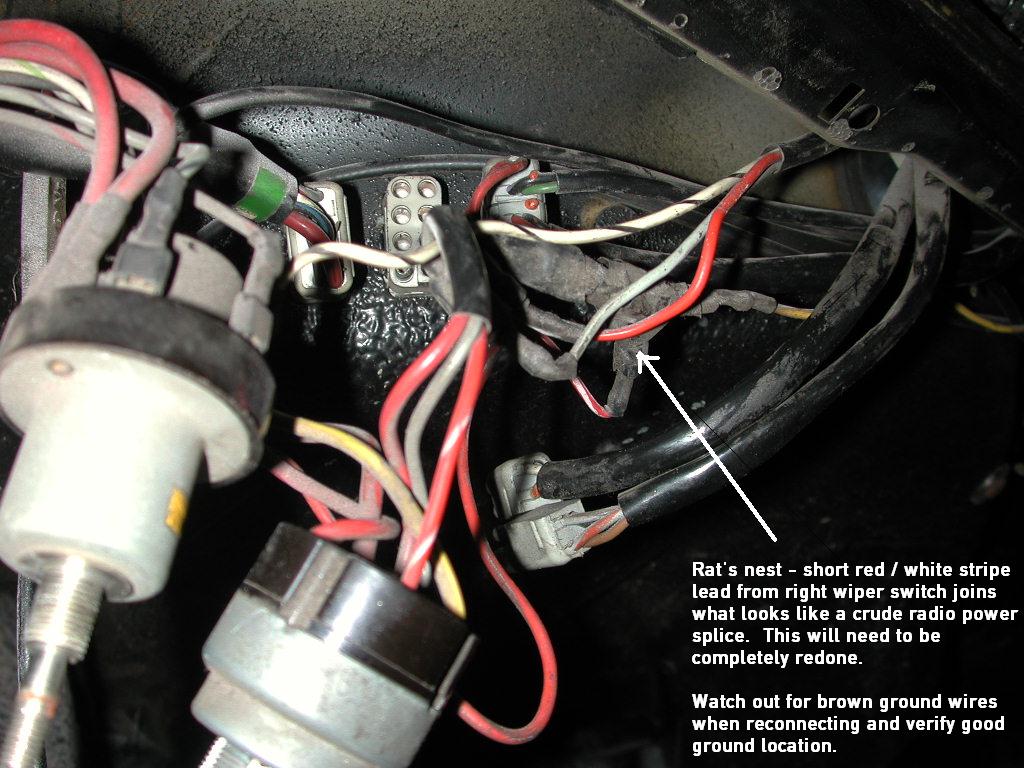
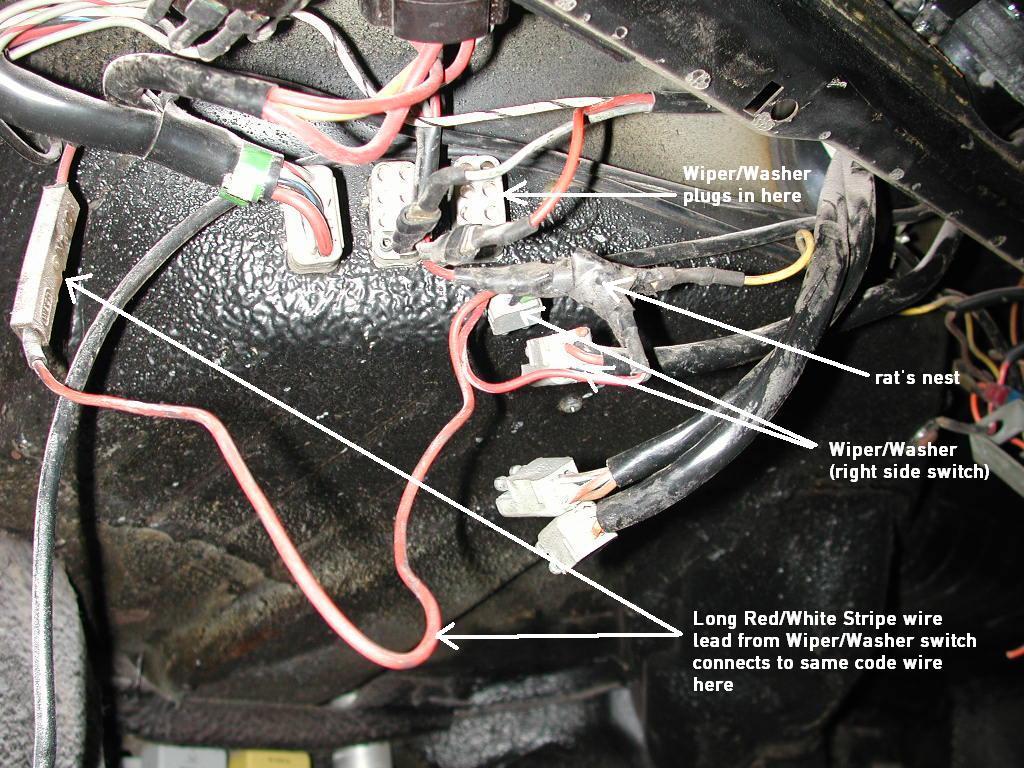
I was able to remove all the wiring hacks for stereos and such made by prior owners and put everything back to exactly as it was from the factory. I made certain to use a wire brush on my Dremel tool to clean the bayonet-type spade connector welded to the dash so an excellent ground was insured prior to coating the connections with dielectric grease to keep them from corroding for a long time.
![[IMAGE]](http://www.darrylsgarage.com/912/912dasho.jpg)
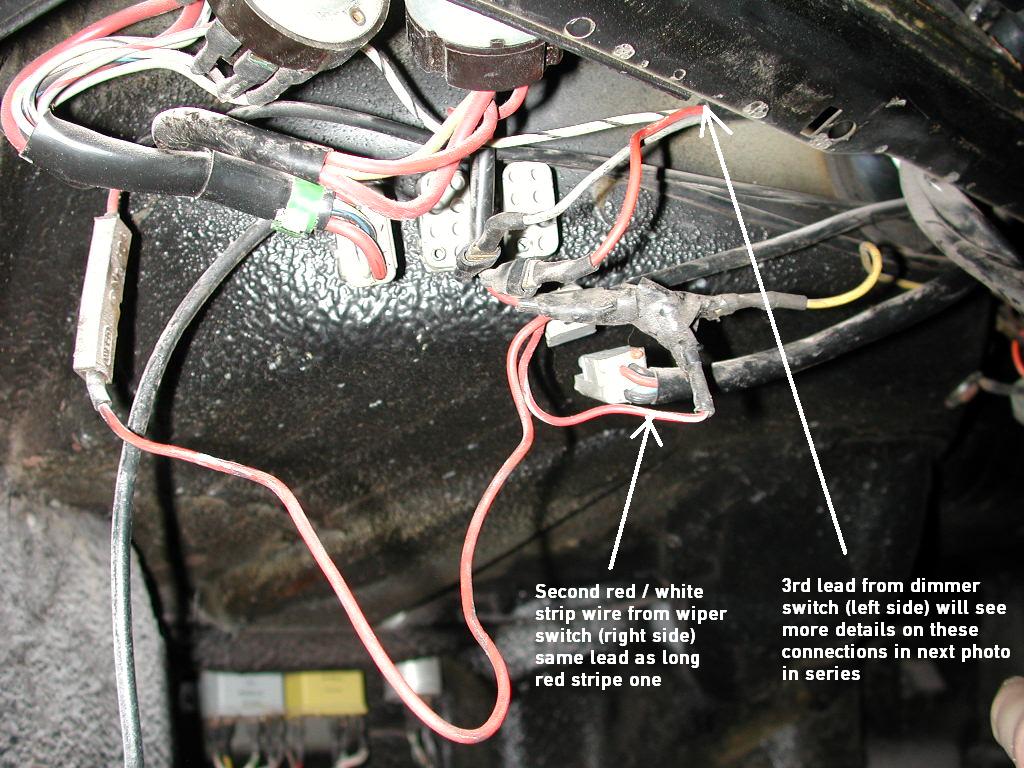
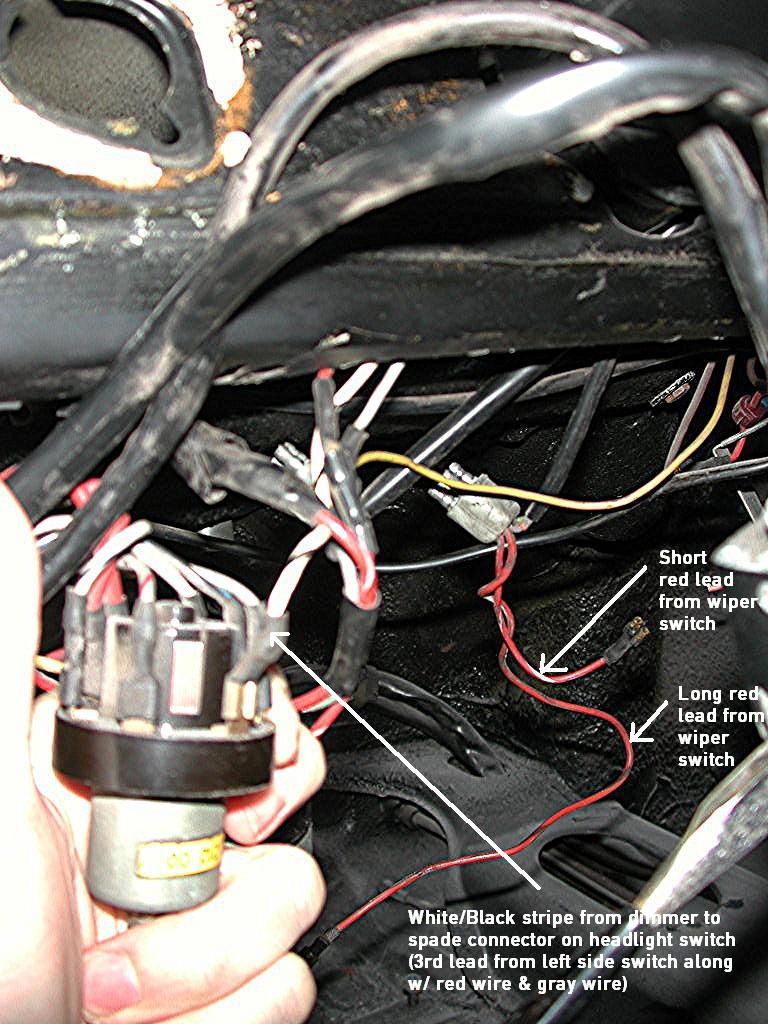
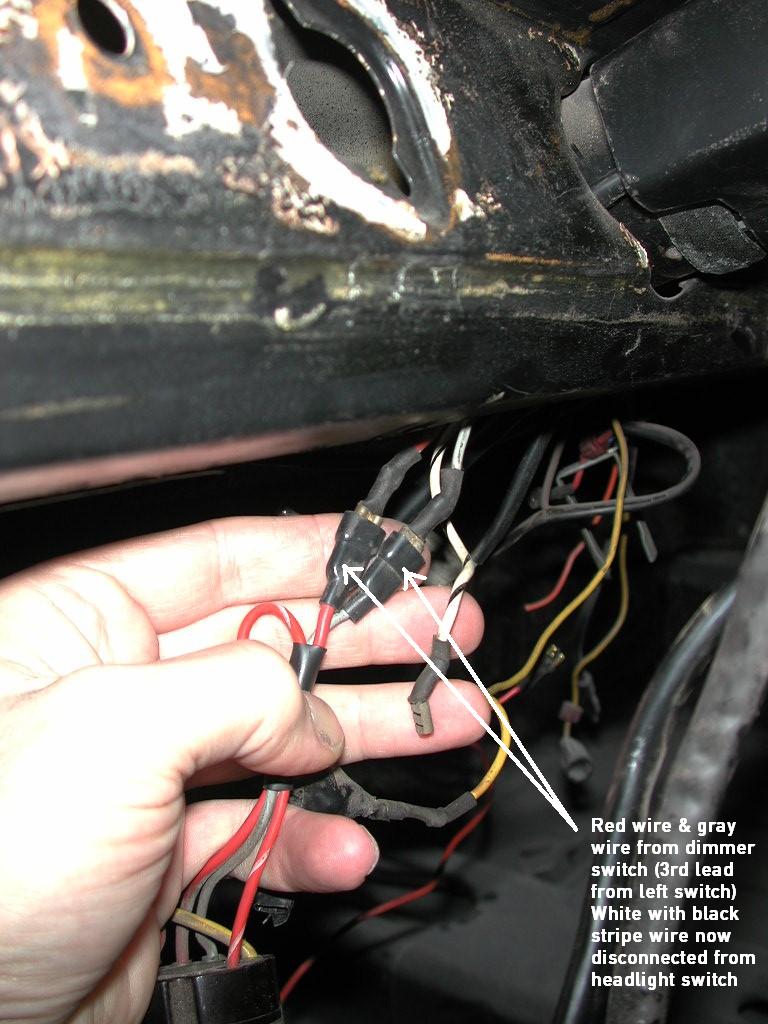
Once the "front office" was all buttoned-up it was time to turn my focus on the "back office" up under the hood. Reconnecting all the wiring to the instruments was aided by detailed drawings I made of each instrument with the wire colors and connections. Click on the image below to see an enlarged version of it.
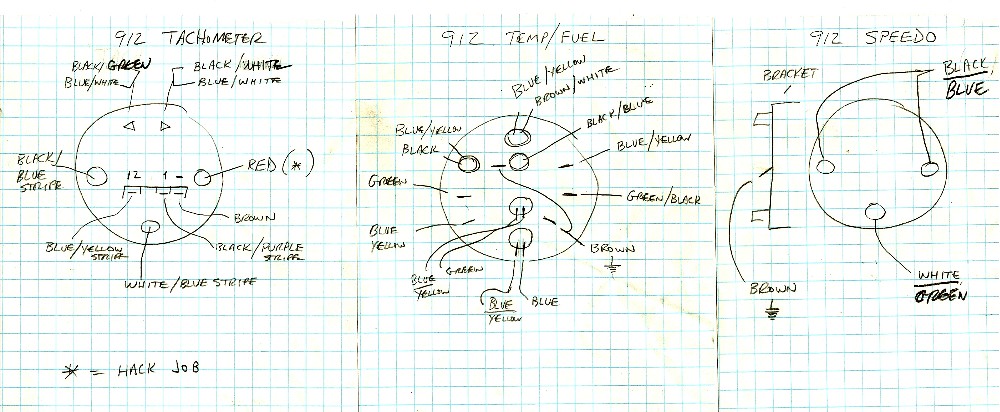
Again, any wiring hacks made by prior owners were removed and the optional clock and ambient temperature gauge were rewired to conform to the correct wire colors and factory connections. Installing the windshield wiper motor and cowl vent drain assembly were the last items installed before calling it a day.
![[IMAGE]](http://www.darrylsgarage.com/912/912dashm.jpg)
I decided to put the rubber factory floor mats in place to make it ready for test driving once the temporary seats I bought off eBay arrive. Now completion of the steering wheel and horn button restoration are all that remains before the interior is ready for test driving. Next step is installing the battery and testing all the electrical circuits... crossing my fingers that all the switches and bulbs work, there are no shorts and the grounds are all good!
![[IMAGE]](http://www.darrylsgarage.com/912/912dashn.jpg)
![[IMAGE]](http://www.darrylsgarage.com/912/912dashp.jpg)
Entry: 9/24/09 - I've let the marine spar varnish on the walnut steering wheel cure for over 6 weeks so now it's time to wet sand those marks out of the black paint on the metal spokes using 1000 grit paper. The edges where the varnish and the paint meet have been cleaned-up and everything looks good for one more layer of paint. I masked the wood off using 3M Safe Release masking tape and a coat of black Eastwoods Extreme Chassis Satin Black is drying in the paint booth and looking like there are no imperfections or sanding marks visible... I'm keeping my fingers crossed we finally have a flawless job!
![[IMAGE]](http://www.darrylsgarage.com/912/912swhl8.jpg)
Entry: 9/25/09 - OK, I think I finally got the result I was looking for on the walnut steering wheel. One additional coat of Eastwood's Extreme Chassis Satin Black paint over the 1000 grit wet sanded surface resulted in a flawless finish and crisp edges where the wood and metal meet. In retrospect, I'm not sure if primer or the actual paint prior to the 8 coats of marine spar varnish stage is preferable but it is evident that some detail sanding where the varnish and paint meet and a final coat of paint is required to get a crisp edge. Using plastic kitchen wrap as a masking material isn't a good idea and I won't do that again! I can't wait to see how this steering wheel looks in the car but I must wait a couple days for the paint to harden before attempting any reattachment of the hub... it's so pretty, I'd just have to start crying if I screwed it up now!
![[IMAGE]](http://www.darrylsgarage.com/912/912swhl9.jpg)
Next little project was freshening up the sunvisors. After much scrubbing and cleaning using a scrub brush and detergent and thorough drying, it's time fix the discoloration from 45 years of use. I use SEM Color Coat Flexible Coating in color code 15003, "Phantom White" of which a thin coat is applied after wiping the visors with lacquer thinner and applying the vinyl dye just as the thinner is flashing. Side-by-side shots show how closely "Phantom White" matches the original color and how discolored the sunvisor was before re-dying.
![[IMAGE]](http://www.darrylsgarage.com/912/912visr1.jpg)
The plastic sunvisor mounts were very stained from the rusty old chromed screws and pivot shafts. A thorough scrubbing with 123 Corrosion Buster removed the rust stain from the plastic but left it dull looking. A thin coat of clear gloss rattlecan paint and some stick on chrome to cover the rust on the pivot shafts has them looking new once the visors are pushed back on.
![[IMAGE]](http://www.darrylsgarage.com/912/912visr2.jpg)
Buffing new stainless steel sheetmetal screws, screwed into a wood block to make them easy to hold while buffing, completes the pieces required to reassemble the refurbished sunvisors once the dye thoroughly dries.
![[IMAGE]](http://www.darrylsgarage.com/912/912visr3.jpg)
Entry: 9/26/09 - My local 912 buddy, Matt Marquez stopped by with his '67 912 today and helped me finally get those rear shocks tightened down. It takes one guy holding them from under the car and another turning the nuts behind the engine to get them tight enough so they don't "clank" when I hit a bump. Matt also let me take his 912 out for a test drive (the same route as my first drive last week) just to see how nicely his engine is running since he had Wolfsburg Motorwerks rebuild the Webers and distributor. I continued working on my interior, installing the freshly re-dyed sunvisors, new dashboard light and the restored walnut steering wheel. Things are starting to look pretty finished in the cockpit, except for carpet and door panels which Steve Shepp told me will be done before Christmas!
![[IMAGE]](http://www.darrylsgarage.com/912/912dashq.jpg)
Entry: 10/14/09 - Just got back home from an overnight trip to Washougal, Washington to meet my new Porsche friend, Steve Carroll who sold me this great set of 2 x 11/65 and 2 x 5/65 dated 4�" Lemmerz (manufacturer) chrome wheels for my 912. The window sticker shows the wheels were a dealer installed item so any reasonable manufacturing date prior to the 11/23/65 sale date on the original bill of sale would suffice. I think I'll try to make a matched set of 5/65 eventually but for now I'm happy to at least have a set of all 4 wheels being '65 and Lemmerz! Steve mentioned he is looking for a single 3/66 dated KPZ (manufacturer) 4�" chrome wheel for his fantastic white over red '66 911 so I'll be doing some prospecting around my various sources for one.
![[IMAGE]](http://www.darrylsgarage.com/912/912whl5.jpg)
I also found a package waiting for me when I opened the front door addressed from Natural Auto Products, LLC (a.k.a. CocoMats.com). It contained my beautiful new, un-backed as original, color code #52 black & gold dot cocomats for the front floors of my 912! Don't they look beautiful contrasting the Bahama Yellow paint and black vinyl? I am really getting excited about getting the interior installed by Steve Shepp sometime next month!
![[IMAGE]](http://www.darrylsgarage.com/912/912coco1.jpg)
Entry: 10/21/09 - Over the last week, I've been working on a couple little interior detailing projects. The first one is refurbishing the glove box lid liner. The one that came with my car was glued in like the ones I've seen on the 356 cars I've worked on. I noticed the remnants of a metal clip on it (labeled '1' on the front/back photo below) and suspected it had been damaged so I decided to compare it with another one still installed on a spare 912 glove box lid I had in my parts stash. I go to remove it from my spare and it comes right off! I discovered the original was held on with 4 little clips, not glued like the 356! So here I have a tired but original one (labeled '2' in the photo) with all 4 clips intact but needing new elastic and some heat treatment (like I did to '1') to straighten it out. I've got a roll of the correct 10 mm wide elastic and will be giving '2' some much-needed love!
![[IMAGE]](http://www.darrylsgarage.com/912/912dashr.jpg)
The second little project has been cleaning up and polishing the stainless steel carpet threshold strips that were another early 912 item that was identical to the ones in the 356C. Removing the rust stains from the retaining screws is easy with a little ABC Corrosion Buster prior to polishing with the correct jewelers rouge for stainless steel and a buffing wheel on a bench grinder. I've completed the polishing on one (the one on the top in the photo below) and wanted to do a before and after shot showing how nicely the scratches put in the metal from scuffing with shoes getting in and out of the car buff out. I really can't wait to see how sharp this stainless steel strip looks against the new gray German square-weave carpet, new rubber threshold mat and new weatherstrip!
![[IMAGE]](http://www.darrylsgarage.com/912/912pol1.jpg)
Entry: 1/14/10 - The winter push to get the interior done has finally started with Steve Shepp's working on my front seats. Early production 911 and 912 seat backs were much more squared-off at the top than the 356 seats and then around '68 they started getting more tapered again. Steve made a glove-tight sleeve of nylon duck material and stapled it to the metal seat frame before laminating, then carving and shaping layers of very firm foam in the the graceful shapes seen here. The final step was gluing a thin foam backed fabric over the top to smooth any irregularities and make the covers slide over them easily. Steve makes carving with a foam saw and shaping with a pnumatic die grinder with a sanding disc look easy.
![[IMAGE]](http://www.darrylsgarage.com/912/912seat5.jpg)
You can see the cover seam locations drawn on one of the cushions as reference points when tracing patterns for the covers and measuring the second cushion's foam carving against. Making the second one exactly match the first such that a single cover pattern can be used is where it starts getting more complicated. Check out the white '58 cabrio and red '59 Convertible D in the background
![[IMAGE]](http://www.darrylsgarage.com/912/912seat6.jpg)
Entry: 1/17/10 - I spent another Saturday down at Steve Shepp's trim shop in Ballard yesterday, watching my front seats materialize from thin air. Steve made patterns for the black German vinyl and basketweave insert panels using a heavy clear plastic material and then transferred them to what looked like posterboard-weight cardstock. Notice the second cushion in the foreground has only had the initial foam saw shaping done to it, final sizing by sanding with a die grinder will take place once the first cushion's measurements have been "confirmed" by a perfect fit of the vinyl cover made with the patterns.
![[IMAGE]](http://www.darrylsgarage.com/912/912seata.jpg)
![[IMAGE]](http://www.darrylsgarage.com/912/912seat7.jpg)
The seat back cover fit like a glove on the first of the two seats and at the end of the day one seat back was completely finished, the second seat back cover is sewn and the second seat back foam is ready for careful sculpting with a sanding disc on a die grinder so it exactly matches the patterns made with the clear plastic material. I love checking out the amazing array of rare vintage Porsches currently in the shop. A '58 cabrio, '59 Convertible D and a '60 Roadster are waiting their turn for Steve's magic to be performed on them. Soon my own 912 will be coming in to have the charcoal gray Germand square-weave carpet and rear panels fabricated and installed!
![[IMAGE]](http://www.darrylsgarage.com/912/912seat8.jpg)
![[IMAGE]](http://www.darrylsgarage.com/912/912seat9.jpg)
Entry: 1/23/10 - I spent another Saturday down at Steve Shepp's trim shop in Ballard today watching him measure and make patterns, cut out the material and sew the rear seats and door pockets. At the end of the day, a nice stack of completed pieces sit ready for final assembly on top of the '60 Roadster. I brought the rear seat backs home to check the fit (one looks bent) and refinish the metal mounting brackets. I also brought the door panel hardboard panels so I could mark the mounting screw holes. The back seats are amazingly simple and the horsehair and jute padding is perfectly preserved so it can be used as is.
![[IMAGE]](http://www.darrylsgarage.com/912/912seatb.jpg)
Entry: 1/28/10 - I stopped by Steve Shepp's trim shop this afternoon to drop off the door panels with the mounting holes marked and the rear seat backs with the mounting brackets refinished. To my surprise, my front seat cushions were done! Now all I have to do is reassemble the rechromed seat recliner mechanisms that I purchased off eBay many months ago. I'm amazed at how perfect the seats turned out, right down to the correct leg bolster (the area pulled down) in the bottom cushions.
![[IMAGE]](http://www.darrylsgarage.com/912/912seatc.jpg)
Here's how the seat bottoms look from the bottom, the correct burlap lining placed under the seat springs and the pans that I had blasted and refinished while protecting the original plating on the slider tracks.
![[IMAGE]](http://www.darrylsgarage.com/912/912seatd.jpg)
Entry: 1/29/10 - I'm working on a list of things that need to be completed before I can get the car into Steve Shepp's trim shop for installation of the carpets, seats and interior trim panels. Today's job was drilling out the broken rear seat pivot bolts and tapping the holes for new ones. The clearance is restricted so I had to use my 90�drill elbow to get a square shot at the hole. I also redrilled a couple holes for the stainless steel door threhshold trim strips where I had welded new steel to patch the rusty weatherstrip lip. Assembling the seat recliners and refinishing the door, rear quarter panel and rear parcel shelf trim caps so they can be recovered in new vinyl is next on the list.
![[IMAGE]](http://www.darrylsgarage.com/912/912rdek8.jpg)
Entry: 2/8/10 - Over the last week I've been tinkering with a tool design to allow one man to install the high-tension spring in a seat recliner mechanism or window winder mechanism without a helper. I used an automotive SAE grade 8, �" x 2" coarse thread socket head cap screw as the basis of the hub design. After welding in the socket head hole, the desired shape was reached after I "machined" it on a drill press using a metal file and Dremel tool to cut the slot. Mounting the hub on a �" x �" x 16" piece of bar stock involved drilling a �" hole for the cap screw to pass through, 2 lock nuts and a cast iron faucet knob drilled and tapped to �" coarse threads, providing a logical hand pressure point. An old screwdriver shaft was "repurposed" as the tang that holds the spring end during compression. Total cost of this experiment was about $12 in metal and hardware.
![[IMAGE]](http://www.darrylsgarage.com/912/seattool.jpg)
The fixture I designed to securely anchor the seat recliner in my bench vise is extremely simple. A 12" length of 2" x 2" wood stud with three 5/16" x 2 �" bolts with rubber washers, fender washers and nuts to secure it. A piece of 1/8" closed-cell neoprene foam with three holes punched in it for the bolts to pass through are all that's needed to protect the fresh chrome from the vise. Here's a photo of it holding an old seat recliner mechanism I used to practice disassembly and assembly on.
![[IMAGE]](http://www.darrylsgarage.com/912/seattool2.jpg)
Well finally today I decided to do all the polishing with Semichrome polish, a coat of Turtle Wax on the exposed chrome and assemble the seat recliner mechanisms I won off eBay for $200. I used Bosch high temperature disturbutor grease or tap oil on all the mechanisms and sprayed the entire assembly with WD-40. New spring covers from SierraMadreCollection finshed up the insides. Next step before installing the recliners on the new seat cushions is polishing the stainless-steel replacement screws from NLA Parts.
![[IMAGE]](http://www.darrylsgarage.com/912/912seath.jpg)
Entry: 2/10/10 - Over the last couple days I've been slowly and carefully installing the rechromed seat recliner mechanisms onto the seat cushions. I was able to preserve the original plating on the splined tubes that connect the seat recliners by removing the layer of oxidized plating with ABC Corrosion Buster and extra fine brass wool so they look freshly plated too. Replacement rubber bumpers were installed in the seat bases where the recliner mechanisms rest so everything is back to the original stock positions. The new stainless-steel replacement screws from NLA Parts were already polished so that saved some time. The black bakelite plastic recliner and release knobs were freshed-up by cleaning them with thinner and a thin coat of gloss clear engine enamel. I feel like I scored the deal of the century by getting these replated recliner mechanisms for only $200 off eBay because having the old ones replated locally would have cost closer to $1000 (8 pieces for $150-$200 each). Now the seats are all ready to install, too bad they're not going in the car until I get it back from the bodyshop for the cut-and-polish of the paint, no dirty bodyman is sitting on these babies!
![[IMAGE]](http://www.darrylsgarage.com/912/912seati.jpg)
I've also finished prepping the door caps, rear quarter caps and rear window parcel tray lip by chemically stripping, media blasting and repainting with Eastwoods Rust Encapsulator. Since they're covered in German vinyl to match the rest of the interior, protecting the exposed back sides from rust is all I'm trying to accomplish here. Now they're ready to run down to Steve Shepp's shop for recovering the next time I go down to Ballard.
![[IMAGE]](http://www.darrylsgarage.com/912/912int1.jpg)
Entry: 2/12/10 - My list of tasks required to wrap-up this project is down to one page and as I'm crossing them off, I see the end in sight. I dropped-off the restored door caps, rear quarter caps and rear window parcel tray lip at Steve Shepp's shop yesterday and saw my completed rear seats, recovered in new German vinyl to match all the other panels in the car. No original vinyl will be left so every vinyl-covered surface, including the arm rests will match and look showroom new.
![[IMAGE]](http://www.darrylsgarage.com/912/912seatj.jpg)
Entry: 2/14/10 - Before installing the plastic vapor barrier and door panels I wanted to make sure and protect the bottom of the door from moisture accumulation by using Wurth Protective Wax to fill the seams. I had already coated this area with undercoating but wanted an additional layer of protection. I plan on using this same product on the longitudinal channels which already have access holes drilled in them and will be plugged with the original rubber plugs. I also finished polishing the stainless-steel door threshold strips and painted the rear fender support arms black so knock 3 more items off the list!
![[IMAGE]](http://www.darrylsgarage.com/912/912doora.jpg)
Entry: 2/20/10 - Today I installed 6-mil thick plastic vapor barriers on the doors. I used clear weatherstrip cement across the tops and 3M strip caulk along the sides, bottoms and around the latch mechanism holes to allow them to be lifted for access if necessary. Cross one more thing off the list! Notice the door hinge bolts are in the process of being painted, a few more coats of Bahama Yellow before a coat of clear and they are done too!
![[IMAGE]](http://www.darrylsgarage.com/912/912doorb.jpg)
Entry: 3/9/10 - Reproducing the liner with the elastic straps that clips to the inside of the glovebox door was today's fun little project. I took my old one down to Steve Shepp's shop and under his direction, used the proper fiberboard and padding on new German vinyl to match all the other vinyl surfaces in the interior. The padding in the old liner had turned to dust long ago so the new one looks much more puffy with the new 1/8" thick foam. I was able to salvage the 4 original metal clips that attach the liner to the back of the glovebox and after the glue cures for a day or two, I will install it into the car. Steve is getting the sense that I'm chomping at the bit to finish the car and can't wait for an opening in his schedule so we can work on it again.
![[IMAGE]](http://www.darrylsgarage.com/912/912dashs.jpg)
![[IMAGE]](http://www.darrylsgarage.com/912/912dasht.jpg)
Entry: 4/3/10 - Today Steve Shepp finished both door panels,all 4 quarter caps, both door pulls/armrests and the bar that goes across the bottom of the rear parcel shelf. Only the two quarter panel wheel house panels and the rear parcel shelf / seat back panel need to be fabricated by Steve. A black German square weave carpet kit is on order from GAHH.com. It's looking like the end is in sight!
![[IMAGE]](http://www.darrylsgarage.com/912/912int2.jpg)
Entry: 4/6/10 - I finished assembling the drivers door today and it turned out very crisp and sharp. The passenger door is just a little more complicated due to the grab handle that inserts into the armrest. I'm attempting to restore a shiny chrome strip that runs down the top of the grab handle and it's turning out pretty good.
![[IMAGE]](http://www.darrylsgarage.com/912/912int3.jpg)
Entry: 4/8/10 - Today I finished installing the passenger door panel after a trip down to Ballard to pick up some of Steve Shepp's "trimmer's secret weapon" #8 screws with #6 size heads to use in the holes that have enlarged over the years and in which the #6 size screws from the Stoddard's door panel installation kit wouldn't snug up. I went around both doors and swapped the loose screws so both doors are completely finished.
![[IMAGE]](http://www.darrylsgarage.com/912/912int4.jpg)
The passenger side armrest has a rubber grab handle with a plastic chrome strip running down the back edge of it. It was looking quite tired so I gave the rubber a coat of black vinyl dye followed by a wipe down with thinner to matte the shine. The plastic strip with a shiny, chrome-like veneer was scraped with a razor blade to level the surface and remove the layer of chrome veneer. New stick-on chrome tape was applied over the top and trimmed with an Exacto knife to the correct size. All-in-all the look is much better than I expected, while not perfect, it does look much better than the damaged chrome and preserves an important original detail.
![[IMAGE]](http://www.darrylsgarage.com/912/912int5.jpg)
Entry: 4/15/10 - I stopped in at Steve Shepp's shop today and saw what I was waiting for, my black German square-weave carpet kit had arrived from GAHH! Because the carpet must be cut with the grain running "square" to the surface it's mounted on, it's just not economical to fabricate these from a roll of German square-weave carpet that runs $150 / sq. yard due to the huge amount of waste so the next best thing is order the kit that retails for $1,016 on their website (Steve gets it at wholesale).
![[IMAGE]](http://www.darrylsgarage.com/912/912int6.jpg)
Unfortunately the kit comes with the floor sections that won't be used because I have good factory rubber mats and want it to look factory original. I'm next on the schedule at Steve Shepp's shop and we've been having some really nice dry weather so it's only a matter of a few days before I take my car down to Ballard and finish the interior! Suffice to say, I can't wait to get it all done. GAHH uses Porsche factory supplied patterns for their carpet kits and automated binding equipment so the quality is as good if not better than Steve could have done. Much steaming and trimming is required to get a perfect fit, something Steve has done countless times so it will turn out perfect.
![[IMAGE]](http://www.darrylsgarage.com/912/912int7.jpg)
Entry: 4/22/10 - It's finally my turn! There was a break in the April showers today so Steve Shepp told me to bring the 912 down to the shop! He's finished fabricating the rear center panel that covers the rear deck (sitting on top of the car with the car cover in the photo) and has organized the GAHH.com German square weave carpet kit pieces around the car on the ground. This weekend is going to be dedicated to finishing the two rear side panels, installing the carpet and putting everything together, completing the interior! WOO-HOO is an understatement!
![[IMAGE]](http://www.darrylsgarage.com/912/912int8.jpg)
Entry: 4/24/10 - Steve Shepp doing his magic, he's looking pretty dang good for surviving a bout with cancer last fall. At nearly 72, Steve was trimming cars like mine when they were new and takes great pride in his work's conformance to the original design.
![[IMAGE]](http://www.darrylsgarage.com/912/912int9.jpg)
Here's how the back cabin came together, all the panels have been fabricated and are in the installation phase. I'm always amazed at the sequencing puzzle the carpeting kits are. The rear seat bottom pads will be glued into the pan once the carpet section below it is installed. The side panels, which were fabricated using reproduction ABS plastic wheelhouse liners I found from Jorge Perez at Sierra Madre Collections, still need to be glued to the weatherstrip lip and a couple mounting screws installed.
![[IMAGE]](http://www.darrylsgarage.com/912/912inta.jpg)
The front section of the carpet is nearly done with just a little more forming at the base of the cowl pockets. Steve said he's found a lot of interesting stuff lost in the bottoms of those pockets as the bottom enlarges as the glue holding the layers of carpet together lets go over time.
![[IMAGE]](http://www.darrylsgarage.com/912/912intb.jpg)
Entry: 4/26/10 - THE INTERIOR IS DONE! Trunk carpeting is installed too, with the '65 only windshield washer bottle hole cut in the German square-weave carpet and binding sewed around the hole. Next step is a visit back to the painter to have the final cut-and-polish of the paint performed.
![[IMAGE]](http://www.darrylsgarage.com/912/912intc.jpg)
![[IMAGE]](http://www.darrylsgarage.com/912/912intd.jpg)
![[IMAGE]](http://www.darrylsgarage.com/912/912inte.jpg)
![[IMAGE]](http://www.darrylsgarage.com/912/912intf.jpg)
![[IMAGE]](http://www.darrylsgarage.com/912/912intg.jpg)
