![[IMAGE]](http://www.darrylsgarage.com/912/teststnd.jpg)
Darryl's VW/Porsche Engine Test Stand of the Future
Last Updated on January 12, 2009
Entry: 11/18/08 - I'm starting to approach the engine building phase of the 912 project, have a 356C engine with a mysterious oil leak and a freshily machined 36hp block for my '56 VW oval window project. It's occured to me that fabricating an engine test stand would really make each of these projects much easier to accomplish and I stashed a worn-out VW tranny case aside for just this purpose. Over the last couple days I've cut the transmission case down so just the bellhousing is left and designed a stand around it. Today I completed step 1; fabricating a box to hold the bellhousing out of Ľ" steel plate and it is ready to weld together once I give the bellhousing a good degreasing and media blast since I'd like to paint the test stand one uniform color, say Hazet blue?
![[IMAGE]](http://www.darrylsgarage.com/912/912lego1.jpg)
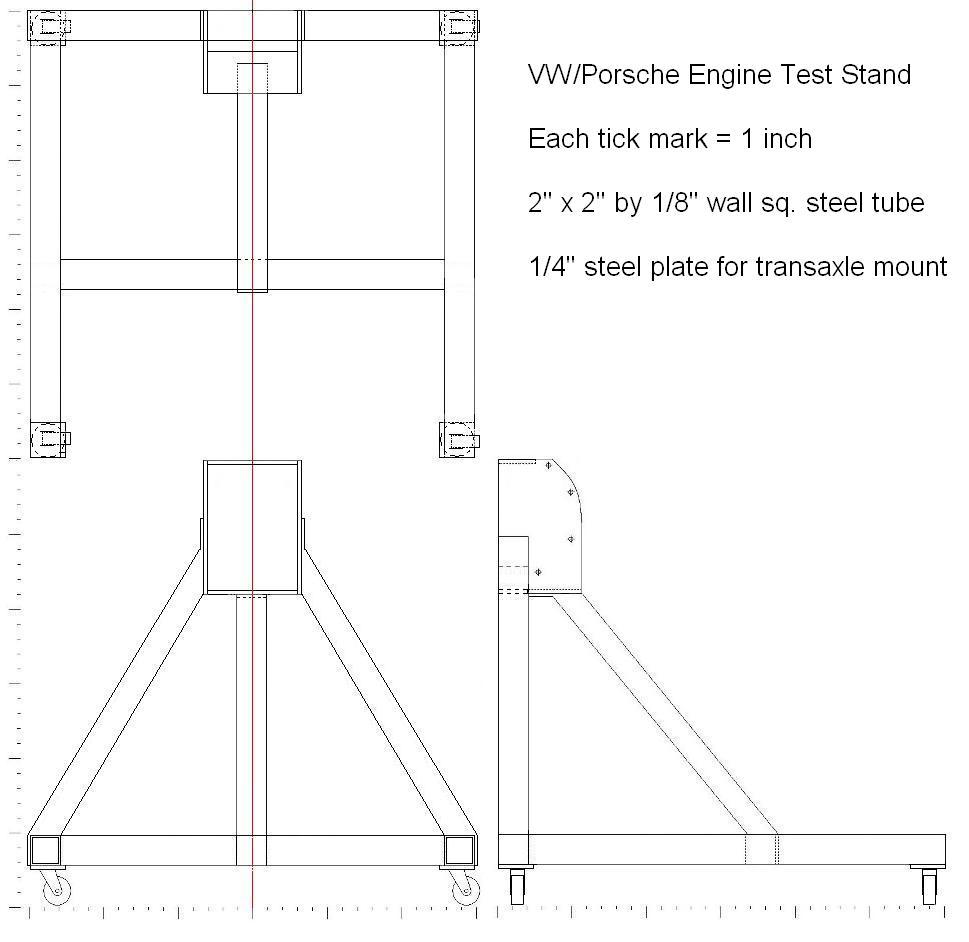
The basic design of the engine test stand is construction of the Ľ" steel plate box inside of which the cut-down transaxle's bellhousing will bolt (after removing the studs), suspended by a tripod of 2" x 2" steel tubing (1/8" wall thickness) 20" over a 30" square base on casters. Clicking on the small drawing below will display a full size version of the design I "sketched" in MS Paint. I plan to attach the legs with carriage bolts so I can take the stand apart when I'm not using it and add a plywood top to the rolling base so it can be used like a piano dolly.
Entry: 11/19/08 - Work on the "Engine Test Stand of the Future" continued today with the cutting and lay-up of the 1/8" walled 2" x 2" square tubing to form the base and the legs of the engine pedestal. My decision to go with a 30" square base looks quite sufficient when the cut-to-size tubing is laid out on the floor next to my 912 engine so the bell housings lined-up. The wheels I picked-up at Home Depot were also positioned on the tubing to approximate their final position (on the bottom!).
![[IMAGE]](http://www.darrylsgarage.com/912/912lego2.jpg)
A little work with my metal "chop saw" determined that angles of the legs on the "sketch" were too acute for the miter fence on the saw so a subtle redesign to get the angles closer to 45ş was done by attaching them to the bottom of the bellhousing box instead of the sides. The following photo shows everything laid-out at the desired 20" above the floor. I think I'll wait to cut the front leg of the tripod until after I have the base and back legs welded together so I can grind and test fit to make it fit perfectly.
![[IMAGE]](http://www.darrylsgarage.com/912/912lego3.jpg)
Entry: 11/24/08 - I finally got a chance to finish up all my welding on the "Engine Test Stand of the Future" and fabricate the center leg of the tripod once everything was in its final position. My first test engine will be the 1600 that came in the '56 oval window. It's 12-volt so it will use the same starter as the 912. I'm not planning on doing any cosmetic work on the engine stand until I know it works OK and needs no further modifications. I plan on installing a starter button and oil pressure warning lamp. I'm pleased with how stout this tripod configuration has turned out and look forward to seeing how stable it is with an engine bolted to it.
![[IMAGE]](http://www.darrylsgarage.com/912/912lego4.jpg)
Entry: 11/25/08 - Testing the "Engine Test Stand of the Future" by bolting the 1600 VW engine that came in my '56 Oval Window to it was today's agenda. You might wonder how a one-man-shop could accomplish such a task, well it's easy when you have a 4-post lift. Simply lower the lift, slide the motor off a piano dolly and on a piece of plywood on the track of the lift and raise the lift to the level of the engine stand and bolt it on, lower the lift and roll it away!
![[IMAGE]](http://www.darrylsgarage.com/912/912lego6.jpg)
The 1600 VW engine flywheel mated with the 912 starter (which doesn't require a starter bushing) so I can install and leave a 12mm / 6-volt starter bushing in the bell housing permanently and handle all applications. I used my "jump box" as a power source and a trigger-type remote starter switch to turn the VW motor over. The ignition system is working fine and I get good spark but the carb and fuel pump seem to be kaputt, diaphram membranes probably dried out and cracked in the fuel and accellerator pumps. I'm very pleased with how rock solid the test stand is and would love to see how stable it is with a running engine. I'm not sure whether it's worth the effort to make the VW engine run right now and would rather spend my efforts on the 912 engine. How and what will be permanently installed on the test stand, such as a battery, fuel tank, warning lights, oil pressure gauge, ignition switches and such are all being carefully considered as the stand evolves.
![[IMAGE]](http://www.darrylsgarage.com/912/912lego5.jpg)
Entry: 12/3/08 - I finally got the old 1600 VW engine running after a carb rebuild, new fuel pump and swapping the worn-out stock vacuum advance distributor for an old centrifical advance Bosch 009 I had laying around. So here it is in action!
Entry: 12/29/08 - Today it was back to work on the engine test stand bellhousing pod for the 12-volt Porsche engines that uses the '76 and newer VW Type-2 (Bus) bellhousing. The bus bellhousing is quite nice since it unbolts from the transaxle and provides such a sweet ready-made mounting set-up. I have alread used a Dremel tool to "adjust" (grind-down) the reinforcing ribs inside the bellhousing that came into contact with the 912 engine's flywheel teeth and then successfully turned-over the 912 engine using the 912 starter (it doesn't need a starter drive bushing since it's driveless). Over the weekend I had also acquired all the Ľ" steel plate, drilled the necessary holes in the main piece of Ľ" steel plate that forms the bulkhead against which the VW Bus bellhousing bolts to the stand and bought all the 8.8 rated metric mounting hardware.
![[IMAGE]](http://www.darrylsgarage.com/912/912lego7.jpg)
Today I did all the necessary cutting and fitting to the remaining Ľ" steel plate and have it all held together with magnets, awaiting a little bit warmer day to weld it together out on the driveway.
![[IMAGE]](http://www.darrylsgarage.com/912/912lego8.jpg)
Entry: 1/2/09 - Happy New Year! Today was the first chance I had since the busy holiday to weld my engine test stand bellhousing pod for the 12-volt Porsche engines. Things went together very quickly with the MIG welder and sunny weather so after a little media blasting to clean everything up, including the bus bellhousing, it was time to mount the 912 motor on it. The engine turns over very nicely using the "jump-box" and trigger-type remote starting switch. Now it's time to do an oil change, valve adjust, mount the Solex 40 PII-4 carbs that came on my 356C (that I know worked fine) and see if I can fire this old gal up!
![[IMAGE]](http://www.darrylsgarage.com/912/912lego9.jpg)
Entry: 1/12/09 - IT'S ALIVE!!! Over the last couple days I wrapped-up all the little tasks required to make sure my 912's engine had every potential for starting right up and running well. I had to make a run to the local import auto parts store this morning for a new oil pressure sending switch to get my test "idiot light" working and a run to the Shell station for some fresh premium gas but then we were all systems GOOD-TO-GO! I primed the carbs with a couple big squirts of raw gas down the throats with an eye-dropper to get the engine to quickly turn over and prime the freshly rebuilt fuel pump and fill the carburetor bowls. The moment came, I flipped the power switch, the "idiot light" oil pressure light came on so I hit the starter trigger a couple times and, well... watch what happened...
The crappy paper gasket that comes with Mann oil filters and seals the oil filter canister leaked purple Swepco oil like crazy, dripping on the ground under the engine so I immediately shut the engine down. Since then I've replaced the pinched paper gasket with the old used rubber one that came on the oil filter canister and the leak is gone.
Entry: 5/29/09 - Figuring out how to set and hold the throttle open at 2000 RPM required fabricating a bracket. My solution spanned existing mounting holes cast in the VW bus bellhousing with a piece of angle iron so that I could attach a spare gas pedal linkage (with the ball at the end) to the bellcrank and use a vise-grip to clamp the throttle rod in position.
![[IMAGE]](http://www.darrylsgarage.com/912/912ebldt.jpg)
Once all the pieces were in place, it was time to finally give my freshly rebuilt 912 engine its first start-up and 20-minute break-in run. This video captures the experience, wouldn't you know the particular vise-grip I had chosen to hold the throttle rod would have to pop open when I needed it most and required two hands to put it back together, luckily I had another one handy.