![[IMAGE]](http://www.darrylsgarage.com/cabrio/2001cab.jpg)
Darryl's Bug Cabriolet
Project Page
Last Updated on October 17, 2021
30 years seemed like a lifetime... when I was 31 years old and had just purchased my first house. This summer marked 30 years since I found this rusty old 1963 VW Cabriolet and couldn't wait to start my first ambitious off-the-pan restoration in my what then seemed HUGE, 24' x 24' two-car garage in my new house. My daughter Audrey used to hang out in the garage with me and helped me recreate the photo taken when she was only 3 years old on her 23rd birthday, 10 years ago already as now she's 33! Now that first house is sold and I'm working in my 36' x 84' pole barn shop that's dedicated to my car restoration hobby. Life certainly does go by fast, best spent doing something you enjoy!
![[IMAGE]](http://www.darrylsgarage.com/cabrio/20year.jpg)
The story of my little Cabriolet started back in the fall of 1962, it was one of the 10,599 Volkswagen Beetle Cabriolets lovingly hand-built during the 1963 model year by the same German craftsmen who made the classic Porsche 356 Notchback, Karmann-Ghia coupe and convertible. This old black & white photo of the Karmann plant which shows the 356 Notchback, Ghia and Beetle Cabriolet sharing the same assembly line at the same time always strikes me as proof of a bygone era when the assembly line worker was a craftsman and not a human robot in a repetitive job with color the only variety.
![[IMAGE]](http://www.darrylsgarage.com/cabrio/karmann2.jpg)
![[IMAGE]](http://www.darrylsgarage.com/cabrio/karmann.jpg)
The low price of $1200 started this long odyssey with the purchase of a non-running, very rusted and damaged old VW. The pitted and bent window frames and a badly deteriorated top frame didn't dim my optimism, it took a while to realize what a long, hard road it would be to find the correct, usable replacement parts in this part of the country. The advent of the Internet with eBay and the bulletinboard site, "TheSamba.com" greatly accelerated my progress and interest in finishing this car to a high level of originality. Thanks to the top boot to hide the damaged top frame I've been able to drive and enjoy this convertible for years but knew that it could never be sold for anything near its value without a top and I prayed it never rained! My skills in choosing better, more complete projects has improved since this first one!
![[IMAGE]](http://www.darrylsgarage.com/cabrio/sadbug.jpg)
![[IMAGE]](http://www.darrylsgarage.com/cabrio/bugbe4.jpg)
This car was a bit rusted when I started, notice the seat rails in the following picture, they are hanging in mid air. The seats were suspended on 2x4s when I started this restoration!!!
![[IMAGE]](floor.jpg)
The first order of business was removing the body from the floor pan and then replacing the sheet metal floor pan pressings. I rented a flux core wire feed welder and my neighbor, Lyle who was a Vietnam Vet helped me with the welding. You can see the new floor pan pressing sitting on the floor in the following picture.
![[IMAGE]](cutting.jpg)
![[IMAGE]](http://www.darrylsgarage.com/cabrio/bugwork1.jpg)
![[IMAGE]](http://www.darrylsgarage.com/cabrio/bugwork2.jpg)
Once the new floor pan was welded in, my role in restoring the suspension and transmission was mostly a matter of media blasting and painting. A factory-trained old-timer at a nearby shop I use professionally rebuilt the transmission and the kingpin front suspension. I replaced all the brake lines, cables and bushings with brand-new parts from West Coast Metric.
![[IMAGE]](http://www.darrylsgarage.com/cabrio/bugwork3.jpg)
![[IMAGE]](floorpan.jpg)
![[IMAGE]](http://www.darrylsgarage.com/cabrio/bugwork4.jpg)
The right front corner of the car was damaged from a minor collision and had to be pulled out using a rented Porta-Power hydraulic ram. I used a straight hood off another Bug I purchased (in 1991 from Jack Morris the eventual owner of Wolfsburg Motorwerks and where our long friendship began) as a parts car to set the gaps correctly. I also cut out the original damaged front apron and welded in a new replacement panel as you can see laying on the ground in front of the car in the following photo.
![[IMAGE]](cabrio2.jpg)
The body had some rust-thru in the bottoms of the rear quarter panels that I cut out and MIG welded in some new sheet metal pressings.
![[IMAGE]](qtrpanel.jpg)
This car was still the original color, Yukon Gelb (yellow), paint code L1009. I chemically stripped and media-blasted the body down to bare metal myself and I'm sure there's still dust in my old garage from it. Once all the bodywork was completed, I primed the entire body using a green-tinted zinc chromate metal etching primer. I test fit new fenders, bumpers and hood sheetmetal, with the help of then 3-year-old Audrey. I told her to pretend she was driving the Bug for the photo. The next step was priming with filler primer and block sanding... what a mess to do in my home garage, not to mention constantly extinguishing and re-lighting the pilot light on my waterheater so the fumes didn't ignite and burn my house down!
![[IMAGE]](helper.jpg)
![[IMAGE]](http://www.darrylsgarage.com/cabrio/bugwork5.jpg)
Painting the body required fabricating a rather elaborate wheeled dolly that allowed me to crawl under it for clean-up and painting. I used Dupont Centari acrylic enamel with a two-stage clear coat with a ton of elbow grease to polish out any runs or sags.
![[IMAGE]](paint.jpg)
![[IMAGE]](http://www.darrylsgarage.com/cabrio/bugwork6.jpg)
To this day I can't believe the effort I took to make this car perfect and I'm still not done! Suffice to say I will never sell this Bug! The interior's fresh upholstery, mats and carpet was achieved using kits; the carpet and floor mat is from Wolfsburg West, the seats and door panels from TMI. The original olive green was available in kit form so I stayed with that theme. Cabriolets originally came only with off-white seats, I suppose to keep them cool in the sun, but I went with matching olive green seats because I like the vintage look. I used Wolfsburg West molded rubberized horsehair padding to re-stuff the seats. The classic 70's style "beetle-bug" floormats are from JC Whitney.
![[IMAGE]](http://www.darrylsgarage.com/cabrio/bugint.jpg)
The engine wasn't running when I got the car so I figured it would be a good idea to tear it down to see if it was in good enough shape to rebuild. The case, rods and crank looked fine so I buttoned it back up and hauled it down to Aircooled Automotive in Longview Washington to have it returned to its original 1200cc specs by Steve Manners, who was the guy who rebuilt the 25hp engine in Bill Diericks' wartime VW Schwimmwagen (now part of the West Coast Metric collection).
![[IMAGE]](http://www.darrylsgarage.com/cabrio/bugcase.jpg)
While the engine was off in Longview, I media blasted all the engine tins and repainted them back to original. I also hunted-down rebuildable cores for the correct 28 PICT model carburetor, factory "VW" logo fuel pump and 90 mm "big cap" Bosch distributor that were on the car originally and I rebuilt them to spec with help from my buddy Jack Morris who now owns Wolfsburg Motorwerks in Ballard. Suffice to say, I'm pretty happy with how the engine restoration turned out and how well it runs.
![[IMAGE]](http://www.darrylsgarage.com/cabrio/bugeng.jpg)
![[IMAGE]](http://www.darrylsgarage.com/cabrio/bugbot.jpg)
The front trunk was completely repainted and all the cardboard liners replaced with reproduction liners manufactured by Wolfsburg West. It is very difficult to tell the trunk is not original, right down to the restored Hella jack. I'm still looking for a NOS (New Old Stock) trunk liner if you know anybody with one for sale!
![[IMAGE]](trunk.jpg)
The major delays in the project started when I went to restore the top frame that came with the car. Most of brackets where the front header bow secure to the metal frame was rusted away to the point where there wasn't anything left to make a pattern from in order to fabricate a new part because it was gone. Every measurement for installing a convertible top assumes the front header bow brackets are perfectly positioned and without them I couldn't proceed. A couple of the bows were also crushed and broken and one was missing. After trying in vain to fix them, I gave up and started looking for a donor top frame and make one good one out of two. Here's a photo taken in 1993 of me trying to make the original top frame work, notice Audrey is about 4 years old!
![[IMAGE]](http://www.darrylsgarage.com/cabrio/bugtop5.jpg)
In the Summer of 2006, I finally found the missing pieces I needed to fix the top frame and fabricated and welded new header bow mounting plates on the front of the frame. All the wood pieces were fitted and attached, new polished aluminum contact plates have been fabricated and installed.
![[IMAGE]](http://www.darrylsgarage.com/cabrio/63top1.jpg)
![[IMAGE]](http://www.darrylsgarage.com/cabrio/63top2.jpg)
In October 2006, the car was placed in the hands of a craftsman from a bygone era, Steve Shepp at Classic Interior Restorations in Ballard, for installation of a new custom sewn black 3-ply Mercedes-style stay-fast canvas padded top and headliner.
![[IMAGE]](http://www.darrylsgarage.com/cabrio/shepp1.jpg)
In February 2008 it was finally done! The custom sewn convertible top was finally installed. After Steve Shepp completed the top, I was left with installing the chromed-brass tack strips that cover the staples along the back edge and bow over the back window. I also removed the cheap light gray synthetic carpet kit I had installed years ago and upgraded to the correct German square-weave carpet kit in a darker charcoal gray color. To say the least, I'm thrilled with how perfectly everything turned out and have nothing but praise and thanks to Steve for taking the time to slip my project in between his big "Pebble Beach Concours" winning projects, even if the car had to sit in his shop for 16 months to do so. There is nobody else on the West Coast who could turn out a quality job like this.
![[IMAGE]](http://www.darrylsgarage.com/cabrio/bugtop1.jpg)
![[IMAGE]](http://www.darrylsgarage.com/cabrio/bugtop2.jpg)
![[IMAGE]](http://www.darrylsgarage.com/cabrio/bugtop3.jpg)
![[IMAGE]](http://www.darrylsgarage.com/cabrio/bugtop4.jpg)
![[IMAGE]](http://www.darrylsgarage.com/cabrio/sqweave.jpg)
I wouldn't recommend restoring a rusty old Cabriolet to anybody who wasn't highly motivated, it took years to hunt down door window frames and internal parts to replace the ones that were too badly rusted. I disassembled each window, sent the frame off to be rechromed, while I polished the scratches out of the glass and replaced the rubber weatherstripping upon reassembly. I would never attempt to restore another convertible and chuckle at the ads for them in the Craigslist that make light of the small amount of work required to make those with clearly rotting tops and rusty window frames into show cars! Buy one that has everything intact, you'll save so much money and grief in the end!
![[IMAGE]](http://www.darrylsgarage.com/cabrio/windone.jpg)
My first car was a '62 sedan and I wanted a convertible to keep as a nostalgic reminder of my first car. I am amazed at the work it takes to install and adjust the windows correctly! I'm not sure I would have taken on this project if I knew what was required when I bought the car back in 1991 but now it's a classic treasure that transports me back to my youth, everytime I get behind the steering wheel or take a wrench to the engine.
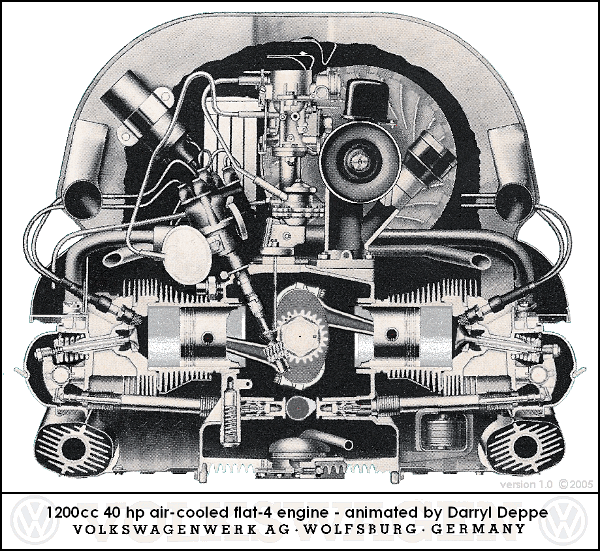
Here are a couple educational 40 horsepower VW engine animations I created: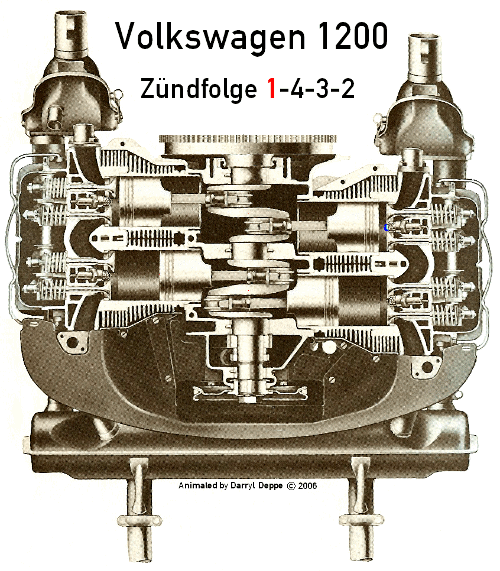

![[IMAGE]](cabrio.gif)
 Adobe PDF format of the original January '63 owners manual from TheSamba.com
Wolfsburg Motorwerks here in Seattle
Wolfsburg West Vintage Parts
TheSamba.com VW BBS - Awesome classified section for buying/selling used parts
The Vintage VW Club of America Home Page
Koch's Web Page
The Beetle Cabriolet Register