![[IMAGE]](http://www.darrylsgarage.com/67ghia/67ghia.jpg)
Powered by the last of the breed, a 2003 Mexican VW Beetle 1600i computer controlled, fuel injected engine!
![[IMAGE]](http://www.darrylsgarage.com/67ghia/1600i7.jpg)
![[IMAGE]](http://www.darrylsgarage.com/67ghia/current.jpg)
Last Updated on January 28, 2013 (chronological order, newest entries at the bottom)
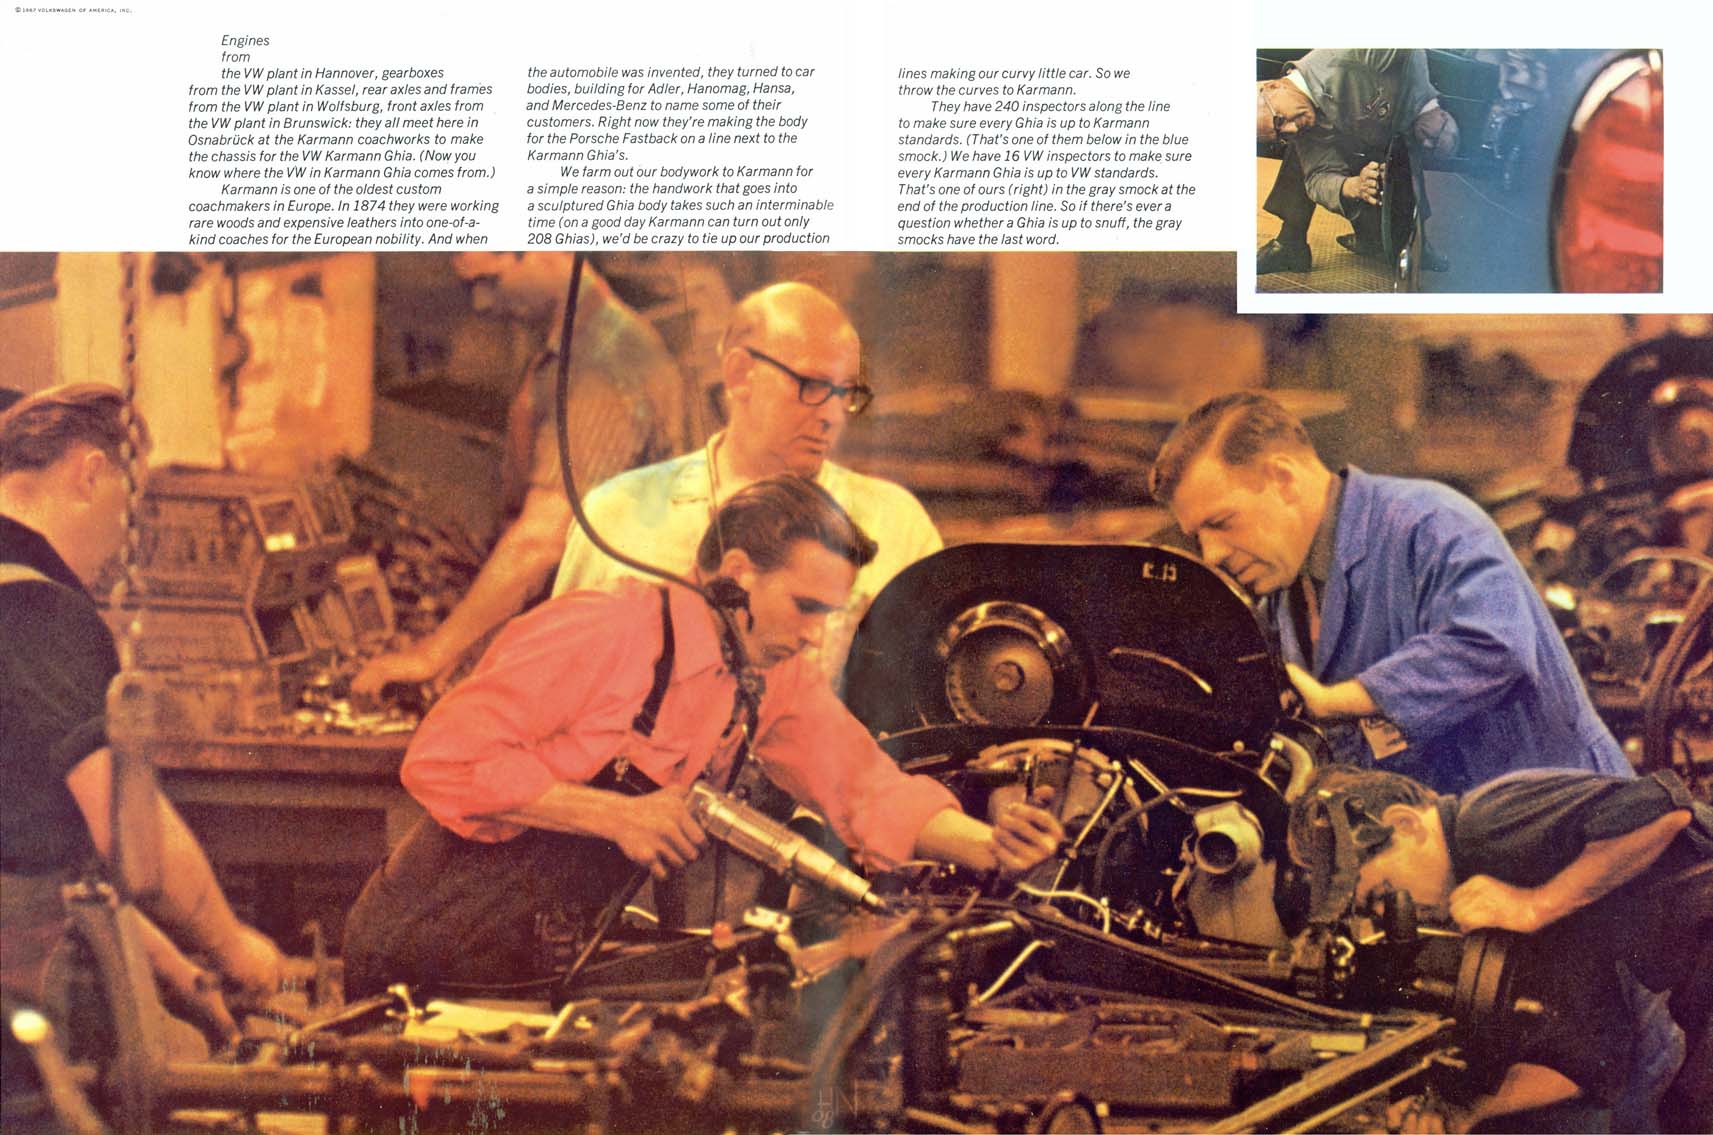
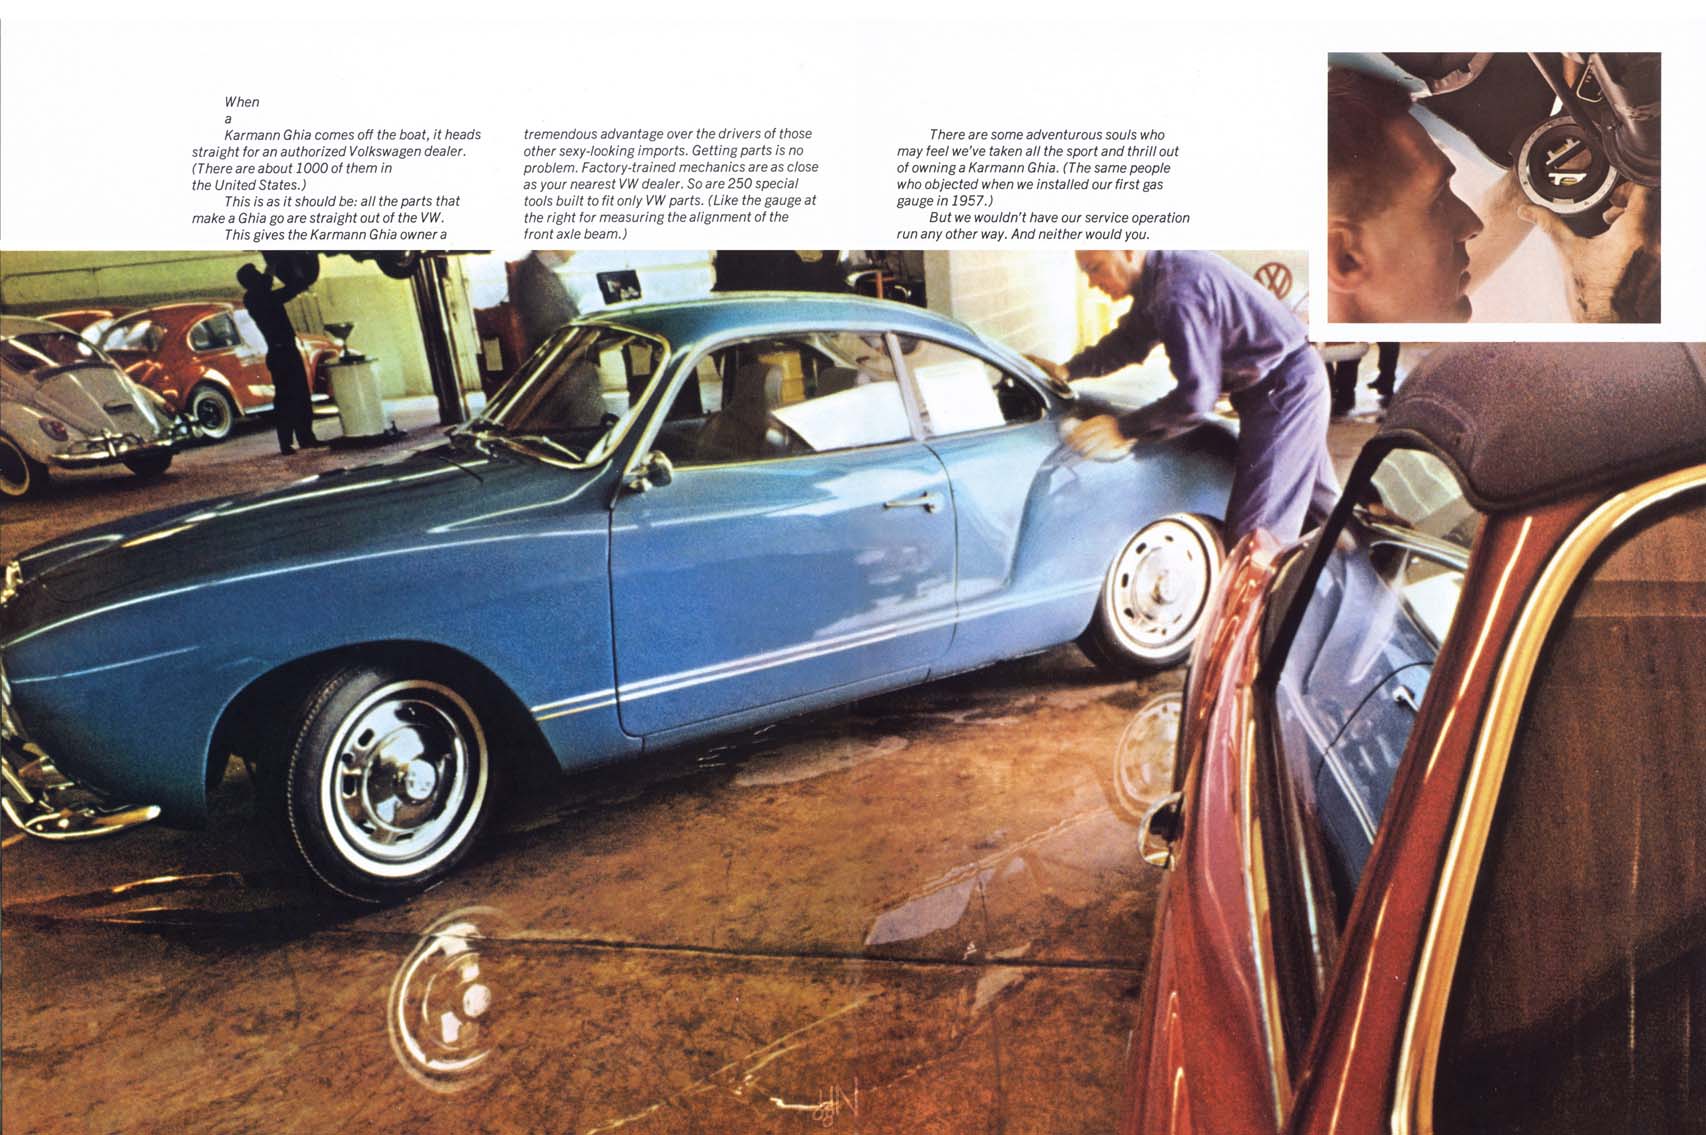
The Karmann Ghia - This photo of the Karmann plant which shows the Ghia and Beetle Cabriolet sharing the same assembly line at the same time always strikes me as proof of a bygone era when the assembly line worker was a craftsman and not a human robot in a repetitive job with color the only variety. The Karmann Ghia represents one of the last truly "hand-built" cars, manufactured in the same lead body solder intensive manner as the 356 Porsche (which discontinued production in 1965). The Karmann Ghia was produced from 1955 to 1974 with only minor changes to the bumpers to conform to governmental 5 mph impact requirements and tail lights for safety requirements. A total of only 19,406 Karmann Ghia sedans were produced in the 1967 model year and many 1967 features are one year only, making them a bit more unique and collectible.
![[IMAGE]](http://www.darrylsgarage.com/67ghia/ghia000.jpg)
Since I already have a Karmann-built Beetle Cabriolet, 912 and 914 it only seemed logical to add a Ghia to my collection someday. I had been on the lookout for a nice clean late '60s Ghia with the elaborate chromed bumpers that was original, complete and had never been hit (especially in the nose). Well, someday came out of the blue with a phone call from the mom of one of my favorite baristas, saying the Ghia I had been promising to help them restore when they got the money someday was now for sale and they would prefer it to go to somebody who would restore it right. So now $2500 lighter, I took it off their hands and will get it in good, reliable driving condition fairly quickly. There is a bit of the usual rust in the floorpans and rockerpanels but the replacement sheetmetal pressings are available and you know how I love to MIG weld! I drove it home (about a mile) under its own power and immediately loaded it onto the 4-post lift and got to work on it!
![[IMAGE]](http://www.darrylsgarage.com/67ghia/newghia.jpg)
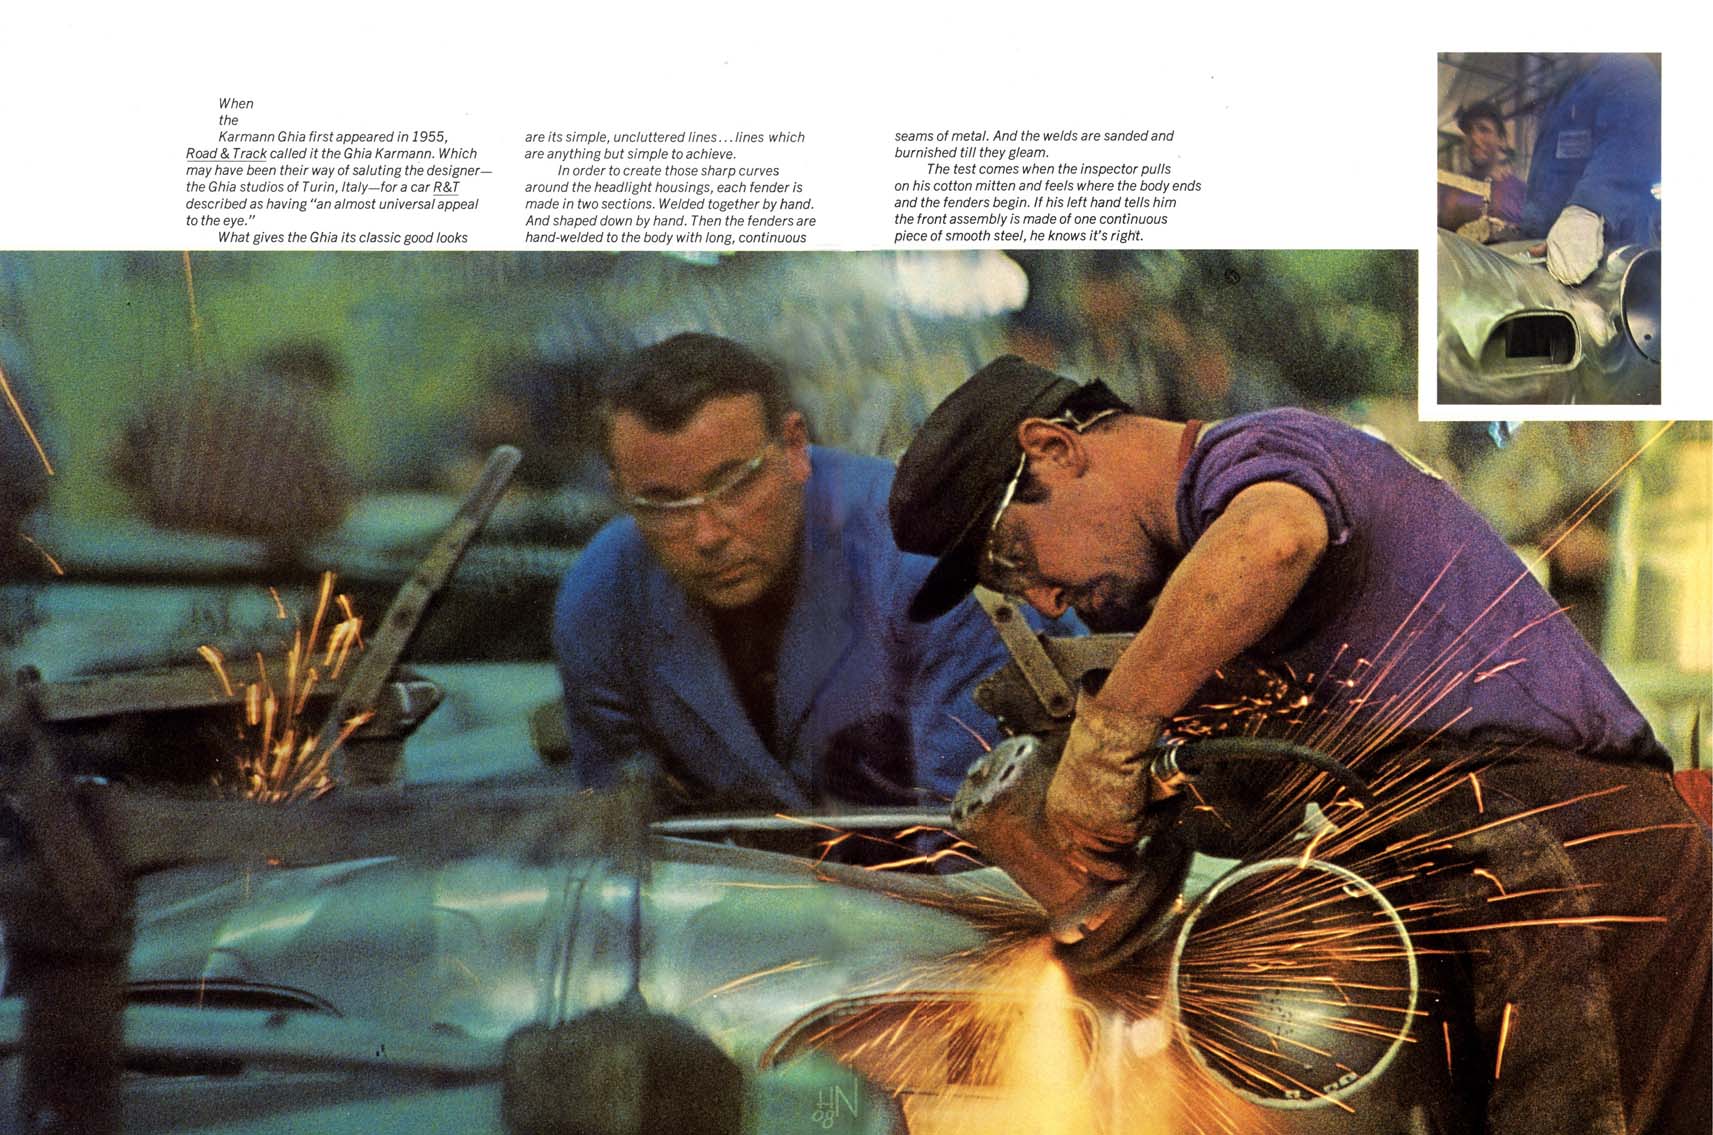
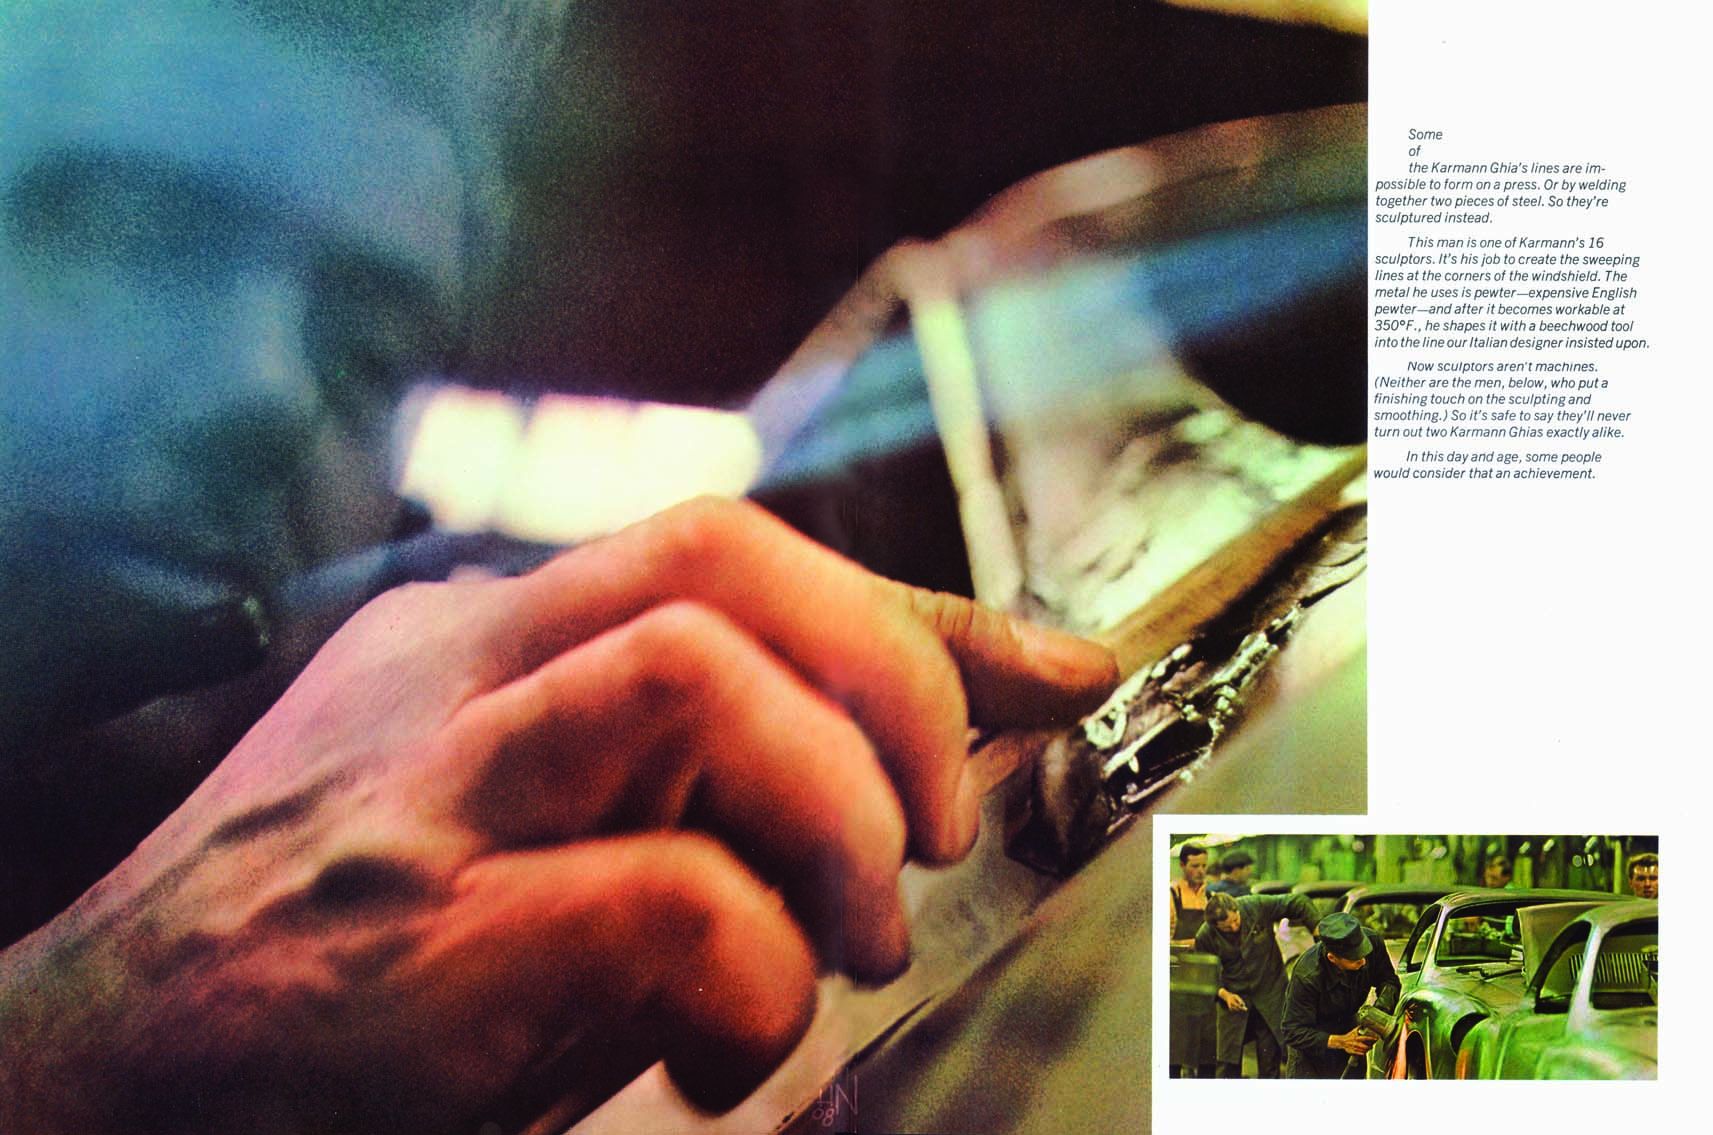
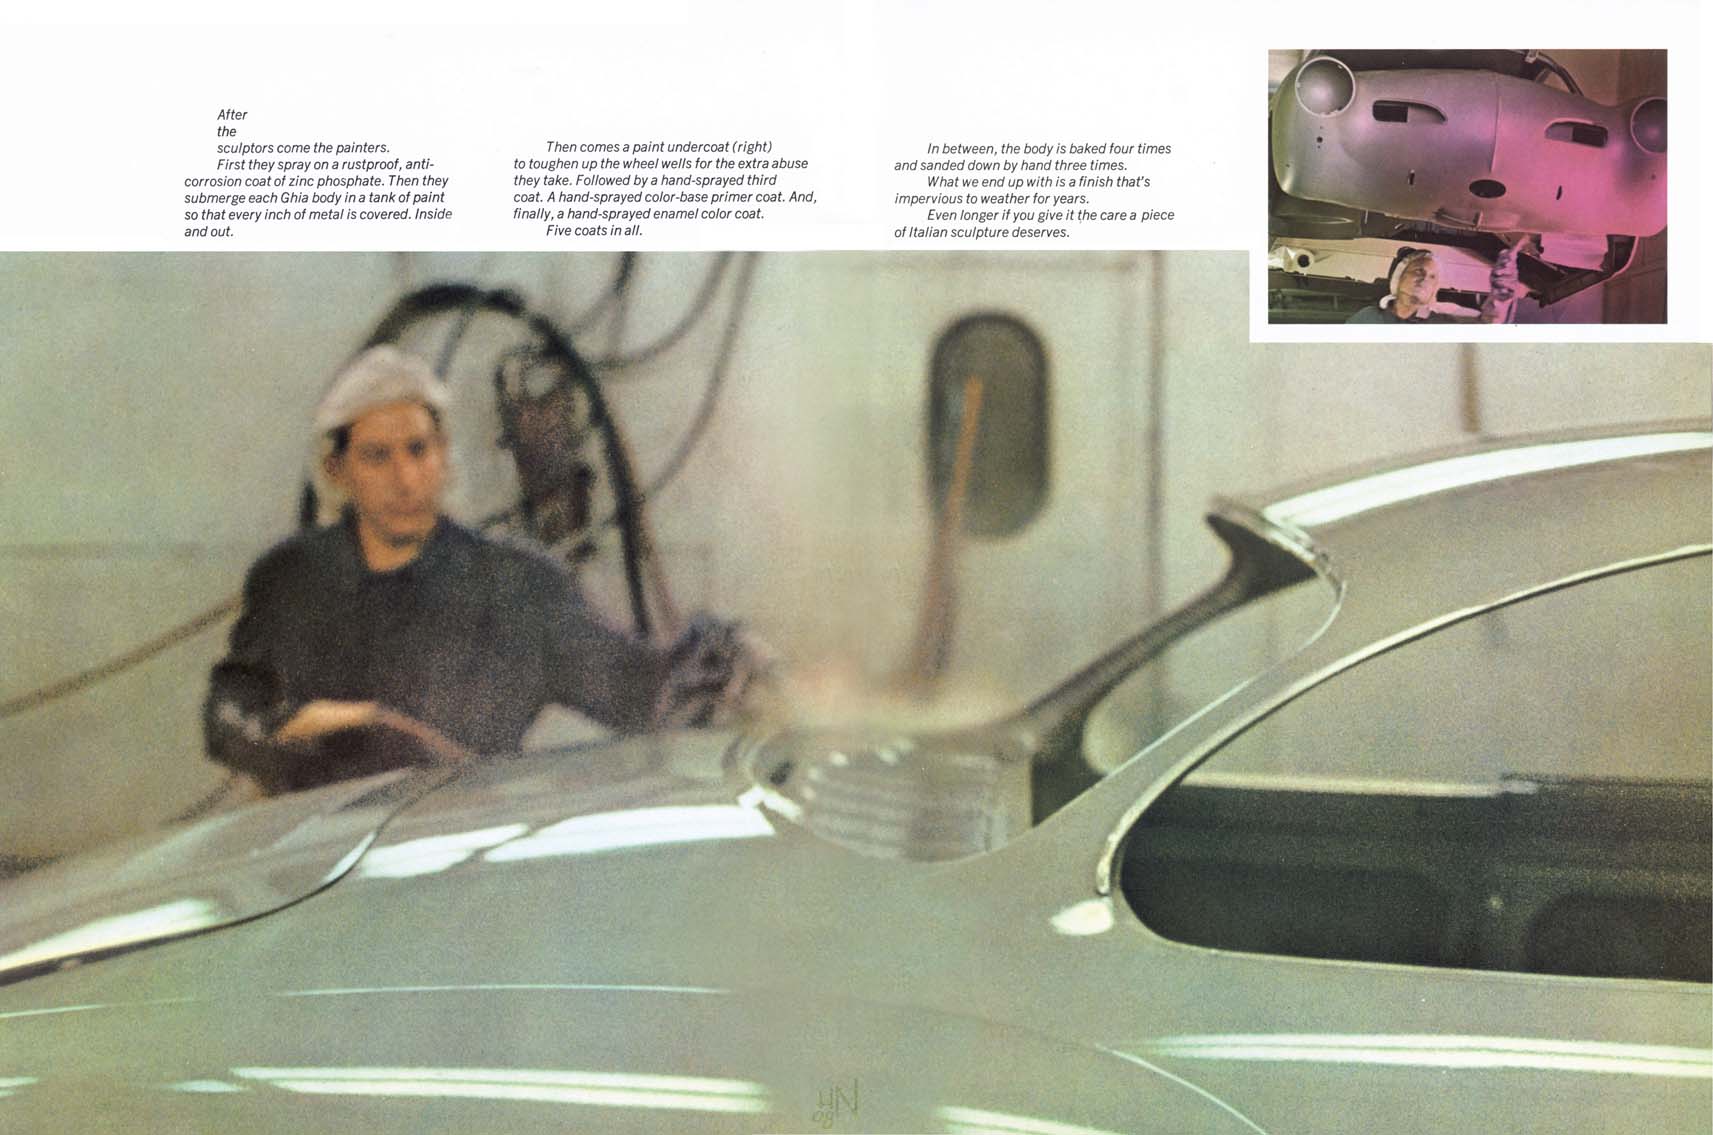
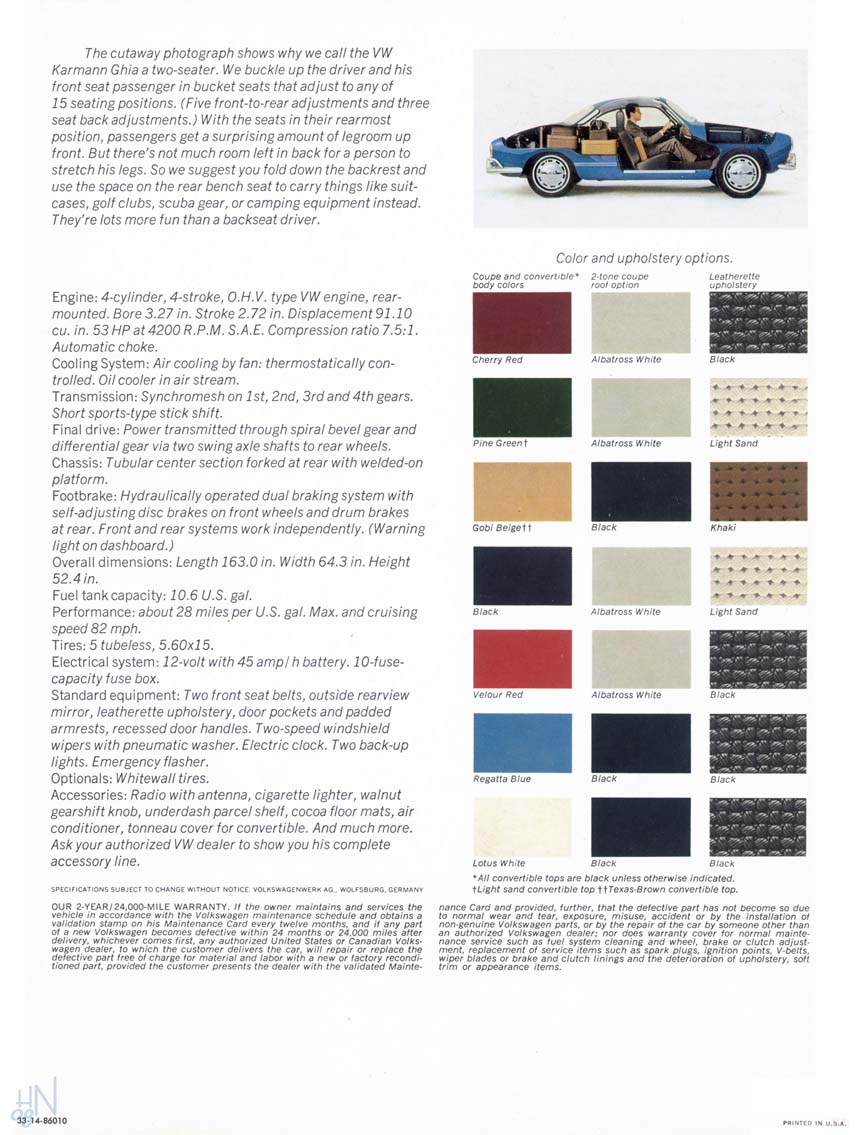
1967 Volkswagen Karmann Ghia Brochure - Here's a little time capsule that takes the reader back to 1967 and the mystique of an Italian-designed, hand-built German "sportscar" from the perspective of Madison Avenue. These scanned images were contributed by H0ward N0urse.


Entry: 8/18/10 - I think the first major repair on this Ghia should be the sagging driver's door hinges and missing check strap. I was prepared to beat the hell out of the hinge screws with a hand impact driver and hammer or at worst drill a couple out. Amazingly all 8 came out with only a large Phillips screwdriver with a wrench on the hex bolster on the screwdriver's shaft to give maximum leverage. It appears the A-pillar is extremely solid with any rust at the very bottom of the cavity.
![[IMAGE]](http://www.darrylsgarage.com/67ghia/ghia002.jpg)
I had the same luck with the hinge screws in the doors, coming out so nicely that all the screws can be reused. The challenge came with removing the upper hinge which bound on the door check strap roller pins. I had to use my air saw to cut the heads of the pins off and only then was I able to remove the old hinge.
![[IMAGE]](http://www.darrylsgarage.com/67ghia/ghia003.jpg)
I sourced a set of new left side, upper and lower door hinges through Karmann Ghia Parts & Restoration for about $80 for the set as well as the door checkstrap & roller rebuild kit for about $30. The reproduction door hinges look to be quite precisely machined and have additional webbing cast into them for added strength. I'm going to test mount the door to see if the new hinges fit and adjust before attempting any major cosmetic work on the door. I have high hopes this hinge swap is going to be a piece-of-cake.
![[IMAGE]](http://www.darrylsgarage.com/67ghia/ghia001.jpg)
Entry: 8/20/10 - My prediction that the hinge swap would be a piece-of-cake came true. The new reproduction hinges went into place without any major issues besides needing to grind two notches in the bottom of the hole behind the upper hinge in the door with my Dremmel tool to allow it to be installed with the checkstrap roller pins already installed instead of the nightmare of installing them with the hinge in the door. Once the hinges were installed, none of the modifications were visible.
![[IMAGE]](http://www.darrylsgarage.com/67ghia/ghia004.jpg)
Installing the door went pretty easily too, a few adjustments and a new rubber centering wedge installed on the back edge and I have no more sagging and the original "crisp" engagement with the latch mechanism has returned. The reproduction door hinges from Karmann Ghia Parts & Restoration are top notch! A few new door hinge screws to replace those with cosmetic issues needs to be put on the parts list for the next order. I'll remove the door, strip all the old rubber weatherstripping, repaint the inside, install new rubber weatherstripping next to complete the job.
![[IMAGE]](http://www.darrylsgarage.com/67ghia/ghia005.jpg)
Entry: 8/22/10 - The next problem needing attention on my new Ghia was the left front headlight. It doesn't take a trained eye to see that the car was bumped on the headlight just hard enough to dent the chrome ring beyond repair (it was found inside the car) and the headlight was damaged so after all the adjustments were at their limits, the beam shot out at about 11 o'clock instead of straight forward. There is quite a bit of BONDO around the headlight bucket on the fender which lets me know this will require some major reworking when I eventually restore the car someday. Removal of the headlight adjuster mechanism from the headlight bucket quickly showed why the adjustment was so far off, the little metal mounting tab holding the adjuster to the bucket was torn loose in the impact. I removed it from the adjuster, straightened it and media blasted it so it would be easy to MIG weld back into place. The holes where the spotwelds ripped loose can be seen at the 3 o'clock position inside the headlight bucket.
![[IMAGE]](http://www.darrylsgarage.com/67ghia/ghia006.jpg)
I prepped the area around the mounting tab in the headlight bucket for welding with a grinder bit on my Dremmel tool prior to some creative use of a sheetmetal screw attached the broken mounting tab back into the correct position. A long machine screw of the correct metric thread size was inserted into the mounting hole to give me something to clip the welder's grounding cable to. A couple quick tack welds with the MIG welder and the mounting tab was back in business.
![[IMAGE]](http://www.darrylsgarage.com/67ghia/ghia007.jpg)
The old headlight adjuster mechanism is still a bit bent after my best attempts to straighten it and the adjusting screws are stripped but I did what I could to make the beam shoot straight forward. I had ordered an inexpensive reproduction headlight ring from California Import Parts (of Canada... LOL!) for less than $25 and mounted it in place as well as I could given the damage to the existing adjuster mechanism. I'll be scrounging for a complete, undamaged used "Hella" marked headlight assembly to use eventually for when I repair the fender correctly during the eventual complete restoration. For now it looks fine for a "driver" and doesn't draw attention to the hack BONDO work it covers.
![[IMAGE]](http://www.darrylsgarage.com/67ghia/ghia008.jpg)
Entry: 8/23/10 - Fixing the broken checkstrap in the passenger side door was today's project. The only way to get the old checkstrap out was to remove the entire door and then remove the upper hinge the same way I did the one on the driver's side, by sawing off the heads of the checkstrap roller pins with my airsaw. Once the upper hinge was out I removed all the checkstrap pins by sawing them off and then driving them out using a small drift punch. A quick media blast and coat of white rattlecan paint preceeded installation of the new checkstrap and rollers I sourced from Karmann Ghia Parts & Restoration. Reinstalling the hinge with the pins already installed required cutting two notches in the door sheetmetal as I did on the drivers side. Now I'm ready to address cosmetic issues with the doors so I have stripped the weatherstripping and begun to prep the inner door and door jab on the passenger side for a fresh coat of brite white paint to match the outside of the car. I'm also cleaning and lubricating the latch mechanism to see if I can get it to work correctly too.
![[IMAGE]](http://www.darrylsgarage.com/67ghia/ghia009.jpg)
Entry: 8/24/10 - Today's task was accessing and arresting the rust in the floorpans, starting with the passenger side. Removing the tarboard insulation and scraping and vacuuming up all the rust scales revealed that the pan ahead of the seat is quite solid and the area under and behind the seat has rotted through on the sides where water has pooled in the low area over the years. Once I removed all the scales using a steel wire brush, I gave the area a liberal coat of SEM Rust Converter which seals the rust and converts it to an inert substance that won't rust further. The good news is that the heater channels are still very solid on this side. I will attempt to patch the holes in the rear section using fiberglass and wire window screen to seal the bottom of the car from further moisture penetration until I completely replace the pans during the "body off" restoration someday. For now I'm pleased to see I have something solid enough to drive safely.
![[IMAGE]](http://www.darrylsgarage.com/67ghia/ghia010.jpg)
Entry: 8/28/10 - I happened across an unissued, 1967 model year owner's manual on eBay for my Ghia the contents of which is available for all to see on TheSamba.com and snapped it up so I have the perfect reference manual as to how the car is supposed to work and look. All the warranty coupons are still in the manual, which makes it quite collectible and a nice conversation piece to go with the car. I'm continuing with the cleaning and rust arresting process on the driver's side floorpan and find the area under the seat is just a bit more advanced than on the passenger side. Still nothing too bad to make it unsafe to drive but a bit more patching will be required to keep the moisture out.
![[IMAGE]](http://www.darrylsgarage.com/67ghia/ghia011.jpg)
Entry: 8/31/10 - I was able to make a little forward progress on the passenger door's cosmetic work today by completing the paint prep work and giving it a coat of rattlecan white paint to freshen it up and match the outside of the car. You can see the two notches I made with my Dremmel tool in the bottom edge of the door checkstrap hole behind the upper door hinge to accommodate installing the roller pins before installing the hinge. Everything looks nice and fresh and new rubber weatherstrip and new black vinyl door panels will look very sharp against the fresh paint.
![[IMAGE]](http://www.darrylsgarage.com/67ghia/ghia012.jpg)
The driver's side floorpans got a coat of SEM Rust Converter after the scraping and wire brushing was completed to remove all the major rust scales and see more rot than I had first thought. Looks like my plans to fiberglass the holes shut is a bit optimistic and a more thorough approach is going to be required.
![[IMAGE]](http://www.darrylsgarage.com/67ghia/ghia013.jpg)
I've ordered a set of rear floorpan sheetmetal patch panels from Karmann Ghia Parts & Restoration to replace as much of the rotten metal as possible without removing the body from the floorpan (I'll reserve that for the eventual total restoration project). These smaller floor pan panels are made to fix this common problem and can be grafted in with a little creative trimming, we'll see how much of the original pan I can keep intact and still have enough "meat" (healthy steel) left to MIG weld to.
![[IMAGE]](http://www.darrylsgarage.com/67ghia/ghia014.jpg)
Entry: 9/2/10 - The passenger side door is pretty much wrapped-up and ready to be set aside. I cleaned and lubricated the sticking latch mechanism and reinstalled it along with the new door centering wedge with new screws prior to gluing in the new weatherstrip. Good old-fashioned wood clothespins are the perfect clamp for holding the weatherstrip in place without marring the paint. I used Wurth rubber cement to bond the weatherstrip to the door after removing the white powdery release agent from the rubber with mineral spirits on a paper towel.
![[IMAGE]](http://www.darrylsgarage.com/67ghia/ghia015.jpg)
I sat the new TMI reproduction black vinyl door panel in place with the door release handle and window crank to get an idea of how it contrasted with the new paint and I think we have a winner! I still need to rehab the original '67 model year only arm rests with a coat of black vinyl dye before they are ready to install.
![[IMAGE]](http://www.darrylsgarage.com/67ghia/ghia016.jpg)
Entry: 9/8/10 - My set of rear floorpan sheetmetal patch panels from Karmann Ghia Parts & Restoration arrived today with a free gift! Dent in the middle of the front bumper? What dent in the middle of the front bumper? A Washington State collector vehicle license plate is only used on the back of the car so removing the old front plate revealed a little dent that is now hidden by this sweet little European-style oval license plate. I'm thinking of adding a small "1967" to it.
![[IMAGE]](http://www.darrylsgarage.com/67ghia/ghia017.jpg)
The floorpan sheetmetal pressings are very substantial, perhaps 19-gauge from the way they look. I'm starting to evaluate my options of how to weld them in without removing the seat tracks since they're still anchored to nice solid sheetmetal.
![[IMAGE]](http://www.darrylsgarage.com/67ghia/ghia018.jpg)
Entry: 9/9/10 -Cutting out the rotten driver's side rear floorpan was today's task and my pneumatic airsaw (at the bottom of the photo below) made quick work of it. I wanted to start by making the most conservative cut, removing the minimal healthy sheetmetal so I could set the rotten piece I removed on top of the new sheet metal patch panel and establish a "footprint" for deciding how much of the new panel to use. The front part of the new pressing is identical to the original pan so it should graft easily but the back section is deeper and seems more Beetle-style (for holding a battery) so it will take some major fitting work but it will work. The good thing is that all the floorpan metal left in the car is very solid and easy to weld to so this will be a very solid patch once it's all in place. Another good thing is all but the section below the rear heater duct tube can be welded from the top side, MIG welding upside down is nearly impossible since the "puddle" drips! Cosmetic work on the driver's side door is also making good progress towards paint.
![[IMAGE]](http://www.darrylsgarage.com/67ghia/ghia019.jpg)
Entry: 9/20/10 - After studying my options for modifying the generic "Beetle" floorpan sheetmetal pressing, I decided to shorten it by cutting out the corners and moving the bend in the bottom forward about 4". I used the rotten section as a template to determine the correct positions of the corners and traced them onto the new sheetmetal. The first cuts were made in order to straighten out the straight section at the back and rebend the bottom edge to roughly the same radius as before.
![[IMAGE]](http://www.darrylsgarage.com/67ghia/ghia020.jpg)
The next steps were cutting out the corners from the original pressing and relocating them in approximately the same location as the corners on the rotten orignal. A lot of careful cutting and fitting ended up with some very nice fitting corner pieces.
![[IMAGE]](http://www.darrylsgarage.com/67ghia/ghia021.jpg)
A series of tack welds on each side of the sheetmetal using my MIG welder ended up with a nice solid pan again. I'm not worried about welding them up water tight, I'll use seam sealer to accomplish that.
![[IMAGE]](http://www.darrylsgarage.com/67ghia/ghia022.jpg)
The original rotten section was once again laid over the new sheetmetal pressing and all but about a �" allowance was cut from the excess material on the new pressing to allow for fitting the new piece once in the car.
![[IMAGE]](http://www.darrylsgarage.com/67ghia/ghia023.jpg)
Finally the new patch was test fitted in the floor of the car and it is quite close to the final size. I'll need to clean up and straighten the cuts made to remove the rotten section for cosmetic purposes. A little more fitting and prepping the old metal for welding and the new patch panel will be ready for welding in.
![[IMAGE]](http://www.darrylsgarage.com/67ghia/ghia024.jpg)
Entry: 9/21/10 - Prepping the metal around the opening in the floorpan was pretty straight forward. Outside the car; remove the undercoating around the outside edge with a wire wheel on a drill, about a �" wide where the patch panel would make contact. Inside the car; grind the edge back about �" to remove all the rust and expose bare steel where the welds will be made. Welding went pretty quickly too, making tack welds with my MIG welder, successively closer to each other, alternating sides to keep any heat from building up and warping the metal. Each weld was about an inch apart and produced a solid bond, no need to make a complete bead due to the risk of fire from a spark igniting the carpet padding or headliner.
![[IMAGE]](http://www.darrylsgarage.com/67ghia/ghia025.jpg)
From the underside you can see the welds made good penetration and the white ash is the weld-thru primer burning off. I'll fill the seam with a thick coat of 3M seam sealer from a caulk gun and smooth it to hide the overlapped patch panel prior to a thick coat of undercoating. A secure and watertight patch is completed on the driver's side, now on to the passenger side.
![[IMAGE]](http://www.darrylsgarage.com/67ghia/ghia026.jpg)
The pneumatic body saw made quick work of removing the rotten section and it's a mirror image of the driver's side but with a bit less extensive corrosion.
![[IMAGE]](http://www.darrylsgarage.com/67ghia/ghia027.jpg)
Deja-vu all over again but a mirror image. I should have all the floorpan work done within a day or two, given that the second time doesn't have all the analysis and planning, just repeat what I just did.
![[IMAGE]](http://www.darrylsgarage.com/67ghia/ghia028.jpg)
Entry: 9/26/10 - I'm a bit large for curling up and crawling into the back of my Ghia to strip all the carpet and padding out from behind the back seat and parcel shelf and sealing any rust I find. But with a big hole in the floorpan behind the passenger seat, yet to be filled with new sheetmetal, I can stand on the floor and work quite comfortably! So over the last couple days I've pulled out all the old carpet and jute felt padding and exposed the painted surfaces below. At first blush, it looked like there was a lot of rust but in reality it was only on the surface and any scales quickly removed with a wire wheel on my drill or 80-grit sandpaper.
![[IMAGE]](http://www.darrylsgarage.com/67ghia/ghia029.jpg)
Once all the rust scales and dust was all vacuumed up I gave the entire surface a good coat of SEM Rust Seal, just like I did to the floorpans. All the original padding is in one piece and will work perfectly once re-glued. I'm actually quite pleased with the overall solid condition of the areas prone to rusting through. For a 43-year-old car from the Pacific NW, this is a really solid little car and now that the rust has been arrested, it is preserved for decades to come. Now welding in the new passenger side floor patch is much safer too, since there's less flammable material inside the car looking for a spark to land in it.
![[IMAGE]](http://www.darrylsgarage.com/67ghia/ghia030.jpg)
Entry: 9/27/10 - The second floorpan installation on the passenger side took about half the time. I started cutting down the new pan pressing about 11 AM and had it completely welded into the car by 5 PM! The finished product is an exact mirror image of the first one but with a lot less steps because no experimenting was required. All the seams and welds will be hidden under tarboard insulation so not much need to dress the welds.
![[IMAGE]](http://www.darrylsgarage.com/67ghia/ghia032.jpg)
From the bottom of the car it won't be obvious that the pans have been replaced when I get done hiding the seams with 3M seam sealer and a thick coating of high-build undercoating. A little dressing of the welds where I grafted the corners in the back of the pan to shorten it will be necessary but that should take all of about 5 minutes. Now I can concentrate on the headliner and dashboard next. Nothing much is happening on this project until I finish construction on my new shop and move in.
![[IMAGE]](http://www.darrylsgarage.com/67ghia/ghia031.jpg)
![[IMAGE]](http://www.darrylsgarage.com/67ghia/ghia033.jpg)
Entry: 9/30/11 - Wow, it's been a year since I had a chance to work on the Ghia! Good news, I've finished a "revolutionary change period" in my life and it's time to start working on the Ghia again. In the last year I've moved to a country acreage, built a new, bigger "facility" for my hobby, and am finally all set up to begin restoration work again. My new shop has 50% more floor space at 24' x 36' and I've built in the necessary work bench and cabinets to keep my tools out of the dust and mess that comes with media blasting and metal working. Like the Three Little Pigs, this, my third shop is the culmination of years of thought and planning and it is a joy to spend time in when the gloomy winter weather sets in.
![[IMAGE]](http://www.darrylsgarage.com/67ghia/newshop.jpg)
Separated by a wall from the shop is a 36' x 60' climate-controlled "showroom" where I display all my projects in one place; the future, in progress and completed ones. Above the showroom is a loft of the same dimensions to serve as a warehouse for organization and storage of all the parts of the dismantled projects since I usually have a couple going at one time. It's been a hell of a lot of work to get this done in a year but my productivity and enjoyment of my hobby should be greatly enhanced. Life out in the country is pretty great too and I have immediate access to some beautiful country roads without having to drive my classic old cars on a freeway to get to them. Not a bad way to start a new chapter of my life and I hope to be blogging frequently again soon.
![[IMAGE]](http://www.darrylsgarage.com/67ghia/showroom.jpg)
Entry: 7/13/12 - My worries and commitments are finally at a point where I can start enjoying my hobby of restoring old cars again. My old house and "barn disguised as a house" are both sold, my daughter has graduated from nursing school, passed the state boards and is practicing as a Registered Nurse at a nearby skilled nursing facility and is quickly becoming totally financially independent. It's time to start making a big mess in my new, clean shop and use it for what I originally intended it for, serious and challenging projects! So the Ghia is rolled in, the windshield and rear glass removed to fix rust in the corners of the window frames and the engine is pulled to get at the transaxle that pops out of 1st gear. I have the car on the lift with jackstands supporting the body so I can remove the rear brakes and then the transaxle itself in the next work session. It's kind of strange to have to hunt for my tools since everything is unfamiliar but time spent out here in my little "sanctuary" will get everything squared-away in no time!
![[IMAGE]](http://www.darrylsgarage.com/67ghia/ghia034.jpg)
Entry: 7/15/12 - So, I remembered seeing plans for a special tool in the official Volkswagen "Local Manufacture of Workshop Equipment" manual supplied to dealers by the factory that allowed the movement of a VW without a transaxle, so I fabricated one for my own use from the plan. Now I have the transaxle out of the car and ready for a complete rebuild by Ben Jones, down at Wolfsburg Motorwerks. Ben did the transaxle rebuild in the '61 Transporter and it is drip-free, quiet and shifts like butter! While the engine compartment is empty, I'm going to order the replacement sheetmetal to fix that rotten battery tray and get the whole area squared away.
![[IMAGE]](http://www.darrylsgarage.com/67ghia/ghia037.JPG)
![[IMAGE]](http://www.darrylsgarage.com/67ghia/ghia035.jpg)
![[IMAGE]](http://www.darrylsgarage.com/67ghia/ghia036.jpg)
Entry: 7/16/12 - It sure is nice to be able to move the Ghia off the lift and out of the shop so it doesn't monopolize my work space. I also assembled the shop crane and lifted the transaxle asssembly up onto the sliding bed of my F-250 and hauled it down to have Ben give it a complete overhaul at Wolfsburg Motorwerks down in Ballard. I ordered all the supplies necessary to restore the engine compartment and will be tackling this job while Ben's working on his part. In the old days, when I still had a back, I would have just hefted that transaxle onto the bed of the truck without the shop crane. Now I use the shop crane because of doing stupid stunts like that! Word to you young guys, use good body mechanics when you lift and use a tool to do it instead or get a friend if can. I will always remember the "pop" of the disc between #L3 and #L4 vertebrae in my back letting go and wish I could get a do-over on that smooth move.
![[IMAGE]](http://www.darrylsgarage.com/67ghia/ghia038.jpg)
![[IMAGE]](http://www.darrylsgarage.com/67ghia/ghia039.jpg)
Entry: 7/19/12 - OH BOY!!! The new rear battery tray patch panels arrived from Karmann Ghia Parts & Restoration (karmannghia.com) today!!! This looks like a fun little repair, I'm thinking it would be easy to place a seam right under the latch and only install half of the rear engine compartment sill patch panel. I'll have to take a closer look at how close the new stamping matches and decide.
![[IMAGE]](http://www.darrylsgarage.com/67ghia/ghia040.jpg)
Entry: 7/23/12 - Rust bubbles under the rubber windshield weatherstrip in both lower corners prompted me to remove both the front and rear glass and take a closer look at the extent of the rust hidden under them. Actually the rust wasn't as bad as I had prepared myself for and really only see the two lower corners in the front windshield needing it blasted out and resulting holes welded shut. The following sequence of photographs show the process. The first shows how the metal looked in the passenger side lower corner after spot sandblasting. Some pretty large holes appeared but the surrounding metal was still sound.
![[IMAGE]](http://www.darrylsgarage.com/67ghia/ghia041.jpg)
The next step was welding a dent-pulling stud near the area to clip the MIG welder's grounding clamp to since close proximity of the ground to the weld makes for excellent penetration. Then I used standard ungalvanized sheetrock nails to fill the holes from behind, feeding the nail head through the hole and holding them from the outside with a Visegrip as I welded them in, then clipping off the nail shaft with a standard wire cutter. It really made the ideal platform to fill with molten MIG wire and quickly took care of any voids in the sheetmetal. Shaping the head of the sheetrock nail with the wire cutter allowed insertion into the smaller holes.
![[IMAGE]](http://www.darrylsgarage.com/67ghia/ghia042.jpg)
After removing the excess material and shaping the welds with a grinder, the filled holes are ready for some plastic filler and solid as a rock. No chance of rust bubbles reappearing here again!
![[IMAGE]](http://www.darrylsgarage.com/67ghia/ghia043.jpg)
Entry: 7/25/12 - Today was the perfect day for working in the cool shade in a shop with a big ceiling fan to keep the air moving. Sometimes I have to pinch myself, I'm all moved into the new shop and all the things I thought about for years are now features that come in really handy. The driver's side of the windshield is the only other severe rust problem in the window seal areas and I did the necessary spot blasting and prep to make a bit more extensive repair. Rather than try to knit together a "lace" of thin, pitted metal, I took a more aggressive approach and made a small patch to which the MIG puddle could bind to. A little 20-gauge steel, bent, drilled and held in place underneath with an ungalvanized sheetrock nail in a Vicegrip from on top made for a pretty quick fix that will have no possibility of bubbling in the future.
![[IMAGE]](http://www.darrylsgarage.com/67ghia/ghia044.jpg)
After MIG welding and grinding, a good solid substrata for a little plastic.
![[IMAGE]](http://www.darrylsgarage.com/67ghia/ghia045.jpg)
The rear battery tray has been calling my name ever since the new pressing arrived. Cutting out the old sheetmetal was a little work because there are braces for the battery and rear bumper welded to it but a little patience mixed with persuasion and everything came apart with a little additional work required to free the braces and reuse them when I put the whole thing back together.
![[IMAGE]](http://www.darrylsgarage.com/67ghia/ghia046.jpg)
The reproduction pressings were close but like the floorpan pressings, needing much trimming and fitting to make work. I guess if you're not a competant sheetmetal fabricator, DIY restoration of vintage cars is unrealistic.
![[IMAGE]](http://www.darrylsgarage.com/67ghia/ghia047.jpg)
In the end, the new sheetmetal pressing will do the job and thanks to firewall insulation, any slight variations from the right side won't be noticed. I'm still planning on only using the left half of the reproduction rear sill pressing and I'm hoping all the seams line up or at least have ample extra material so I can trim it to fit perfectly like the panel I modified today!
![[IMAGE]](http://www.darrylsgarage.com/67ghia/ghia048.jpg)
Entry: 7/28/12 - Well, I looked at the prospect of saving the original sheetmetal on right half of the rear engine compartment sill but as it turns out, the reproduction pressing is just so different and the rear valance so badly rusted, the only logical choice was to replace both completely with new sheetmetal. Cutting away the right side went very quickly and with the rear valance cut away, left a "Baja" style opening that would make engine swaps using a milk crate possible, but no, it's going back together as close to original as currently available reproduction pressings will allow. Before cutting away, I took careful measurements of the engine opening dimensions so I would avoid running into problems later when I reinstall the engine.
![[IMAGE]](http://www.darrylsgarage.com/67ghia/ghia049.jpg)
Surprisingly, the reproduction rear sill pressing fit very close to perfect, just a few snips on each side with the tinsnips to get it positioned in the opening. I ran a string across the front of the engine opening where the rubber seal would meet the engine tins as a visual reference to see if the new pressing lined-up horizontally and to measure the distance of the opening front to back. Everything lined-up and the measurements look good so I took and clamped everything into place using Vicegrips. I placed an order for the rear valance sheetmetal pressing and hope it isn't on backorder or takes too long to get here.
![[IMAGE]](http://www.darrylsgarage.com/67ghia/ghia050.jpg)
I also used the tinsnips to liberate the bumper overrider support braces from the discarded original sheetmetal. They are in very good shape and should look like new after a little work to remove the spotwelds holding the remnants of the old engine sill and media blasting. There is a captive nut in one of them for the bumper overrider support bar to bolt to so I'll have to replace the missing one as well.
![[IMAGE]](http://www.darrylsgarage.com/67ghia/ghia051.jpg)
Entry: 7/31/12 - A couple days of patience paid off, with ample applications of penetrating fluid and not forcing the stuck bolts beyond wiggling them back and forth for two days, I was able to get the rear bumper apart without any damage. The left rear corner had taken a bit of a bump at some point and there's a significant dent in the left outer blade and wrinkle in the left overrider support arm. I was able to pound out and straighten all the pieces so I can reassemble it in perfect alignment for the positioning of the bumper overrider support braces into the new rear valance sheetmetal (when it gets here).
![[IMAGE]](http://www.darrylsgarage.com/67ghia/ghia052.jpg)
I'm afraid the damage to the left outer blade is too severe to leave as it as is and I really don't want to invest the significant dollars it would cost to have it rechromed so the hunt for a better used one begins. These come up on thesamba.com's classified ads and Craigslist occasionally and I have plenty of leadtime to find them before the final assembly. The only complication is this one has the indentation and mounting hole for the Hella backup lights so it must come from a '67 to '69 Ghia since the backup light was integrated into the turnsignal/brake light from '70 on.
![[IMAGE]](http://www.darrylsgarage.com/67ghia/ghia053.jpg)
The left bumper overrider support arm has been kinked and straightened back to it's original angle but the damage is clearly visible when the bumper is assembled. These seem to be readily available on thesamba.com so finding one in perfect shape shouldn't present much of a problem. The good thing is that I can use this one for alignment of the support braces in the new valance and keep the sheetmetal repairs moving forward.
![[IMAGE]](http://www.darrylsgarage.com/67ghia/ghia054.jpg)
Entry: 8/2/12 - All the sheetmetal for fixing the rear valance, front valance and both rockerpanels arrived today from California Import Parts (just across the Canadian border from me in Vancouver) in 4 days from placing the order so I can dive back into finishing the rear engine compartment work! I took a closer look at the rockerpanels on the car and see rust bubbles starting and a thick BONDO repair around the torsion bar access holes in the rear quarterpanels so rather than look at something that's going to bug me as long as I own this car, I'm going to do this once and do it right. Nothing makes me madder than rust bubbles coming through new paint.
![[IMAGE]](http://www.darrylsgarage.com/67ghia/ghia055.jpg)
Entry: 8/5/12 - The rear valance pressing required only a minimum of fitting to get it into place and clamped securely. Everything seems to be coming into alignment very nicely but a little "prospecting" around the left bumper bracket hole revealed a very crude metal patch with a thick slathering of BONDO, sculpted into something vaguely resembling the original sheetmetal. It would appear that the battery acid run-off from the battery tray ran into the bottom of the fender cavity and rotted it out completely.
![[IMAGE]](http://www.darrylsgarage.com/67ghia/ghia056.jpg)
A closer look at the left bumper hole reveals something ugly easily hidden under the large bumper bracket covers that are unique to the Ghia. The gray material is filler and it looks to be over �" thick in some sections. Luckily three separate reproduction sheetmetal pressings are readily available to replace the back, side and inside (where the bumper mounts) sections and have already been ordered from California Import Parts (cip1.com).
![[IMAGE]](http://www.darrylsgarage.com/67ghia/ghia057.jpg)
The view from the inside reveals the degree of "hack" work done to fix the rotten panel so it looked good from the outside of the car. The patch panel that houses the captive nuts for the bumper bracket will need to be completely replaced, but not until after the new rear latch sill, battery tray panel and rear valance panels have been welded in since they rely on the exact positioning of this rusted panel. If there's one thing I've learned in my 20+ years of rust repair in the Pacific Northwest, it's that simply sculpting BONDO over a rusty panel is a waste of time, rust bubbles will appear again in short order. I'd like to have a nice solid driver that I can drive in the rain without worry.
![[IMAGE]](http://www.darrylsgarage.com/67ghia/ghia058.jpg)
Entry: 8/7/12 - I got the word today that the Ghia's transaxle was the next job in Ben Jone's work queue down at the Wolfsburg Motorwerks shop in Ballard so I got my butt down there to witness the "autopsy" and see just how extensive the damage to inner workings is. Ben had the unit apart in a few minutes and quickly determined that the whole thing was only a few miles away from a catastrophic failure with an anchor ring that holds all the gears on the main cluster slowly letting go and slop developing between the gears. Once it let go, damage to all the gears and the ring and pinion would have resulted, pretty much requiring all new and very expensive parts. As is sits now, just a few new parts to "freshen it up" will have it back to working like new.
![[IMAGE]](http://www.darrylsgarage.com/67ghia/ghia059.jpg)
All the gears and shafts strewn about Ben's workbench with the signature MAPP gas torch used to expand gears to remove them from the main shaft.
![[IMAGE]](http://www.darrylsgarage.com/67ghia/ghia060.jpg)
Once run through the parts washer, the transaxle case looked like somebody had really "pimped it out" with an additional highlighting of the ribs on the case with purple paint. The magnesium case was originally painted black at the factory and much of that remained but the origin of the purple is anybody's guess.
![[IMAGE]](http://www.darrylsgarage.com/67ghia/ghia061.jpg)
I saved Ben a couple hours effort by bead-blasting the case down to the bare magnesium and it will be left in the raw once reinstalled in the Ghia. The black paint generally flakes off the magnesium pretty quickly and I think it looks much better once a little gray patina develops. Meanwhile the axle tubes and brake backing plates are being sent off to the powdercoater for a nice durable coat of semi-gloss black.
![[IMAGE]](http://www.darrylsgarage.com/67ghia/ghia062.jpg)
Entry: 8/9/12 - I stopped by to see the progress Ben's been making on the transaxle rebuild this morning and once again marvel at the expertise on display. First of all, that's a special VW factory tool in the photos, an antique one to boot, a jig that allows a mechanic to assemble the gear stack and test the shifting outside the transmission case. Because he uses this jig, Ben was able to see that one of the new gears had some machining tolerance issues causing one of the shift forks to bind, way before assembling the transaxle and installing it into the car. A new part is on order and will be installed and tested to replace the bad one so that all is perfect before final assembly.
![[IMAGE]](http://www.darrylsgarage.com/67ghia/ghia063.jpg)
![[IMAGE]](http://www.darrylsgarage.com/67ghia/ghia064.jpg)
More sheetmetal pieces arrived today as well to fix the rot in the lower fender due to the battery acid run-off draining into it. I want to finish the battery tray and rear valance welds before cutting this section away since they've got to be in the right place for these pieces to line up. Lots of pondering and measurements before any cutting but it's looking like putting this back to solid steel is not going to be much problem with the abundance of prefabricated panels that are cheap and still available.
![[IMAGE]](http://www.darrylsgarage.com/67ghia/ghia065.jpg)
Entry: 8/20/12 - Now that I'm ready to start welding, I figured it was as good of time as any to give everything a thorough degreasing to minimize the fire danger and while everything was so accessible. So once again, stringing the garden hose out the utility room window and hooking it to the hot tap on the clothes washer hook-up, I delivered scalding hot water and degreaser to the bottom of the car while up on the 4-post lift. I couldn't believe all the dirt and caked grease that came off the bottom and much of the surfaces are bare metal that was protected by a layer of grease. Now I can clearly see where I need to clean the thick, factory applied undercoating off of the suspension and frame components that look much better detailed with a semi-gloss black paint. A few details such as fabricating the tabs for holding the engine compartment insulation in place on the new panels and I'm ready to start assembling and welding in the new sheetmetal parts.
![[IMAGE]](http://www.darrylsgarage.com/67ghia/ghia066.jpg)
![[IMAGE]](http://www.darrylsgarage.com/67ghia/ghia067.jpg)
Entry: 8/21/12 - Besides degreasing, the other reason I removed all the test-fit panels was to install this new inner left rear fender pressing to fix the rot in the bottom of the cavity. Pondering when it is best to cut out and install this piece has me thinking it's more about squaring-up the rear sill than putting new metal exactly where the old stuff was. Something tells me that between rotting and getting "bumped" (the impact that wrinkled the bumper), this area needs to be approached as if it was in a collision and careful measurements, leveling and alignment efforts must be taken to get it back to perfect.
![[IMAGE]](http://www.darrylsgarage.com/67ghia/ghia068.jpg)
Entry: 10/27/12 - OH BOY! I've found a Mexican Beetle 1600i "ACD" engine to power this Ghia! The last Volkswagen Beetle, #21,529,464 was built in Mexico back in 2003 and left the factory with the most advanced air-cooled 4 cylinder boxer engine of the series; 1600cc, fuel injection, electronic ignition, ODBII-based engine management computer & diagnostic codes, high amp alternator, adjustment-free hydraulic valve lifters, and full-flow spin-on oil filter top the list of enhancements over the 1967 1500cc engine that came in the Ghia. The 1600i is a low emission & low maintenance product of German engineering evolution that, amazingly, would still bolt directly into a 1946 VW Beetle! Well, thanks to my buddy Jack Morris, I have a factory-fresh, low-mileage 2003 example sitting in my garage, talk about a compelling powerplant for my Karmann Ghia, the Teutonic equivalent of putting a Corvette LS1 V8 into a '56 Chevy!
![[IMAGE]](http://www.darrylsgarage.com/67ghia/1600i1.jpg)
![[IMAGE]](http://www.darrylsgarage.com/67ghia/1600i2.jpg)
![[IMAGE]](http://www.darrylsgarage.com/67ghia/1600i3.jpg)
I've been delaying on final gear set decisions on my transaxle rebuild until I settled on the engine choice, so now we can complete the transaxle geared specifically for this engine. I am actually hungry to start researching and understanding all the refinements of 50 years of Volkswagen engineering so I can thoughtfully and sanitarily slip it undetected under the sensually curved 1950's vogue Karmann Ghia rear decklid and pass it off as an obsolete antique when I know it's actually state-of-the-art and environmentally responsible. I found a particularly information packed German website dedicated to the Mexican Beetle and 1600i engine searching the Internet with some major contributions in English. This lengthy tutorial on care and maintenance written by Tom Brunson has really provided an excellent starting point and Google Translate is unlocking more from the sections written in German. This should be an extremely challenging and fun retrofit project!
Entry: 11/2/12 - This morning I cruised down to Wolfsburg Motorwerks to pick up my completely rebuilt transaxle. The gearing is set up for the higher horsepower 1600i and everything is freshly powder coated, one-piece rubber axle boots with original factory style clamps and all new assembly hardware. I can't wait to see how smoothly this thing shifts and quietly it runs after my excellent experiences with the one that Ben Jones rebuilt for my '61 Transporter. My next step on the project is getting this transaxle installed and then test fitting the Mexican 1600i engine to see if I have any clearance issues with the engine sheetmetal and muffler on the rear valance. The rebuilt transaxle sure looks great all cleaned-up!
![[IMAGE]](http://www.darrylsgarage.com/67ghia/ghia069.jpg)
Entry: 11/6/12 - Today the VW of Mexico "sport muffler" arrived via FedEx from Antonio Trejo, my parts source in Mexico City that I contacted through a classified ad he placed on TheSamba.com. I was concerned about two things with the headers/muffler that came with my 1600i "ACD" engine, the bung for the oxygen sensor was not sampling the mixture from all the cylinders due to its location on the header and the muffler itself was so big! This "sport muffler" is much more compact and the oxygen sensor bung is in the correct location, where it would be entering the catalytic converter on the original factory set-up. This is essentially a factory "catalytic converter delete" option and it looks like it will have a better chance of clearing the Ghia's rear apron. What I really need to do is mount the header and sport muffler on the engine and compare it to the original muffler from the Ghia's old engine. I've already placed a new engine to engine management computer wiring harness on order (currently on back order) with Antonio instead of trying to fix the one that came with the engine that had been cut when removed from the donor car.
![[IMAGE]](http://www.darrylsgarage.com/67ghia/1600i4.jpg)
In the "nothing new under the sun" department, I found an inspirational YouTube video of a guy who has accomplished the 1600i "ACD" engine swap in his 1971 Karmann Ghia already. It looks like he's running the stock muffler/catalytic converter and used the stock Ghia oil bath air cleaner. Notice how quiet the hydraulic lifters are at idle, definitely a much more refined sounding VW engine!
Entry: 11/7/12 - Today it was time to do a side-by-side comparison of the original 1500cc motor with the Mexican 1600i and get an idea of what needs to be done to get it to fit into the stock engine opening.
The VW of Mexico "sport muffler" bolted on with no issues and looks like it may not be a problem clearing the rear apron but installing the engine and test fitting is going to be necessary before any new body sheetmetal is welded into place. I'd prefer not doing any customization of the body if possible but since I'm using reproduction pressings, deviating from originality isn't a big problem.
![[IMAGE]](http://www.darrylsgarage.com/67ghia/1600i5.jpg)
The thing that did quickly become obvious is that the area around the fuel injector rails has been enlarged so it clears the Mexican Beetle engine opening without having to remove them. All the blue tape on the cylinder head tins shows the excess material that has to be removed to fit into the Ghia's engine opening. Removing the fuel injector rails will be necessary when installing the engine, luckily the seals and such are the same as the US-import water-cooled VW engines of the same vintage and readily available locally.
![[IMAGE]](http://www.darrylsgarage.com/67ghia/1600i6.jpg)
Entry: 11/29/12 - All the pieces of the rear bumper were reassembled today after getting a good polish and all the dents hammered out and straightened. A used (the orange part in the photo) bumper overrider support bracket was found on-line to replace the bent one and all new rubber overrider tube to bumper gaskets and bumper overrider beading is installed. Now it's all bolted together tight and is ready for test fitting to the new rear apron sheetmetal when I do the final fitting of that area. It's actually kind of amazing how clean and sharp it looks even with some dents and a few scratches. Rechroming the damaged bumper parts is always an option but first priorities are rust repair and getting it on the road.
![[IMAGE]](http://www.darrylsgarage.com/67ghia/ghia070.jpg)
![[IMAGE]](http://www.darrylsgarage.com/67ghia/ghia071.jpg)
Entry: 12/6/12 - I finally got the time to make the modifications to the Mexican 1600i engine tins so the engine will fit into the stock 1967 engine opening. My goal was to make the modification with the engine tins in place since removing them would require removing the intake manifolds, alternator, etc., etc. and with a low-mileage engine that was last assembled at the factory, not the brightest idea. Cutting away the extra tin was easily accomplished with the standard "aircraft-style" tin snips (left, center and right cut models). Bending the 90� edge like was on the original 1967 type require a little creative use of �" angle iron and ViseGrip pliers to create a solid edge to hammer the sheet metal against. Cutting some notches in the angle iron to accommodate the captive nuts on the back side of the cylinder tins allowed the top and bottom ones to be perfectly aligned prior to clamping.
![[IMAGE]](http://www.darrylsgarage.com/67ghia/1600i8.jpg)
![[IMAGE]](http://www.darrylsgarage.com/67ghia/1600i9.jpg)
A blunt tip on my pneumatic air chisel, with the speed turned way down, made quick work of making the 90� bend and once the angle iron and clamps were removed, a quick adjustment in width of the downward pointing sheetmetal lip with a 4�" grinder smoothed the sharp edge left by the tin snips and made it look totally uniform. The right side went pretty quickly.
![[IMAGE]](http://www.darrylsgarage.com/67ghia/1600i10.jpg)
![[IMAGE]](http://www.darrylsgarage.com/67ghia/1600i11.jpg)
The left side went even quicker than the right and now the engine is ready to install in the car. Now it's time to start getting the car ready for the engine!
![[IMAGE]](http://www.darrylsgarage.com/67ghia/1600i12.jpg)
Entry: 12/12/12 - I thought it would be wise to get some fresh Swepco synthetic oil in the 1600i so I began an oil change only to discover, for whatever reason, the drain plug was not to be found on the factory sump plate. I guess the factory wanted the sump screen to be inspected and cleaned with each oil change which seems silly with a full-flow modern oil filter also installed. Unless your engine is spitting chunks of metal or silicone sealant, the sump screen really only stops mosquitos so I found an earlier model sump plate with a drain plug and "back-dated" the sucker!
![[IMAGE]](http://www.darrylsgarage.com/67ghia/1600i13.jpg)
With the new oil filter and new sump plate, the bottom side of the engine looks as clean and drip-free as one would hope a low-mileage, factory-assembled engine would look. There is quite a bit of surface rust on the cast iron cylinder fins and metal pushrod tubes, which is not a problem besides looking a little ugly. The engine turns over easily by hand and my next step is mounting a proper starter and turning it over on the test stand to get some oil pressure and all the internal parts lubricated again. I'm also pondering the logic of running the engine on the test stand which would require sorting out the wiring harness, fuel pump and engine diagnostic interface while it's all easy to get to.
![[IMAGE]](http://www.darrylsgarage.com/67ghia/1600i14.jpg)
Entry: 12/15/12 - Well, after a closer look, ordering a new wiring harness for the engine compartment might not be necessary. The wiring harness that came with the engine has all the wires that ran back into the donor MexiBeetle's chassis snipped off and a fuse block section containing the fuel pump and fuel injection relays also left with stubs of the original wires snipped off but still attached and retaining their color coding so they correlate to the wiring diagrams. The wires that run from the Electronic Control Unit (ECU) to the engine itself are all intact, though it might look like a rat's nest, it is actually quite usable. I found lots of documentation on the engine side of the wiring harness, like this elaborate diagram on the www.1600i.de website and was able to trace the circuits to figure out which pins go with which wires (pinout) on the 28-pin connector that attaches the wiring harness to the engine.
![[IMAGE]](http://www.darrylsgarage.com/67ghia/1600i16.jpg)
I've got all but 8 of the wires completely understood and have a very clear idea of how the ECU and the engine communicate with each other. What I don't understand yet is how things like the idiot lights and the security immobilizer system are hooked up, which might explain a couple of the mystery wires. Armed with specific questions, I'm now able to dive into the Volkswagen factory circuit diagrams .pdf file that I found on the www.1600i.de website and see that they are actually pretty understandable as I dig deeper. The more I learn, the more feasible and exciting this retrofit project is becoming to me. I also found the ECU diagnostic wires and need to find a Microsoft Windows-based OBDII diagnostic software package and USB to VW diagnostic port adapter cable to interface with it and be able to read trouble codes and set operational parameters if they need to be adjusted.
![[IMAGE]](http://www.darrylsgarage.com/67ghia/1600i15.jpg)
Entry: 12/27/12 - Just for grins, I placed a "ScanTool 423001 ElmScan 5 Compact OBD-II Scan Tool and OBDwiz Diagnostic Software" on my Amazon.com Christmas gift wishlist and what do you know, my darling daughter Audrey watched me unwrap it on Christmas Eve! So, with a "DLC connector" to USB port interface and diagnostic software, I needed a female DLC connector to wire into the Ghia. A trip to the local junkyard, Pick-n-Pull, yielded two versions, a Volkswagen type (left) and a Mopar type (right) which has a mounting bracket integrated into it so I can install it under the dashboard. The ElmScan scan tool and software should allow me to at least read the raw scan codes which the Digifant ECU uses to communicates under the VAG1552 (Volkswagen proprietary) protocol and if not, there are other DLC connector enabled scan tools out there that are fully VAG1552 compatible, but for much more money.
![[IMAGE]](http://www.darrylsgarage.com/67ghia/1600i17.jpg)
Entry: 1/28/13 - Today I scrounged a used Vanagon fuel pump, mount and new rubber mounting studs for the 1600i installation. I've decided to use a Vanagon fuel pump instead of the exotic Mexican Beetle version that came with the engine even though it means having to install a return line fitting into the fuel tank. It just makes for a more compact and easy to replace set up in the event the fuel pump fails someday.
![[IMAGE]](http://www.darrylsgarage.com/67ghia/1600i18.jpg)
