![[IMAGE]](http://www.darrylsgarage.com/carrera/preview3.jpg)
Restoration Project Journal
![[IMAGE]](http://www.darrylsgarage.com/carrera/911at25.JPG)
Last Updated on July 15, 2023
UPDATE: 12/6/13 -Well, what can I say, out of the blue someone I used to know got an urge to experience 50 years of 911 evolution, deciding to upgrade Porsches and bought a new 2013 911 Carrera S. I got to experience that 50 years of evolution personally when she let me drive her from Santa Barbara to Ojai and back, about 70 miles of twisting canyon roads and a couple "pedal to the metal" freeway on-ramps. In the curves, it's all the traditional 911 nimbleness and rumbling power sitting behind you, especially with that muffler noise switch in "sport" mode on. On the freeway on-ramps, it's crazy fast, like I couldn't have a car like this because I'd lose my license, crazy fast. I struggle with the idea of paying over $100K for one car, that is about what I have in my entire, 4 restored Porsche collection, not counting the 5th, the unrestored 356C waiting its turn and I take comfort in knowing that amount is appreciating.
![[IMAGE]](http://www.darrylsgarage.com/carrera/2013carrera.jpg)
![[IMAGE]](http://www.darrylsgarage.com/carrera/911in2014.jpg)
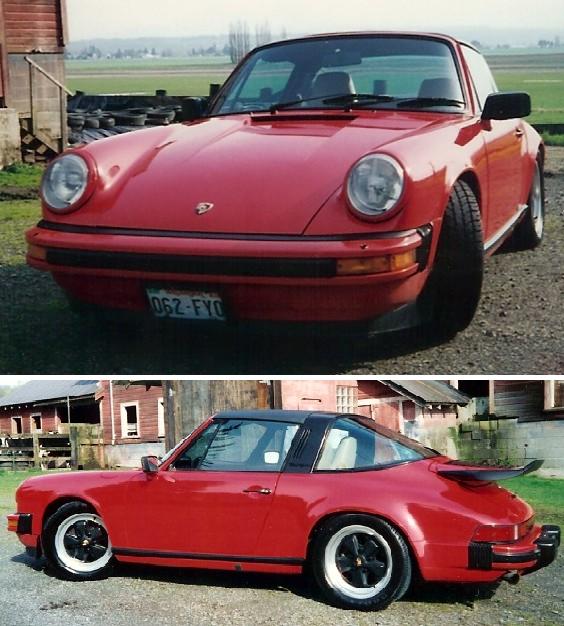
I told her many times during visits to Santa Barbara, "Please let me make you an offer if you decide to sell" the Grand Prix White, 1989 Porsche 911 Carrera Cabriolet that she's owned since new. It's in great shape, with only 165K miles on it, so when the e-mail came telling me the dealer was only offering her $8500 on it as a trade-in, I didn't hesitate to negotiate a mutually fair price somewhere between the dealer's trade-in offer and the Hagerty's Classic Car Value for a "good condition" private sale and I flew down and drove it home on the weekend after Thanksgiving. A pre-trip inspection at the seller's Porsche dealer resulted in me putting a set of new Bridgestone Potenza RE-11 tires put on it and getting an oil change, all arranged by her the week before the road trip. I love her '80s vintage vanity license plates, "SHE BRKR" as in "she broker" and I joked, "I'll fix her" knowing that I had plenty of budget "headroom" to get it back in excellent condition without exceeding its market value.
![[IMAGE]](http://www.darrylsgarage.com/carrera/shebrkr.jpg)
I took off from Santa Barbara early Sunday morning, December 1 and started the trek north up Hiway 101 to the Bay Area, with a stop to visit an old high school friend in Lafayette, CA for lunch. Then I contined on up I-5 while listening to NFL games on AM radio until after Sunday Night Football was over. I finally stopped for the night in Eugene, Oregon after crossing Siskiyou Pass just as a snow storm was starting to move in and the temperatures began dropping. Nearly 17 hours and 900 miles driving the 911 made the bed at the Holiday Inn feel like heaven.
![[IMAGE]](http://www.darrylsgarage.com/carrera/roadtrip.JPG)
Of course, freezing temperatures the second morning of the trip caused the plastic gear in the odometer to snap, about 300 miles away from home! The needle showing speed still worked on the speedometer, and luckily I had the free Droid app, Ulysse Speedometer already running on my cell phone to let me know how far I traveled and all kinds of other fun facts so I knew exactly how many miles were missing from the odometer reading.
![[IMAGE]](http://www.darrylsgarage.com/carrera/89stats.jpg)
Once I got home and took a close look it turns out, there's not really much to "fix" on "her"; a grinding problem with the starter on the first attempt when the engine is cold, a few missing or broken bits on the dash and around the body, hood and deck lid struts that didn't keep them up, foggy headlights, seats and a steering wheel with leather that is tired from all that California UV exposure. I happen to have a set of the correct 7" bolster sport seats for it so I'm going to recover them in "Burgundy" colored leather using a GAHH kit instead of the standard style seats that came in it. The dealer-installed chromed Fuchs wheels are also a bit rough, with flaking chrome so I'm going to move the new tires to a set of annodized rim, black painted center 16" Fuchs as was factory original to the car. Other than that it's mostly just freshening it up, cleaning up overspray from sloppy masking from a low-budget repaint and detailing it thoroughly due to all the dust sitting open the majority of the time caused. I'll add more details as I get further into the project, for now it's safely in my shop after passing a smog test and getting new Washington plates.
![[IMAGE]](http://www.darrylsgarage.com/carrera/89home.jpg)
In the old days, a build sheet called a "Kardex" was recorded and filed away for a new Porsche at the time it was manufactured. By 1989, this "Kardex" was also printed on a sticker and stuck to the underside of the front hood and the key to all the codes is listed in the back of the Porsche PET online parts catalog available in PDF format on the Porsche corporate website. The original build specification for my car is easily decoded to show it's a Stuttgart-built 1989 911 Cabriolet (640), engine type (64K) and number 93025, transmission type G50, variation 01, paint code L908 (Grand Prix White), interior code YZ (burgundy leather seating surfaces, leatherette everything else). The option codes are easy, C03 = California emissions, 018 = with elevated hub 30mm, 070 = tarpaulin (a.k.a. tonneau cover), 158 = Blaupunkt Reno stereo, 243 = shorter gear shift lever, 439 = electric seats, 454 = automatic speed control (a.k.a. cruise control), 490 = sound system and 494 = additional amplifier.
![[IMAGE]](http://www.darrylsgarage.com/carrera/89hoodtag.jpg)
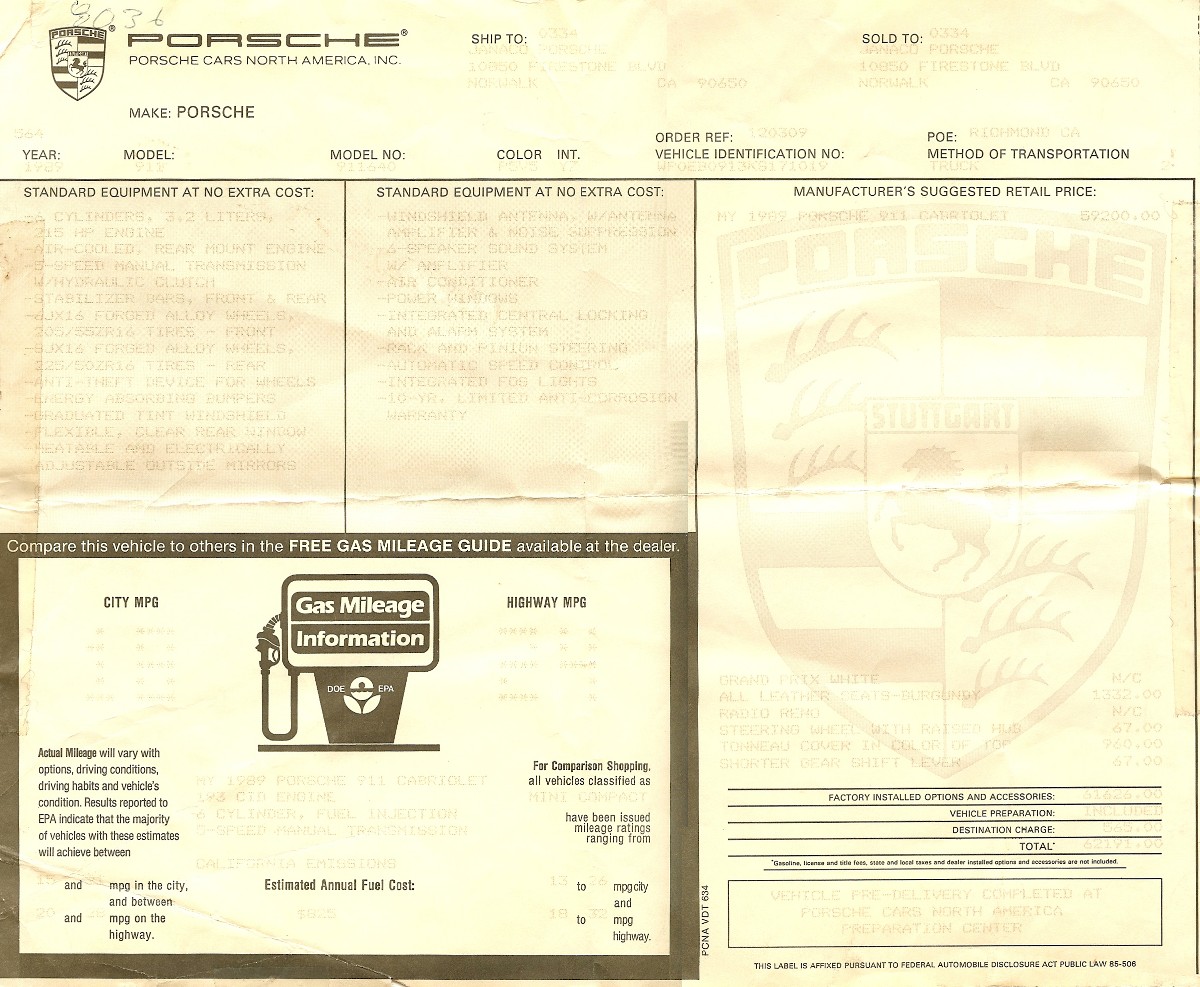
The original window sticker was still in the glovebox and quite faded but still readable. It's hard to believe this car's MSRP was $62,191 when new and a quick inflation calculation using the CPI calculator in 2014 dollars, that would be $116,893, so maybe the price of that new Carrera S the seller purchased isn't all that staggering. You can make out the faded dot-matrix printing on the full size scan of the original window sticker.
![[IMAGE]](http://www.darrylsgarage.com/carrera/89sticktmb.jpg)
UPDATE: 12/10/13 -Where to start? How about foggy headlights and sagging lids? I disassembled the foggy H5 headlights and began soaking the inside of the glass lense in isopropyl alcohol by pouring it in the bulb opening as recommended on the Pelican Parts BBS and it seems to be eating away the built-up layer of haze that has formed over the last 25 years. Because the unit is sealed, I can't directly scrub the inside of the glass lense with a scrub brush so I'm hoping patience will prevail if I let it soften the layer over a couple days. I was able to find all the missing or broken parts in the interior at the online Porsche junkyard, dC Automotive and it only came to a little over $100 with shipping.
![[IMAGE]](http://www.darrylsgarage.com/carrera/89H5-1.jpg)
I ordered a set of hood struts from Sierra Madre Collection and they arrived today so installing them was the first improvement made to the car beyond washing and detailing.
![[IMAGE]](http://www.darrylsgarage.com/carrera/89lids.jpg)
I'm researching burgundy leather dye via Google to see what's available for Porsche leather rehab since the steering wheel is needing a lot of love. The stitching is loose and missing in some sections and the dye is worn through but the leather is still in pretty good shape so it's going to look like new once I get it all restored.
![[IMAGE]](http://www.darrylsgarage.com/carrera/89dash1.jpg)
The seats are sun damaged beyond a simple repair and I'd rather put the money into my fancy sport seats. In looking for seat covers for the sport seats I noticed that GAHH also carries the complete tonneau cover for this year in the correct color to match the German canvas top so that's going on my list of things I'd like to get for the car eventually. Since it's over $1500, it won't be soon but I really love the idea of having one since all the necessary Tenax studs are already installed across the dashboard and down the sides of the doors. Something I only thought you could find on an old Ferrari or British sports car.
![[IMAGE]](http://www.darrylsgarage.com/carrera/tonneau.JPG)
Matching the color is going to be easy, I drove the car down to my buddy Steve for inspection and his professional opinion. Steve immediately pointed out the GAHH logo molded into the plastic rear window and then grabbed the GAHH color swatch catalog. We pulled out the top material page and laid it on the convertible top of my car. An obvious match to German Sonnenland Classic Canvas color "111 Maroon/Black" which is maroon on the outside and black on the inside. So now I know it's a best available replacement top which hasn't faded under the bright Southern California sun at all and all the little scratches in the rear window can easily be polished out.
![[IMAGE]](http://www.darrylsgarage.com/carrera/89top1.jpg)
![[IMAGE]](http://www.darrylsgarage.com/carrera/89top2.jpg)
UPDATE: 12/15/13 - The inside of the headlight lenses are cleaned as much as I could do with isopropyl alcohol and later carburetor cleaner, without damaging the reflector material on the back side. All in all the improvement is significant but still not crystal clear. I'm sure I'll figure out a more agressive detergent, such as wheel cleaner and try it again sometime in the future. For now the car is ready for a run down to John Walkers Workshop in Seattle tomorrow for an engine drop to diagnose an intermittent grinding starter problem, probably requiring a new flywheel ring gear, starter and clutch while it's all apart. I also want JW to replace the engine compartment sound insulation while he's got the engine out. I know, I'm being lazy but when I have access to the best 911 guy in town, I might as well have him give the car the once-over like he did on my '74 911, which saved a ton of headaches by having him tell me what I need to do to it from his experienced eyes.
![[IMAGE]](http://www.darrylsgarage.com/carrera/89H5-2.jpg)
UPDATE: 12/17/13 - Less than 24 hours inside John Walker's Workshop in Seattle and any mysteries of the car are now known facts. John already has the engine out, the G50 transmission separated from the engine, the clutch disassembled and all the problems diagnosed. Good news, only the starter and ring gear are the problem with the grinding that only happens with a cold engine. It was caught very early so damage to the teeth is minimal so there are very few metal shavings falling into the moving clutch and electronic flywheel sensors. The clutch itself is like new, the flywheel recently machined and throw-out arm a later, updated model with very little wear. All the factory advised updates have been made which indicates that the dealership that serviced this car for 25 years did a fantastic job. So the cost of this little adventure has really dropped back into the reasonable range, purchasing new GAHH leather sport seat covers and matching tonneau cover will be sooner rather than later... PHEW!
![[IMAGE]](http://www.darrylsgarage.com/carrera/89walker1.jpg)
The teeth on the starter are showing some wear patterns consistent with the amount of grinding I was hearing.
![[IMAGE]](http://www.darrylsgarage.com/carrera/89walker2.jpg)
The starter gear ring is also consistently worn to the degree it was grinding and it would have only quickly become much worse, potentially leaving me stranded somewhere.
![[IMAGE]](http://www.darrylsgarage.com/carrera/89walker3.jpg)
John pointed out that the wires on the reference (TDC) sensor and engine speed sensor were starting to show cracks and would probably start giving false readings to the Motronic engine management system and cause problems soon. Here's one of those opportunities John's expertise provides and following his advice to replace them now while the engine's out and things are easy to get to saves headaches in the future.
![[IMAGE]](http://www.darrylsgarage.com/carrera/89walker4.jpg)
The bottom of the car is actually very clean, no damage of any kind and a little time with a steam cleaner will make it look awesome. CV joint boots are intact and everything looks very good in the back side, just the normal road grime.
![[IMAGE]](http://www.darrylsgarage.com/carrera/89walker5.jpg)
The same story with the front end, no scrapes on the gas tank and nothing looks worn or needing attention beyond a little steam cleaning and some fresh black paint on the surface rusted bar and cage protecting the front A/C condenser.
![[IMAGE]](http://www.darrylsgarage.com/carrera/89walker6.jpg)
The G50 transmission looks good, dry on the outside with only a slight amount of seepage of gear oil inside the bellhousing which will be cured with a new main shaft seal.
![[IMAGE]](http://www.darrylsgarage.com/carrera/89walker7.jpg)
The clutch disc and throw-out arm look like they're practically new, showing very little wear. The throw-out arm is an updated, more heavy-duty model but they retained the rubber-hub clutch disc that's brand-new so it will stay for now. The odometer also quit working on the way up the coast, about 300 miles from home so John called Buz at Seattle Speedometer to come over and pick up the instrument so that's being rebuilt while the car is apart. I'm having John open the engine up and adjust the valves, check for loose case studs, look for cam wear and replace any worn ignition components as required so he can dial it in for the best performance and fuel efficiency while he's got the car. This is one of the best model years for getting a bulletproof 911 and years of trouble-free driving are the goal here so investing a little money up front go a long way towards insuring it. So far it looks like I got an excellent, well maintained car.
![[IMAGE]](http://www.darrylsgarage.com/carrera/89walker8.jpg)
UPDATE: 12/19/13 - Today the new wheels came from Pelican Parts. I went with cast Euromeister Alloy replica wheels instead of original forged Fuchs. Why? A complete set of brand new wheels for $840 for a car I'm going to drive on the street. Price restored Fuchs and you'll understand. They are going to make the car look like it did back in the showroom! I purchased a set of new Bridgestone Potenza RE-11 tires down in Santa Barbara for the trip north, installed on the flaking chrome Fuchs on the car so it's just a matter of taking the wheels off the car and running them over to Les Schwab to have the tires moved to the new wheels, balancing and mounting.
![[IMAGE]](http://www.darrylsgarage.com/carrera/89fuchs1.jpg)
John Walker also called this afternoon and informed me that during his valve adjustment he discovered a broken spring on #1 cylinder intake valve, a $15 part that would have caused all kinds of rough running problems, so talk about that little investment paying off! He also noticed that the original factory Boge shocks and strut inserts were still on the car and after 165K miles, they had to be shot, so while it was up in the air I had a new set of Bilsteins installed all the way around. See what not having to buy a new flywheel and clutch kit does to the budget's headroom? New starter and starter ring gear, valve spring, 2 flywheel sensors, a complete 15K miles service (which includes all new filters, fluids, belts and ignition components) and new Bilsteins on all 4 corners with labor (including installing my new sound-deadening pad to the firewall) came to right at $3,500. Sounds expensive until you realize the peace of mind it buys and how smooth the engine purred on the way home not to mention how it handled made it quite the nice little bow tied on this deal the seller gave me on this car. The speedometer didn't make it back from Seattle Speedometer today so John put one of his spares in and I'll go back and have the repaired unit installed after Christmas. John also recommended I have him install a new, OEM Porsche DME relay since the old one was dated 2007 and a new one would insure years of trouble-free use and keeping the old, known working one in the glovebox as a spare. I'm so relieved that every element of the car has been gone through by a trusted expert and only minor problems were found, not bad for a 25 year old car!
![[IMAGE]](http://www.darrylsgarage.com/carrera/89yikes1.jpg)
UPDATE: 12/21/13 - Curiousity got the better of me today so I dug the sports seats I used to have in my first 911 I sold in 1997 (an '82 SC Targa) down from the loft to see if I remembered them correctly as the exact fit for this year. Sure enough, they are the exact 7" bolster model that would have been an option on this car and GAHH has exactly the correct burgundy leather kit to fit them. I had them recovered locally in that color of tan leather to match my '82 and I was never really happy with the job they did, especially substituting French seams for the beaded seams that were originally on the car. The GAHH kits are perfect matches to the factory style since they purchased the right to use the original factory patterns and have the correct perforated leather in the center sections. The sport seats are powered, this passenger side seat is in the photo so the switches are on the other side. I remember these seats being super snug and holding me in place during hard cornering in addition to reminding me to mind my weight because there is no room for "love handles" in them! I'll be putting my order in at GAAH through my buddy Steve's shop after the holidays and see if my wholesale price privileges still apply down there.
![[IMAGE]](http://www.darrylsgarage.com/carrera/89sport1.jpg)
UPDATE: 12/24/13 - I swung by John Walker's Workshop this morning to drop off one of my annual coffee mugs and pick up my speedometer he had Buz at Seattle Speedometer rebuild for me. It's electronic so there's no cable and it's very easy to install. I still need to get it out for a test drive, but I can't imagine any issues given the reputation they have with John Walker. I also finally got the replacement dashboard parts for DC Auto (dcauto.com) which included the replacement center dash vent, the old one is missing the the right side adjuster. Figuring out how to remove the old one is proving to be a bit of a challenge since brute force is the last option. It might be more of a 4-hand problem since there are a couple tabs that need to be held down while pulling it out.
![[IMAGE]](http://www.darrylsgarage.com/carrera/89speedo.jpg)
UPDATE: 12/26/13 - Today's project was removing the wheels and tires currently on the car in preparation for taking them and the new reproduction Fuchs wheels to the tire shop. I put an old set of wheels on the car while it sits in the shop. Next it was time to start putting some of the goodies I ordered from DC Auto (dcauto.com) on the car. The center dash A/C vent was missing the right side to side adjuster control so it had to be removed. I tried as much as I could, to remove it as designed but finally gave into the desire to just break it into pieces to remove it... funny how that ALWAYS works! The $40 used one I purchased from DC Auto needed quite a bit of detailing to get the dirt and grime out of it but with patience, it turned out nice and slipped right into place without any real problem.
![[IMAGE]](http://www.darrylsgarage.com/carrera/89vent1.jpg)
The protective flap on the fuel filler door was missing, as well as the screws, probably the fault of a careless reassembly after painting. DC Auto had new Porsche OEM ones so I installed it using new stainless steel screws. A new cap on the windshield washer fluid tank filler and some detailing on the back side of the door really cleaned that area up quite a bit too. I'll get the dirt out of the bottom of the filler well when I wash the car so I can just hose it out.
![[IMAGE]](http://www.darrylsgarage.com/carrera/89fuel1.jpg)
UPDATE: 12/27/13 - So, you can't just put brand new Fuchs (actually Euromeister's Chinese-made reproductions) on dirty old brakes. So the day started with a pickup load of wheels and tires to Les Schwab, Friday after Christmas, a slow day in the tire market this year. The majority of the day was spent using solvent and rattle can spray paint. A crafty set of cardboard painting masks and magnets made using aluminum foil for masking a breeze. Tonight the Carrera sits on new wheels, tires and lug nuts and a rather large improvement in overall looks if I say so myself.
![[IMAGE]](http://www.darrylsgarage.com/carrera/89brks1.jpg)
![[IMAGE]](http://www.darrylsgarage.com/carrera/89brks2.jpg)
![[IMAGE]](http://www.darrylsgarage.com/carrera/89brks3.jpg)
UPDATE: 12/28/13 - After taking a nice long test drive with the new wheels and repaired speedometer installed it was time to wash the car and detail the door jabs and engine compartment using my favorite biodegradable purple cleaner and various scrub brushes but cold water at this point. All the original factory stickers and decals are still in great condition and the majority of the grease and road grime is gone so it looks very presentable as is other than a little touch-up paint on nicks and such once the bottle of Grand Prix White I have on backorder arrives from Sierra Madre Collection.
![[IMAGE]](http://www.darrylsgarage.com/carrera/89eng1.jpg)
![[IMAGE]](http://www.darrylsgarage.com/carrera/89lbpilr.jpg)
![[IMAGE]](http://www.darrylsgarage.com/carrera/89lapilr.jpg)
![[IMAGE]](http://www.darrylsgarage.com/carrera/89rapilr.jpg)
UPDATE: 1/3/14 - Just searching on eBay using the terms "Porsche burgundy" has scored me two parts for the car that will really freshen up the interior. The current steering wheel's leather has worn through the dye, is sun damaged and has missing stitching and I'm thinking that it might be better to replace it with a less worn one. I puchased one on eBay which only has to be restitched in several sections but the leather is in much better condition so no new dye will be necessary. I also found a driver's side door trim that isn't cracked between the door lock post and the lip and that will fix two very visible defects very easily.
![[IMAGE]](http://www.darrylsgarage.com/carrera/89buy1.jpg)
![[IMAGE]](http://www.darrylsgarage.com/carrera/89buy2.jpg)
The windshield seal on the '89 transitioned to the newer, all-rubber 964 type about mid year. A service bulletin announced the change and I happened to find a copy of it on the internet. So I ordered a new Porsche OEM windshield seal (964 style) from Stoddards and it arrived today. My buddy Peter, who owns a used car lot and shop near my house can get me the correct, internal radio antenna windshield at wholesale cost, installed at my shop so that will fix 25 years of pits and chip repairs.
![[IMAGE]](http://www.darrylsgarage.com/carrera/89tb8902.jpg)
UPDATE: 1/8/14 - Ok, once again the slippery slope is being unsuccessfully negotiated and a small crack between the instrument pod and defroster vent grill in the dash pad has now become a major issue since I'm replacing the windshield and its weatherstrip. Looking closely at the crack photo below you can also see the degree of sand pitting in the original windshield, very annoying when driving at night. I can't leave well enough alone, while it's out, I've got to make the dash perfect if possible.
![[IMAGE]](http://www.darrylsgarage.com/carrera/89dash3.jpg)
The beauty of a burgundy interior is that it's totally possible since most people usually want to convert their interiors to black so good burgundy replacements are bountiful. I found this beauty on Pelican Part' BBSs "for sale" section for a reasonable price and now it's on the way here. The steering wheel I found on eBay arrived today as well and it's in much better shape than I expected so now it's looking like the interior is going to get a complete re-do by the time I get done with new leather upholstery on the sport seats. I know, I know, why go "half-assed" when "whole-assed" is such an easy pattern to fall into... OCD is a hard thing to live with!
![[IMAGE]](http://www.darrylsgarage.com/carrera/89dash2.jpg)
UPDATE: 1/10/14 - So my Grand Prix White touch-up paints have finally arrived and it's time to address the the overspray issues in the door and engine lid jabs caused by a complete lack of proper masking during a low-budget respray. The body panels of the car have a very nice refinish quality but the masking done around weatherstripping and body molding looks like the person who did it was high or lost their glasses! Luckily this is a convertible so the only window weatherstrip is the windshield and it's going to get replaced when I install the new one. The body seals and molding are easy to remove and replace, clean or touch-up with black paint to cover the white. The overspray on the front hood's weatherstrip lip is minimal, the door jabs aren't bad but the rim around engine compartment that's only visible when it's open is terrible. That's where this experiment begins, I sourced OEM Porsche touch-up paint through Sierra Madre Collection that's thick and formulated for filling chips. I also sourced a thinner, brushable touch-up paint for open surfaces from Express Paint and I hoped for a perfect match given the current top coat isn't original factory paint but a bodyshop's best match.
![[IMAGE]](http://www.darrylsgarage.com/carrera/89jabs2.jpg)
![[IMAGE]](http://www.darrylsgarage.com/carrera/89jabs3.jpg)
I cleaned a 6" section of the engine compartment lip with carburetor cleaner, scuffed it with a fine Scotchbrite pad and masked off the areas where I didn't want to let the brushed-on paint to spread to. A wide, fine bristle brush worked great for spreading a thin first coat of the Grand Prix White paint over the oversprayed channel. I let it dry overnight and it looks to be a perfect match and no brush marks are visible, but it will take another coat to completely cover the dark primer overspray that is "ghosting" through the light color. The Express Paint is also a 2-stage so the color dries to a matte finish, once all the brushed-on painting is complete, I'll need to mask it off and use an aerosol clear top coat. I am quite delighted to see that it looks like I'll be able to hide the poor masking job and create the illusion that a top-dollar paint job was done on the car. This is the kind of stuff I really enjoy doing because it's more about the attention to detail that only I will enjoy knowing made the car look nice and original again.
![[IMAGE]](http://www.darrylsgarage.com/carrera/89jabs1.jpg)
UPDATE: 2/13/14 - Steve Shepp called to let me know my GAHH order had arrived down at his shop. The tonneau cover ended up being ordered in a color to closely match the seat leather color instead of the color of the replacement convertible top currently on the car because that color has been discontinued. Not a big problem since the folded-down convertible top is completely covered when the tonneau cover is on and I can replace it with a matching one, next time I replace it. The tonneau snaps and Tenex fasteners are not installed since every car is slightly different, so I'm going to rely on Steve to help me with that.
![[IMAGE]](http://www.darrylsgarage.com/carrera/89tonneau1.jpg)
The GAHH burgundy colored leather sport seat upholstery kit also arrived and looks absolutely beautiful. The center sections have the perfect perforation pattern to match factory stock and will be installed over my old 911SC's tan sport seats when Steve has a break in his schedule. Unfortunately, Steve is going in for a biopsy on his prostate tomorrow so my seats and tonneau cover are the least of his worries and I'm more concerned for his condition than any car project. Steve's had several bouts with cancer in the 8 years I've known him and each time he bounces back because he's a tough SOB but I still worry that he puts himself under so much pressure promising so many people his best work and is exposed to so many cancer-causing chemicals, that it's going to catch up with him.
![[IMAGE]](http://www.darrylsgarage.com/carrera/89newseat1.jpg)
![[IMAGE]](http://www.darrylsgarage.com/carrera/89newseat2.jpg)
UPDATE: 3/27/14 - My old buddy Steve Shepp is currently undergoing treatment for prostate cancer and appears to be struggling to keep up the pace with more vintage Porsches showing up there every time I stop by. Although he promised he would, I can't, with a good concious ask him when he thinks he could install the new seat covers for me so I followed up on a question about 356 seats on my guestbook with a guy named Tim Paull who owns and operates MDM Upholstery in Marysville. I called Tim and he was happy to do the work on my seats and as it ends up, he worked at the same shop as Steve in downtown Seattle back in the '90s. He also had done work for an old friend, long passed, Stan Baker and I had seen his work before. So I dropped the seats off on the 19th and they're done on the 27th. I'm pretty happy with the before and after. I'll put the tan leather covers on eBay and maybe get a few bucks for them. I'm really thrilled with how nicely the GAHH kit fit the larger side bolsters of the sport seats and they are spot on for the factory originals.
![[IMAGE]](http://www.darrylsgarage.com/carrera/89sport3.jpg)
![[IMAGE]](http://www.darrylsgarage.com/carrera/89sport2.jpg)
Late in the evening, I got a wild hair and dove into removing the old seats and cleaning out the rats nest of gum wrappers and spare change lost under them. Only one of the heads of the 8 allen head bolts holding them stripped and needed to be drilled out and luckily it was in an easy to get to spot on the front of the outboard passenger side rail. I was able to snake a long drill bit through a piece of copper tubing past the cushion so no damage was incurred. Once the old ones were out, I removed the burgundy colored hinge covers and gave them a "spa treatment" in Wurth Rubber Care overnight. I also removed the inboard seatbelt buckles and cleaned them up. I'll touch up the black paint on the mountinging points before I begin the process of installing the new seats. I'll also follow John Walker's advice and install a new, OEM Porsche DME relay since the old one was dated 2007 and a new one would insure years of trouble-free use while keeping the old, known working one in the glovebox as a spare.
![[IMAGE]](http://www.darrylsgarage.com/carrera/89sport4.jpg)
![[IMAGE]](http://www.darrylsgarage.com/carrera/89sport5.jpg)
UPDATE: 3/29/14 - Another night of burning the midnight oil, I finished installing the new sport seats at 1 AM after swapping the plastic hinge covers and installing the seat belt buckles. I also installed the new OEM Porsche DME relay, once I remembered where I had stashed it, the old one is now in the glovebox and a tested backup. The electric seats work fine and I need to test the seatbelt buckle switch to make sure it still works because there is a reminder buzzer. I can't tell you how happy I am that I could repurpose those expensive 9" bolster sport seats in this car for about the same cost as recovering the old standard ones. The tired steering wheel and a few places I missed cleaning out the car are visible in the photo, my buddy Steve Shepp has the new steering wheel I bought on eBay to restitch it and I hope I can get it back from him and do the restitching and redye myself.
![[IMAGE]](http://www.darrylsgarage.com/carrera/89sport6.jpg)
UPDATE: 6/29/14 - My buddy Steve Shepp is doing much better after finishing the chemo phase of his prostate cancer treatment but he is still working fulltime through the radiation phase, he is one tough old fart. I finally convinced him that I could do the restitching on the newer leather steering wheel I found on eBay to replace the one that was all torn up by the jewelery of the seller when she drove it, if he could give me the proper needles, thread and a lesson. It's a pretty easy process to replicate the cross stitch but it just takes lots of time and patience. Steve got me started and now it's sitting in my livingroom as a project for those quiet evenings around the ranch.
![[IMAGE]](http://www.darrylsgarage.com/carrera/89steer1.jpg)
![[IMAGE]](http://www.darrylsgarage.com/carrera/89steer2.jpg)
After I brought the steering wheel back to the shop, I got inspired to finally summons the courage to punch 3/8" holes in the new burgundy GAHH tonneau cover and put it on the car since I had just taken my new girlfriend over Stevens Pass with the top down a few days back and left the top down since then. The fully electric top mechanism works perfectly but me being me, has anxiety about it not working every time I raise or lower it, nothing indicates a problem, I'm just paranoid. The top kit came with 18 Tenax fasteners, a whole bunch of snaps and some mysterious straps and such. I pulled the owners manual out of the glovebox and found the page referring to how to put on the tonneau cover and saw there's some elaborate straps for stowing the drivers side for open car driving. I've elected to leave those snaps off for now and just installed the 2 snaps and 17 Tenax fasteners to keep the tonneau cover on the car. I'll figure out the other stuff later. I had purchased a "German" Tenax fastener installation tool from eagleday.com and a snap installation tool from the local West Marine boat store. I had a complete set of hole punches so I simply used the 3/8" hole punch with my biggest dead-blow hammer. A 4' long section of 4" x 6" beam standing on end provided a portable surface to punch the holes on and I used a plastic food container lid as the soft backing to the canvas to get cleaner holes. As you can see from the following series of photos, everything went perfectly. I started with finding the exact center of the rear area, installed the two snaps and then the Tenax fastener at the center of the dashboard. The rest of the Tenax fasteners were installed alternating sides, one-at-a-time from the back towards the front. The studs on the front of the doors require pulling the cover very tightly but I would bet that over time the thing with stretch, especially in the sun, and the drum-like tightness will relax a bit. The car is a kick to drive with the cover on, feels like a Sopwith Camel, distinctly British.
![[IMAGE]](http://www.darrylsgarage.com/carrera/89tonneau2.jpg)
![[IMAGE]](http://www.darrylsgarage.com/carrera/89tonneau3.jpg)
![[IMAGE]](http://www.darrylsgarage.com/carrera/89tonneau4.jpg)
![[IMAGE]](http://www.darrylsgarage.com/carrera/89tonneau5.jpg)
![[IMAGE]](http://www.darrylsgarage.com/carrera/89tonneau6.jpg)
![[IMAGE]](http://www.darrylsgarage.com/carrera/89tonneau7.jpg)
UPDATE: 1/12/15 - Over the last week, I finally finished restitching the entire steering wheel that I started back in June. Let me just say two things, it's a good winter project and a lot more work than I initially anticipated. As soon as I was done with restitching, I wanted to get the burgundy SEM "flexible coating" on the leather so it could sit and cure for a week before mounting it on the car. Not really much to say except that the spray dye has some really strong fumes and in a heated, closed shop, lung protection is not an option. The burgundy is a bit bright but I think it will darken with age since the rest of the interior now over 25 years old and has an aged patina. In the car the wheel looks and feels very nice and I really enjoy driving the car and not looking at that old, beat-up wheel.
![[IMAGE]](http://www.darrylsgarage.com/carrera/89steer3.jpg)
![[IMAGE]](http://www.darrylsgarage.com/carrera/89steer4.jpg)
![[IMAGE]](http://www.darrylsgarage.com/carrera/89steer5.jpg)
UPDATE: 8/10/17 - The windshield on the Carrera was so pitted that driving directly into the sun was unsafe, the pits so bad I was blinded as I was driving up a hill in Kenmore and had to stop and turn around. Oncoming headlight hi-beams created a similar blinding situation so I began my hunt for a local company that could handle the job. I saw a company in Redmond called Euroglass was recommended by members of the local PCA's Facebook group page so I stopped in and talked with Bruce and got a quote for my late production '89 which actually uses a 964 windshield and seal. The windshield also has the radio antenna integrated into the glass so it's not simple or cheap. Luckily Bruce had access to an excellent quality aftermarket windshield that saved me about $400 over the Porsche OEM version, so with installation it came in right at $750 without the new windshield seal. I had already purchased the new windshield seal from Stoddard for $220 (with shipping) and it was Porsche OEM which was good because that's all that Euroglass would use. The windshield seal is one use only because of the urethane sealant that is used to further "glue" the windshield in place makes it impossible to reuse. Jeff was the technician who did the actual install and he discovered a little rust in the early stages, bubbling on the left, lower side. Upon cleaning up with a wire brush, I truly got lucky that I caught it when I did, the rust was surface only and not rotten all the way through so after being called back in to inspect it, I gave them the go-ahead to simply seal the spot with a professional product similar to POR-15 and proceed. If the car sat out in the weather, I'd probably want to do a more extensive repair but it lives a charmed life, living in a climate controlled garage and rarely gets dirty enough to wash the whole car. As you can also see from the rust pocket photo, because it was repainted with the windshield in, there was a very pronounced masking line between the old and new paint, where it was masked at the old rubber seal. Jeff carefully shaved this with a razor blade and smoothed the masking line so the new seal covered it perfectly without any rough spots or rust repair telegraphing through the thin edge of the rubber seal. The original interior rear view mirror had fitment issues, it was not fully seated on the old windshield so when Jeff attempted to install it on this new windshield, the bayonet lug on the pot metal mounting base broke, calling for yet another order to Pelican Parts for a brand-new OEM one costing $145 with free shipping.
![[IMAGE]](http://www.darrylsgarage.com/carrera/89euroglass1.jpg)
![[IMAGE]](http://www.darrylsgarage.com/carrera/89euroglass2.jpg)
![[IMAGE]](http://www.darrylsgarage.com/carrera/89euroglass3.jpg)
![[IMAGE]](http://www.darrylsgarage.com/carrera/89euroglass4.jpg)
![[IMAGE]](http://www.darrylsgarage.com/carrera/89euroglass5.jpg)
UPDATE: 8/17/17 - My new rear view mirror arrived from Pelican Parts via UPS this afternoon so I quickly unpacked it, put on a little smear of Wurth silicone assembly lube and attempted to slide the new bayonet lug into the new female mounting base stuck to the windshield glass. It was tight, even after a couple light taps with a rubber mallet and wooden dowel. My new, less optimistic about things going perfect self remembered that Jeff at Euroglass said to bring in the mirror when it came and he would be happy to install it, so I did. Boy am I glad I did, because when Jeff laid his hands on it, he instantly recognized the mount was too tight, broke out a small heat torch and melted the adhesive on the first mount, removing it from the windshield. He then hunted through his box of ones he had taken off old windshields and found one that slid on with the smoothness of Glock. About 5 minutes later the second "used" mount is stuck to the windshield and the new rear view mirror is completely seated just like it should be. Jeff then put a little dry Teflon lubriant on the tight adjusting ball so it wouldn't torque on the base when adjusting the mirror. Suffice to say, I probably would have broken either the new mirror mount's bayonet lug or the bent the base by attempting the "ham-handed" approach, proof I'm getting smarter at this stuff and trusting a professional that does it every day. So now for a grand total of $1,116 I now have a cosmetically perfect and completely safe windshield, with a new crisp (not fogging at the edges) brand new rear view mirror, now if I can just avoid any rock launching double dump trucks and keep it flawless for a while, it really makes the car a joy to drive in the evening again!
![[IMAGE]](http://www.darrylsgarage.com/carrera/89euroglass6.jpg)
![[IMAGE]](http://www.darrylsgarage.com/carrera/89euroglass7.jpg)
![[IMAGE]](http://www.darrylsgarage.com/carrera/89euroglass8.jpg)
UPDATE: 3/1/21 - I've put off adding some photos of upgrades I made to the car in the fall of 2019 but with the pandemic dragging on, I decided I had better add them before I forgot all about them once we get back to normal. I had been noticing the car smoked a bit on cold starts after sitting so like my '74 911, I added a Rothsport Racing check valve to my oil return hose to solve the problem completely. The old oil return tube looked like it was startng to look tired so I purchased a new one as well as a set of 4 of the proper NORMA hose clamps so everything was stock and looked new. I have also been noticing the car smokes a bit at idle on hot days and this spells clogging troubles for catalytic converters so I also installed a new stainless steel cat bypass tube before the running into any issues. I actually realized I've been running too thin of oil with Swepco 20W-50 when the spec is 10W-60 and 3.2 liter engine valves guides are known for this problem so higher viscosity oil might actually cure it next oil change. The cloudy headlights finally got to me so I sprung for a new set of reflector/lense units and the difference is amazing, the photos show side-by-side comparisons and it really makes the car pop from the front now. Lastly I finally gave into the urge to put a Carrera stripe on the side of my car once I found a source for making a custom one in burgundy to coordinate with the tonneau cover and interior. A set cost only $38 and it was really easy to install them after researching the proper placement on the Pelican Parts BBS. It seems the fad with the younger Porsche crowd is doing whatever you want to your car and not worrying too much about originality. My recent addiction to Classic Porsche magazine out of the UK liberated me from caring what the purists think, it's my car and there's nothing that can't be changed back if some future owner feels the need.
![[IMAGE]](http://www.darrylsgarage.com/carrera/89upgrade1.jpg)
![[IMAGE]](http://www.darrylsgarage.com/carrera/89upgrade2.jpg)
![[IMAGE]](http://www.darrylsgarage.com/carrera/89upgrade3.jpg)
![[IMAGE]](http://www.darrylsgarage.com/carrera/89upgrade4.jpg)
![[IMAGE]](http://www.darrylsgarage.com/carrera/89upgrade5.jpg)
![[IMAGE]](http://www.darrylsgarage.com/carrera/89upgrade6.jpg)
![[IMAGE]](http://www.darrylsgarage.com/carrera/89upgrade7.jpg)
UPDATE: 3/23/23 - So I finally bit the bullet at 170K miles on the clock and turned the Carrera over to my old buddy John Walker to have him dig in and resolve the oil burning problem. I knew that the valve guides used on my 3.2 were a different material than those on the older 3.0 engine, one of those improvements that didn't stand the test of time. The lower head studs were also made of a material called Dilavar that was also found to grow brittle over time and crack so replacing them with steel Canyon brand head studs was also on the list. The last factory improvement to be backdated was the problematic rubber hub clutch disc to designed absorb the G50 transaxle's gear noise and vibration but prone to cracking and spitting chunks of rubber into the clutch mechanism. The answer to the "when not if" it fails question, leaving the car stranded required reverting to a traditional steel spring hub used on the turbo, taking the opportunity to install one while the engine was out. I dropped the car off at John Walker's new retirement shop relocated to his country acreage in north end of Marysville, Washington after closing his old shop in the Greenwood area of Seattle for decades. John tore the engine down and found what was predicted, the valve guides were very worn and lots of deposits built up in the exhaust ports of the heads. All but one of the exhaust valves was still within spec and reusable but all of the intake valves needed to be replaced. The 3.2 cylinder barrels are aluminum lined with a material called Lokasil and there was no scoring or ridges found so simply cleaning the pistons and installing new Goetze brand rings was performed while the cylinders were out of the case to install the new head studs. The cams and timing chains looked like new, so little wear and no stretching for so many miles restored my faith in Porsche engineering. John found the oil pressure was excellent and there were no leaks that new seals couldn't cure so no need to split the case. John says he has customers with over 400K on their bottom ends so this top-end rebuild should give me many miles of trouble-free driving.
![[IMAGE]](http://www.darrylsgarage.com/carrera/89topend1.jpg)
![[IMAGE]](http://www.darrylsgarage.com/carrera/89topend2.jpg)
![[IMAGE]](http://www.darrylsgarage.com/carrera/89topend3.jpg)
![[IMAGE]](http://www.darrylsgarage.com/carrera/89topend4.jpg)
![[IMAGE]](http://www.darrylsgarage.com/carrera/89topend10.jpg)
![[IMAGE]](http://www.darrylsgarage.com/carrera/89topend5.jpg)
![[IMAGE]](http://www.darrylsgarage.com/carrera/89topend6.jpg)
![[IMAGE]](http://www.darrylsgarage.com/carrera/89topend7.jpg)
![[IMAGE]](http://www.darrylsgarage.com/carrera/89topend8.jpg)
Once the engine was back together John's big black Saint Bernard shop dog approved. All the aluminum parts were blasted with glass beads and clearcoated with high temperature engine enamel to seal the surfaces. While he had the fan housing apart for blasting we decided to install a new Valeo brand alternator and new gold cad pulley hub. New fuel lines, timing chain tensioner oil lines, oil tank vent tubes and spark plug wires were installed to replace the old brittle ones. Two of the CV-joint boots were torn so John installed new boots along with cleaning, inspecting and repacking the CV-joints with moly grease. The G50 transaxle got a bath in the engine washer and fresh gear oil before installing the new turbo-style clutch disc and mating it back onto the engine. Driving it home was delightful and the gear noise and vibration I was concerned about with the new solid clutch disc was really much less then I read about online. I also elected to remove the non-functioning air conditioning compressor and will also remove the condenser off the engine lid myself soon. The total cost was a little over $11K with taxes, 50 hours of labor at the amazing bargain of $140 hour, nearly a $100 per hour less than shops on the Seattle Eastside. The price for parts was consistent with what Pelican Parts charges and sales tax in Marysville is 2% lower so that saved a bit. John is now 75 years old and reminds me that time flies so jump on the opportunity to have one of the best 911 mechanics in Western Washington give my car the attention it needs if I ever plan on selling it for anything near what a "well sorted" 911 is worth.
![[IMAGE]](http://www.darrylsgarage.com/carrera/89topend11.jpg)
![[IMAGE]](http://www.darrylsgarage.com/carrera/89topend9.jpg)
![[IMAGE]](http://www.darrylsgarage.com/carrera/89topend15.jpg)
![[IMAGE]](http://www.darrylsgarage.com/carrera/89topend12.jpg)
![[IMAGE]](http://www.darrylsgarage.com/carrera/89topend13.jpg)
![[IMAGE]](http://www.darrylsgarage.com/carrera/89topend14.jpg)
![[IMAGE]](http://www.darrylsgarage.com/carrera/89shifter1.jpg)
![[IMAGE]](http://www.darrylsgarage.com/carrera/89shifter2.jpg)
![[IMAGE]](http://www.darrylsgarage.com/carrera/89shifter3.jpg)
![[IMAGE]](http://www.darrylsgarage.com/carrera/89shifter4.jpg)
![[IMAGE]](http://www.darrylsgarage.com/carrera/89shifter5.jpg)
![[IMAGE]](http://www.darrylsgarage.com/carrera/89shifter6.jpg)